
Rheem HVAC
Condenser Start Capacitor Replacement Guide
How to replace a faulty start capacitor in
the outdoor condenser unit of a Rheem home air conditioning system.

By Paul B. Michaels Author & Photographer Auto Mechanic Since 1989 |
||
|
|
||
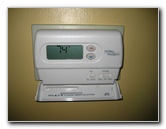 Turn Off A/C Thermostat |
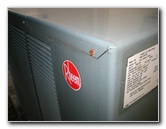
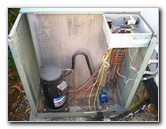
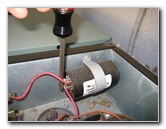
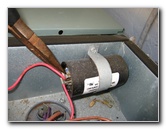
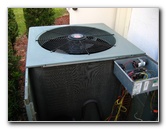
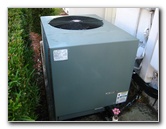
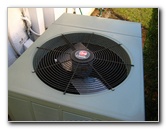 Rheem Classic Condenser Unit |
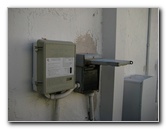 Condenser Power Box |
| This home
maintenance "how-to" guide was specifically written to assist owners
of the Rheem Classic HVAC condenser unit (model # RAMC-060JAZ) in
replacing a faulty start capacitor. Owners of other A/C systems with similar outside condenser units such as Trane, GE (General Electric), LG, Lennox, Amana, American Standard, Arco, Carrier, Goodman, Bryant, Luxaire, York, Kenmore, Frigidaire, Goldstar, Maytag, and Whirlpool may also find this guide to be useful. The symptoms of a home air conditioning system that may need a new start capacitor include the inside air handler only blowing room temperature air, the outdoor condenser fan motor won't turn on, or both the outdoor condenser fan motor and compressor won't start. You may hear an electrical humming sound coming from the condenser unit's fan motor and/or the compressor. It's also common for the top of the condenser near the fan to feel hot. |
||
|
|
||
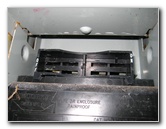
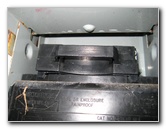
 Remove Fuse Shutoff Block |
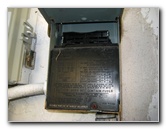 Fuse Block Removed |
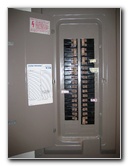 Turn Off A/C Breakers |
| If you're desperate
to get your A/C working again, you could try jump starting the fan motor by
carefully spinning it with a small stick until it starts up. But be sure to
replace the capacitor as soon as possible!
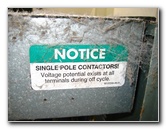
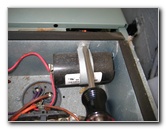
If your condenser unit has a "dual run/start" capacitor (for both the fan and compressor with three wire terminals), the HVAC system still won't cool the home even with the fan running since the compressor won't be able to start. The first few steps for replacing the capacitor are to turn off the A/C system at the thermostat inside the house, turn off the A/C breakers in the home's main breaker box, and pull out the fuse block or "handle" outside by the condenser. Your condenser unit may be equipped with a common breaker switch in the outside power supply box rather than the circuit block/handle as pictured above. |
||
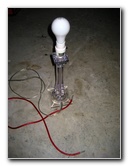 Capacitor Discharge Device |
 Rheem Condenser Cover |
 Access Cover Removed |
| Before I removed
the electrical access panel to our Rheem Classic condenser, I prepared a
device to safely discharge the capacitor.
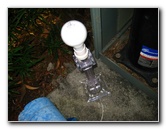
There are several common methods for discharging the dangerous voltage stored in a capacitor. They include using a screwdriver to short the terminals (possibly dangerous), using a resistor attached to wire leads (safest), and using a motor/bulb or other electrical device attached to wires. I chose to use a common desk lamp with a 60 watt light bulb attached to two old car stereo wires as my capacitor discharging device. A multimeter can also be very useful for double checking that the capacitor is really discharged before removing it. Refer to the owner's manual for your multi meter for the correct settings. Some newer condenser units are equipped with a "bleed resistor" that will automatically discharge the capacitor after the power supply is removed. Even in this case, you should still use something to discharge the capacitor just in case. |
||
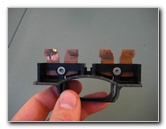
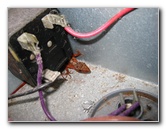
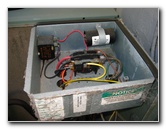 Relay & Start Capacitor |
 330 VAC Start Capacitor |
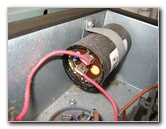 Two Connection Terminals |
| The electrical
access panel of the Rheem Classic HVAC condenser is held in place by two
flat head screws located at the top corners.
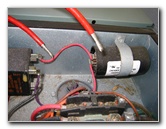
The access cover is on the side of the condenser that has no air vent openings like the other three sides. (If your condenser unit is a smaller round unit as commonly used for apartments, condos, townhomes, or small houses, you may be better served by referring to my GE Mars HVAC Condenser Unit Dual Run/Start Capacitor Replacement Guide.) Once the access panel is moved out of the way, you'll see a small metal shelf filled with wires and electrical components. The round (or possibly oval) device that looks like a large battery, is the capacitor. A "start" capacitor has two wire terminals while a "dual run/start" capacitor will have three power terminals. You can usually easily tell the difference between a "start" capacitor, a "run" capacitor and a dual "start/run" capacitor by examining it. A "start" capacitor will have two electrical terminals that are recessed from the top and usually a black plastic case. A "run" capacitor will have two terminals that extend out from the top and a silver metal case. A "dual run" or "dual run/start" capacitor will have three electrical terminals labeled "HERM", "FAN" and "COM" with a silver metal case. |
||
 Voltage Warning Sticker |
 Discharge Capacitor |
 Desk Lamp |
| I suspect that our
Rheem Classic condenser had a "bleed resistor" in place, so the capacitor
was already discharged once I cut the power to the unit.
But to be completely sure, I turned the desk lamp on and touched the two car stereo wire leads to the two terminals on the capacitor in both polarity combinations. |
||
 Check Cap. With Multimeter |
 Double Check - Screwdriver |
 Red Lizard Hiding |
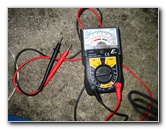
| Then I checked the capacitor with my cheap analog multi-meter ($6 at Wal-Mart) and finally I touched a screwdriver to the two terminals just to be 110% sure that it was discharged. | ||
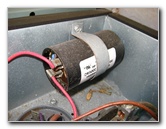
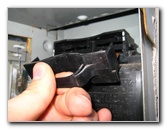
 Loosen Strap Screw |
 Pull Off Terminal Wires |
 Replace Capacitor |
| To remove the old
capacitor, pull off the two wires from the terminals with rubber handled
needle nose pliers and loosen the single flathead screw on the metal strap.
Slide the old capacitor out of the metal strap without touching the terminals or other electrical components in the box. Hopefully you have an HVAC parts supply store or home appliance parts warehouse in your area where you can purchase a replacement capacitor with the same microfarads and voltage rating as the old one. Alternatively, you could buy a replacement online or possibly from a local A/C repair company at a premium price. A new A/C condenser capacitor, depending on the type, could range in price from about $10 to around $40 with the most common price being between $25 and $30. Be sure to bring the old faulty capacitor with you to the parts store for them to verify that they sell you the correct replacement. If the old capacitor is bulging, deformed or leaking an oily substance, transport it in a box or plastic bag. Avoid touching the greasy substance if your capacitor developed a leak since older capacitors contain cancer causing chemicals known as PCBs. Newer capacitors no longer contain PCBs but this also means that they have a limited shelf life. |
||
 Replace Access Cover |
 Condenser Circuit Breaker |
 Line Up Fuse Block |
| Slide in the new
capacitor into the metal strap, push on the two wire terminals with the
needle nose pliers, replace the fuse block/handle in the outside power
supply box, turn on the A/C breakers inside the house, and turn on the A/C
system at the thermostat.
I had also turned off the breaker switch on the air handler, so I turned that on as well. (This would be a good time to remove the dust, dirt and debris on the condenser coils since you already have the access panel removed. For more, check out my Rheem Classic HVAC Condenser Coils Cleaning Guide.) |
||
 Replace Fuse "Handle" |
 Turn On Circuit Breakers |
 Turn On Air Handler |
| You should hear the
condenser fan motor turn on, the compressor start working, and the air
handler will begin blowing cool air out of the A/C registers in your home
shortly afterwards.
If it works, replace the condenser's electrical access panel. If the system doesn't turn on or only the inside air handler starts working, double check that every breaker switch and/or fuse block has been turned on and/or replaced. It may also take a few minutes for your A/C system to start working. Be patient and
don't quickly cycle the thermostat on and off as this may cause damage to
the compressor. |
||
| For more of my
related how-to guides, click on the following links:
Rheem
Classic HVAC Condenser Coils Cleaning Guide,
Freezer Icemaker Replacement Guide,
Bathtub/Shower Water Diverter Valve,
HVAC Air Handler Coils Cleaning Guide,
Home Water Heater Sediment Flushing Guide,
Culligan US-600A Under Sink Water Filter Installation Guide,
Laptop to HDTV Via CAT6 HDMI Extender,
Home Clothing Dryer Exhaust Vent Lint Cleaning Guide,
Kitchen Sink Drain Water Leak Repair Guide,
Culligan Icemaker Water Filter Installation Guide,
Culligan IC-EZ-1 Drinking Water Filter Installation Guide,
Honda EU3000is Generator Maintenanc Guide,
How To Fix A Sticky Door Lock,
Hunter Just Right Digital Thermostat Installation,
GE A/C Condenser Run/Start Capacitor Replacement Guide,
Refrigerator Water Leak & Clogged Defrost Drain Repair Guide,
Toilet Water Supply Valve Leak Repair Guide,
Kenmore Oven/Range 220V Power Supply Restoration Guide,
Carpenter Bee Insect Pest Control Guide, and
TiVo Hard Drive Upgrade Guide. |
||
| If you found this guide to be helpful,
please consider making a small donation by clicking on the PayPal.com
"Donate" button located to the right of this paragraph. Thank you!
(Note: I am not a registered charity. Donations are not tax deductible.) |