
A/C Start
Capacitor Replacement Guide
A step by step pictures illustrated
instruction guide for replacing the dual motor start capacitor in an air
conditioner.

|
|
||||
 General Electric (GE) |
 Mars A/C Fuse Box |
 Pull Fuses For Safety |
||
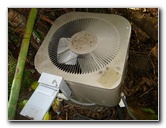
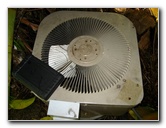
| This guide is meant to assist residential home owners in troubleshooting
any HVAC capacitor problems with their split unit air conditioning system. One hot South Florida afternoon I noticed that our A/C was blowing warm air out of the vents (a.k.a. "registers"). So I began the process of figuring out what was wrong by going outside to check on the condenser unit. The condenser outdoor unit consists of a fan, coils, cooling fins, a hermetically sealed compressor, electrical contactor and a dual start capacitor. Neither the fan nor the compressor were
running. But I could hear a distinct electric humming noise. I put my
hand on top of the unit's housing where the fan motor is mounted and it
felt uncomfortably hot. The compressor was also turned off in thermal
overload mode. |
||||
|
|
||||
|
After doing some online research I suspected that the symptoms of the problem with my air conditioner pointed to a faulty "dual motor run/start capacitor". To be sure, I used a stick to give the fan blades a jump start in the correct direction. Sure enough the fan blades easily began to spin and the motor quickly revved up to normal speed but I still couldn't hear the compressor making any noise. I checked inside and the A/C was still blowing warm air but slightly less hot than before. If the fan blades on your motor won't spin at all or take a lot of force to move them, your fan motor has seized and probably needs to be replaced. |
||||
 Power Off |
 Condenser Unit Fuses |
 |
||
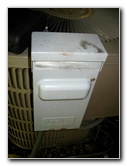
| Once I was
convinced that my MARS GE (General Electric) air conditioning system needed
a new combination or "combo" capacitor to help the condenser fan and
compressor get the kick start of alternating current electricity that they
needed to operate, I pulled the fuses.
Don't let your AC unit just sit there humming and building up heat if your unit has the same problem, at least turn it off at the thermostat and then turn off the power at both the breaker box and condenser fuse box if you're going to open the case. |
||||
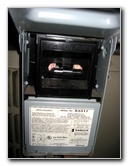
 A/C Fan & Compressor |
 |
 Electronics Access Panel |
||
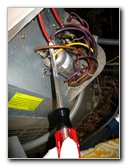
|
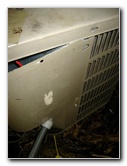
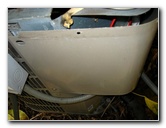
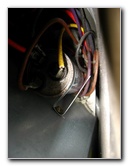
To access the electrical panel I had to remove the top cover where the fan is attached using an 8mm socket (or flat head screwdriver), lift it slightly off to the side and then take out two more screws on the bottom of the condenser unit housing. With that side panel off I could easily see the electrical contactor and the old capacitor. It's a sure sign that your capacitor needs to be replaced when it looks disfigured, bent, bulging, popped, or is leaking an oil like or greasy substance. |
||||
 8MM Flat Head Bolts |
 |
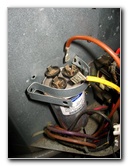
 Single Pole Contactor |
||
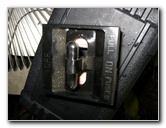
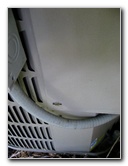
| I checked the
single pole contactor for any insects, bugs or ants stuck in between the
silver contacts but it seemed to be clean and working correctly.
Anything stuck in the contactor can cause the outdoor A/C unit to stay on even when you turn it off at the thermostat. The indoor evaporator unit and blower will stop but the condenser outside will remain on because the contactor may have welded itself in the on position. |
||||
 |
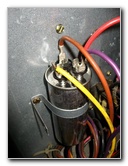
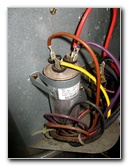 Old Capacitor |
 Bulging Capacitor Top |
||
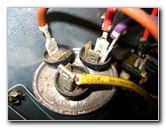
|
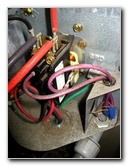
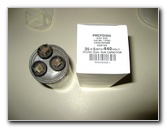
The old capacitor was very swollen and looked like a soda can that had been repeatedly shaken up. Be sure to write down which wires go to what terminal on your capacitor before removing the old one or just take a few pictures. For home air conditioning systems that use dual run/start capacitors they will have 3 terminals. The terminal labeled "HERM" is for the yellow wire that goes to the "Hermetically Sealed" compressor. The "FAN" terminal gets connected to the brown wire that goes to the condenser fan. Finally the "COM" terminal is for the purple and red wires that go to the contactor and provide power to the capacitor. |
||||
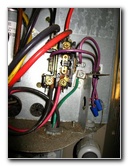
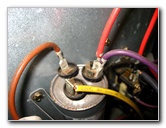 Fan, Herm, Com Wires |
 Screwdriver Discharging Capacitor |
 Unscrewing Capacitor Bracket |
||
|
You could use either a 100 watt light bulb wired up to alligator clips, a 20k to 100k ohm resistor also wired with alligator clamps or just a large screwdriver with an insulated handle. I opted for the screwdriver capacitor discharging method with rubber gloves added for extra safety. Luckily my capacitor wasn't holding a charge so there weren't any dramatic screwdriver welding sparks or loud electrical pops with bright flashes of arching lightning bolts.
Can you tell that I was
just a little bit disappointed?
|
||||
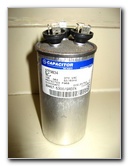 5UF 36UF 370 VAC 60HZ |
 New 440 Volt Dual Run Capacitor |
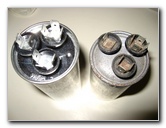 Old Vs. New Capacitor |
||
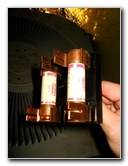
| To be completely
sure that the old capacitor is discharged of all electricity, short each of
the terminals across each other and also to the metal lip on the body.
Then you can gently wiggle loose and remove the HERM, FAN and COM wires. With the old part in hand, I took a trip to my local air conditioning supply warehouse to buy a new capacitor. For those of you living in South Florida, I can recommend ASAP Appliance Parts Inc. located at 1100 N. Florida Mango Rd. Suite "H" in West Palm Beach, FL 33409. My old capacitor was a GE (NO PCB) 370 VAC 60 HZ unit which they didn't have an exact match for but they said that it was perfectly fine to replace it with a higher voltage 440 Volt 35+5MF capacitor. The total cost with sales tax was $31.84. That is much less expensive than the $150 to $250 or more that a professional HVAC company (heating, ventilation, & air conditioning) technician would have charged me for the service call, the part and labor. |
||||
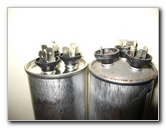 Flat Top Vs. Disfigured Bulging |
 New Capacitor Installed |
 Fuses Replaced In Box |
||
| I installed my
shiny new
round combination capacitor by tightening the metal strap bracket and hooked
up the Herm, Fan and Com wires to the correct terminals which had those
words stamped into the metal on top of the part.
Then I confidently closed up the condenser electrical access panel, and replaced all the screws that hold the roof of the unit in place. Finally I pushed the fuses back in and closed the fuse box lid. If you haven't done it in a long time, now would be a good time to clean or change the A/C filter. With sweat on my forehead I rushed inside, flipped the breakers back to "ON" and switched the thermostat down to "Cool". I
heard the familiar sound of the compressor and fan start outside and within
a few seconds the A/C vents started to blow refreshingly cold air.
|
||||