
How To
Reattach Car Door Molding Trim With 3M Tape
A photo illustrated guide to reattaching
plastic automotive door molding or body trim with 3M double sided tape.

By Paul B. Michaels Author & Photographer Auto Mechanic Since 1989 |
||
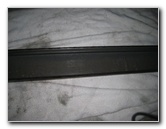
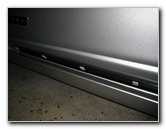
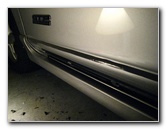
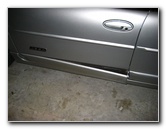 Molding Hanging Off |
 GM '01 Pontiac Grand Prix |
 Old Double Sided Tape |
| After
nearly 10 years of repeatedly shutting the driver's door on my 2001
Pontiac Grand Prix, the vinyl molding trim piece at the bottom of
the door started to come loose. It seems that the plastic clips or rivets behind the panel had broken and the double sided tape had lost its adhesive ability. I used a piece of silver duct tape, which conveniently matches my car's paint color, to hold up the panel for the trip to Advance Auto Parts to buy some 3M Super Strong Molding Tape. In order for the new 3M double sided tape to securely hold up the door molding, I needed to remove the old tape and thoroughly clean all the surfaces. I generously sprayed "Goo Gone" adhesive remover to make the old tape easier to scrape off from the car and the trim. |
||
|
|
||
 |
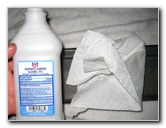
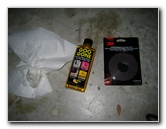 Goo Gone |
 3M Super Strong Tape |
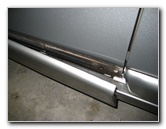
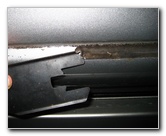
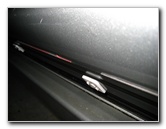
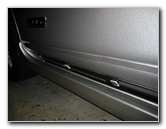
| To access the old
double sided tape, I gently pulled off the entire vinyl door molding trim
piece at the bottom of my driver's door.
Underneath, I could see the metal bar that used to be securely attached with plastic clips or rivets to the body of the car and glued to the door molding. There was also a long strip of old double sided tape along the entire length of the top area where the molding piece meets with the car door. |
||
 Door Moulding Removed |
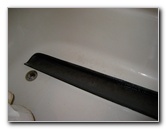 Cleaning Trim In Bathtub |
 Spray On Goo Gone |
| I took the door
molding to the bath tub to wash it off and clean off any adhesive or road
grime with the Goo Gone solution.
Then I sprayed the old double sided tape on the car door with a generous amount of Goo Gone and let it sit for a few minutes to give it some time to work. |
||
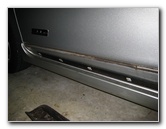
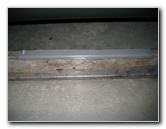
 Old Tape Removed |
 Clean With Alcohol |
 Scraping Off Old Tape |
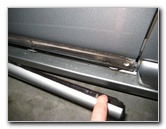
| It took about half
an hour for me to carefully scrape off the old double sided tape from the
door with an interior car door panel pulling tool.
Any other flat and relatively dull tool such as a paint or ice scraper would also work well. Try to not scratch the paint above the line where the door molding attaches to the door panel. To finish the surface preparation, I wiped everything down with alcohol and allowed them to air dry. |
||
|
|
||
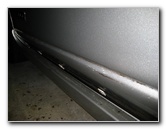 Double Sided Tape Off |
 Car Door Paint Cleaned |
 Metal Piece Taped |
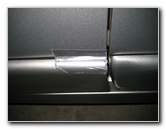
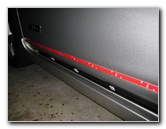
| Since the metal bar
below the door molding piece was barely hanging on to the car, I placed two
pieces of the 3M double sided tape underneath the bar.
Then I pushed on the metal bar and held it for 30 seconds to ensure a good bond. |
||
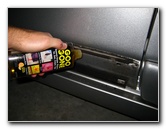
 Apply 3M Tape |
 Remove Tape Backing |
 |
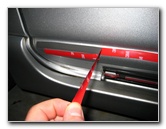
| I applied a long
piece of new 3M tape along the top area where the molding attaches to the
car and also a few pieces on the outside face of the metal bar.
It can be difficult to remove the red plastic backing strip on the 3M tape, but you just have to pick at it with your fingertips. I also applied some double sided tape to the very bottom inside face of the vinyl door molding. Once all of the tape was in place with the backing strips removed, I carefully lined up the door molding and pushed it into place. I held it there for about 30 seconds applying even pressure to ensure that it sticks well and forms a permanent bond. Be sure to not press too hard in any one small spot as you may crease, crack, or break the soft vinyl panel. |
||
 Ready For Mounting |
 Extra Tape On Molding |
 Push On & Hold Trim |
| For more of my
related automotive how-to guides, click on the following links:
GM Power Window Motor & Regulator Replacement Guide,
GM Power Window Tracks & Regulator Lubrication Guide,
GM Pontiac Grand Prix Headlight Bulbs Replacement Guides,
GM Pontiac Grand Prix Tail Light Bulbs Replacement Guide,
Zaino Bros Show Car Polish Review,
WeatherTech FloorLiner Car Mats Review,
GM 3800 II Power Steering Whine Repair Guide,
GM Pontiac Grand Prix Front Brake Pads Replacement Guide,
GM Brake Line Bleeding Guide,
GM Pontiac Grand Prix Rear Brake Pads Replacement Guide,
Headlight & Tail Light Condensation Solution Guide,
GM Pontiac Grand Prix GTP Supercharger Belt Replacement Guide,
GM Pontiac Grand Prix Serpentine Belt Replacement Guide,
GM 3800 II Idler & Tensioner Pulleys Replacement Guide,
Corroded Car Battery Terminal Replacement Guide,
GM 3800 II Alternator Replacement Guide,
GM
Pontiac Grand Prix PCV Valve Replacement Guide,
GM ABS/TCS/SES Warning Lights Solution Guide,
GM Wheel Bearing Hub Replacement Guide,
GM 3800 Series II Engine Oil Change Guide,
GM
Power Window Switch Contacts Cleaning Guide,
GM Grand Prix Fog Light Bulbs Replacement Guide,
GM Key Fob Remote Control Battery Replacement Guide,
Buffing Old Faded Headlights Guide,
K&N Air Filter Cleaning Guide,
GM 3800 Series II Eaton M90 Supercharger Oil Change Guide,
GM Pontiac Grand Prix 3rd Brake Light Bulb Replacement Guide,
GM A/C Condensate Drain Pipe Unclogging Guide, and
Meguiar's Headlight Restoration Kit Review.
For more, check out all of my Pontiac
Grand Prix DIY Repair & Maintenance Guides. |
||
| If you found this guide to be helpful,
please consider making a small donation by clicking on the PayPal.com
"Donate" button located to the right of this paragraph. Thank you!
(Note: I am not a registered charity. Donations are not tax deductible.) |