
Pontiac Grand
Prix Headlight Bulb Replacement Guide
Pictures illustrated guide for replacing
a burnt out headlight or turn signal bulb on a 1997 to 2003 GM Pontiac Grand
Prix.

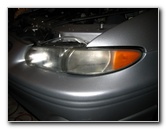 Grand Prix Headlight |
 Front Turn Signal |
 Press Tab & Turn |
| This
automotive "how to" guide was specifically written to assist owners of
the 2001 General Motors Pontiac Grand Prix GTP sedan in replacing a
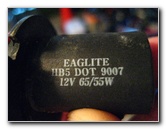
faulty headlight or front turn signal bulb. Owners of other sixth generation (1997, 1998, 1999, 2000, 2001, 2002 & 2003) Pontiac Grand Prix coupe or sedan vehicles in the SE, GT and GTP trim levels may also find this guide to be useful. To replace the headlight bulb, you'll need a 10mm socket with ratcheting wrench. No tools are necessary to replace the front turn signal bulb. The OEM (original) combination high beam & low beam headlight bulb is an Eaglite HB5 DOT 9007 12V 65/55w. Replacement headlight bulbs, such as from Sylvania, also share the same 9007 part number. The front turn signal/parking light bulb's part number is 3457A from various manufacturers. |
||
|
|
||
 3457A Signal/Parking Bulb |
 Two 10mm Headlight Bolts |
 Removing 10 mm Bolt |
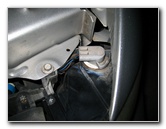
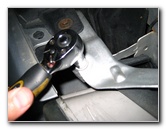
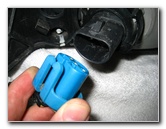
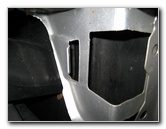
| To access the front
turn signal bulb, press and hold the plastic locking tab and turn the socket
a quarter turn counter clockwise.
Then lift the turn signal socket and bulb out of the headlight assembly. To remove the bulb, just pull it straight out. Wiggling it helps if it won't come out easily. Replace it with a new amber colored Sylvania 3457A bulb. |
||
 Removing 2nd 10mm Bolt |
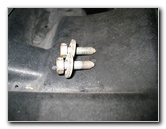 Two 10mm Bolts Removed |
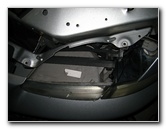 |
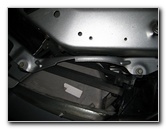
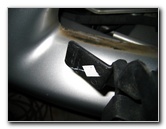
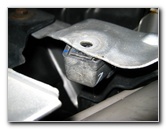
| To access the
headlight bulb in your Pontiac Grand Prix, you'll need a
10mm socket and
ratcheting wrench in order to remove the two 10 mm bolts that secure the
headlight assembly to the car.
Turn the wrench counter clockwise to loosen and remove the bolts, and then put them aside in a safe place. |
||
 Gently Pull Out Headlight |
 Headlight Assembly |
 Headlight Bulb Plastic Clip |
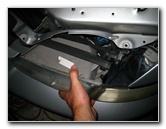
| Next, gently pull
the headlight assembly away from the car in a slightly upward movement. Try not to let it drag on the car or you risk scratching the paint immediately in front of the headlight. Then place the entire assembly down on the engine bay on top of a towel. |
||
 Plastic Clip Popped Off |
 Unscrew Collar 1/4 Turn |
 Headlight Bulb & Collar Nut |
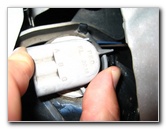
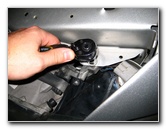
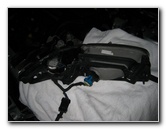
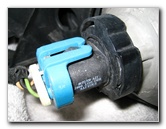
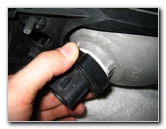
| The headlight
bulb's power connector is held in place by a blue plastic connector with a
two pronged clip.
To remove the power connector, gently pull up on the blue plastic clip and wiggle it free from the headlight bulb. Then grasp the headlight bulb's black plastic collar nut and turn it a 1/4 turn counter clockwise until it comes free. The headlight bulb may come along with it, or it may stay inside the headlight assembly. |
||
 Connector, Bulb, Collar |
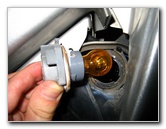
 Eaglite 9007 Bulb |
 Headlight Plastic Tab |
| To complete this
procedure, just reverse the steps.
First insert the new 9007 high/low beam headlight bulb into the headlight housing. It only fits in one way due to plastic tabs on the bulb's base, so don't force it. Then secure the black plastic collar nut by sliding it onto the headlight bulb and turning it a quarter turn clockwise. Next, slide the male blue plastic power connector back into the headlight bulb's female power plug until the two pronged clip snaps into place. When re-installing the headlight assembly, again remember to avoid scratching the paint on the lip of the front bumper. Line up the black plastic tab on the headlight housing closest to the center of the car with the metal slot on the car. Also be sure to get the center most bolt hole down below the metal bolt hole. Finally, secure the two 10mm bolts and test the headlight or parking/signal light bulbs. It's a good idea to check the alignment and level of the headlights at this time to avoid blinding other drivers. If the headlight's beam is too high, try remounting on the car or adjust the level by using the headlight alignment adjustment screw. |
||
 Headlight Seat Metal Slot |
 Bolt Hole Under Metal |
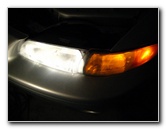 Headlight Fixed |
|
For more of my related automotive guides or reviews, click on the following links: Tail Light & Headlight Condensation Guide, GM Pontiac Grand Prix Power Steering Whine Guide, Zaino Show Car Polish Review Guide, WeatherTech FloorLiner Review, Pontiac Grand Prix Front Brake Pads Replacement Guide, GM Brake Line Fluid Bleeding Guide, Pontiac Grand Prix Rear Brake Pads Replacement Guide, Pontiac Grand Prix GTP Supercharger Belt Replacement Guide, Pontiac Grand Prix Serpentine/Accessory Belt Replacement Guide, Pontiac Grand Prix Idler & Tensioner Pulleys Replacement Guide, Corroded Car Battery Terminal Replacement Guide, GM Pontiac Grand Prix Alternator Replacement Guide, Pontiac Grand Prix PCV Valve Replacement Guide, GM Pontiac Grand Prix TCS Off / ABS / SES Warning Lights Solution Guide, Pontiac Grand Prix Power Window Motor & Regulator Replacement Guide, GM Pontiac Grand Prix Wheel Bearing Hub Replacement Guide, Pontiac Grand Prix Engine Oil Change Guide, Buffing Old Faded Headlights Guide, K&N Air Filter Cleaning Guide, GM Pontiac Grand Prix Tail Light Bulb Replacement Guide, GM A/C Condensate Drain Pipe Unclogging Guide and the GM Pontiac Grand Prix Eaton M90 Supercharger Oil Change Guide.
For more, check out all of my
Pontiac Grand Prix DIY Repair & Maintenance Guides. |
||
| If you found this guide to be helpful,
please consider making a small donation by clicking on the PayPal.com
"Donate" button located to the right of this paragraph. Thank you!
(Note: I am not a registered charity. Donations are not tax deductible.) |