
GM Low
Coolant Light Flashing Repair Guide
How to resolve the "Low Coolant" light on
a GM 3800 II V6 engine by cleaning, replacing, or disconnecting the sensor.

| Please note, I am not a professional mechanic and assume no responsibility for any damage to your vehicle, property, persons, or pets. If you have any doubts, please do not proceed and consult with a repair shop or your dealership. | ||
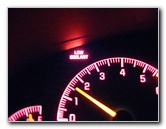 Low Coolant Indicator Flash |
 GM 3800 Series II V6 S/C |
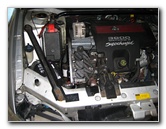
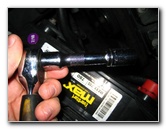
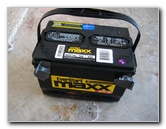
 Radiator Cap & Battery |
| This
automotive "how-to" guide was specifically written to assist owners
of the 1997, 1998, 1999, 2001, 2002 and 2003 Pontiac Grand Prix in resolving the "Low Coolant"
light that may be flashing or illuminating intermittently on the
driver's instrument cluster. Owners of other General Motors vehicles equipped with the GM 3800 Series II 3.8L V6 engine such as the Buick Park Avenue, Riviera, Regal, Chevy Impala, Monte Carlo, Olds Eighty-Eight, Bonneville, and Holden Commodore may also find this guide to be helpful. The "Low Coolant" light in my 2001 Pontiac Grand Prix GTP starting flashing on and off a few weeks ago. I checked the coolant level and it was completely full. The engine temperature gauge also never went over 180 degrees Fahrenheit since I have a 180 thermostat installed. To resolve the problem, you'll need to either clean, replace or disconnect the radiator's coolant level sensor. A new "Engine Coolant Level Indicator Sensor" is part # 10096163 from AC Delco, Airtex, or Wells and costs anywhere from $10 to $45. |
||
|
|
||
 Remove Cross Brace |
 13mm Socket & Wrench |
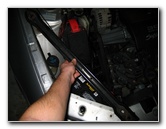 Lift Off Cross Brace |
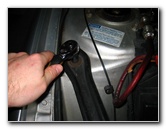
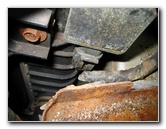
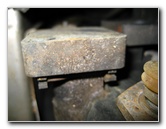
| The coolant level
sensor is located a few inches below the radiator cap on the passenger side
of the engine. It looks like a small rectangular black box with a power wire
connector coming out of the bottom of it. To easily access and remove it for
cleaning or replacement, you'll need to remove the black metal passenger
side cross brace. The brace is held in place by three 13mm bolts with two
near the front bumper and one longer bolt located closer to the windshield. If you just want to disconnect the coolant level sensor to eliminate the flashing "Low Coolant" light, you can reach the sensor's power plug by removing the passenger side headlight by unscrewing the two 10mm bolts. |
||
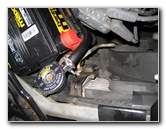
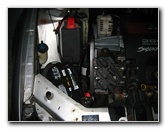 Passenger Side Brace Removed |
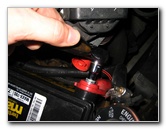
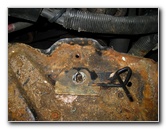
 Battery Bracket Bolt |
 13mm Socket & Extension Bar |
| Once the passenger side engine bay brace is removed, you can loosen and remove the 13mm bolt on the battery bracket using a 13mm socket and extension bar. | ||
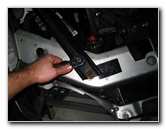
 Loosen Battery Bracket Bolt |
 Battery Bracket Bolt Removed |
 8mm Socket - Battery Terminal |
| Next, remove the battery terminal cables using an 8mm socket and ratcheting wrench. I like to cover the battery terminals with duct tape for extra safety. I found it easier to remove the battery after popping off the fuse box cover and lifting the side of the battery closest to the windshield first. | ||
|
|
||
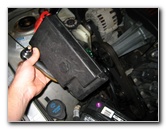 Remove Fuse Box Cover |
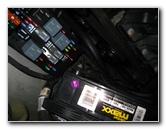 Pull Out Car Battery |
 Car Battery Removed |
| Since I just
recently changed the coolant, I decided to simply disconnect the
coolant level
sensor to stop the Low Coolant light from flashing while I drive until
the next time I replace the coolant. If you check your engine fluids
frequently and always take note of your engine temperature gauge,
disconnecting the sensor is the easiest temporary solution.
If you haven't flushed and changed your coolant recently, it would be best to drain the coolant and clean the sensor with some brake parts cleaner spray or replace it with a brand new one. To clean or replace the sensor when you don't plan to also change the coolant, drain some of the coolant out until it reaches just below the level of the sensor into a catch container. A new GM coolant level sensor is part # 10096163 and costs about $35 to $45 at online parts stores such as Rock Auto, GM Parts Direct, or Amazon.com. |
||
 |
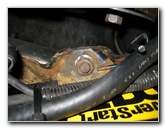
 Coolant Level Sensor |
 Disconnect Sensor Wire |
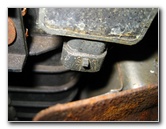
| The
coolant level
sensor is held in place by a thin metal retaining clip that can easily be
released with a screwdriver. Insert a small flathead screwdriver in between
the clip and the sensor body and pry it off. A rubber o-ring holds the
sensor securely in place, so twist and wiggle while pulling on it to remove
it from the radiator.
Be sure to have your catch container in place below the car since some coolant may flow out. Stuff a shop rag or plastic bag in the hole in the radiator to stop the flow of coolant. Cleaning the sensor with brake parts cleaner may or may not solve the blinking "Low Coolant" light problem but it may be worth the trouble if it saves you the $10-$45 + shipping cost of a new coolant level sensor. |
||
 |
 Coolant Sensor Power Plug |
 Sensor Metal Retaining Clip |
| For more of my
related automotive how-to guides, click on the following links:
GM Power Window Motor & Regulator Replacement Guide,
GM Power Window Tracks & Regulator Lubrication Guide,
GM Pontiac Grand Prix Headlight Bulbs Replacement Guides,
GM Pontiac Grand Prix Tail Light Bulbs Replacement Guide,
Zaino Bros Show Car Polish Review,
WeatherTech FloorLiner Car Mats Review,
GM 3800 II Power Steering Whine Repair Guide,
GM Pontiac Grand Prix Front Brake Pads Replacement Guide,
GM Brake Line Bleeding Guide,
GM Pontiac Grand Prix Rear Brake Pads Replacement Guide,
Headlight & Tail Light Condensation Solution Guide,
GM Pontiac Grand Prix GTP Supercharger Belt Replacement Guide,
GM Pontiac Grand Prix Serpentine Belt Replacement Guide,
GM 3800 II Idler & Tensioner Pulleys Replacement Guide,
Corroded Car Battery Terminal Replacement Guide,
GM 3800 II Alternator Replacement Guide, GM
Pontiac Grand Prix PCV Valve Replacement Guide,
GM ABS/TCS/SES Warning Lights Solution Guide,
GM Wheel Bearing Hub Replacement Guide,
GM 3800 Series II Engine Oil Change Guide,
GM
Power Window Switch Contacts Cleaning Guide,
Buffing Old Faded Headlights Guide,
K&N Air Filter Cleaning Guide,
GM 3800 Series II Eaton M90 Supercharger Oil Change Guide,
GM Pontiac Grand Prix Fog Light Bulb Replacement Guide,
GM Pontiac Grand Prix 3rd Brake Light Bulb Replacement Guide, and
Meguiar's Headlight Restoration Kit Review.
For more, check out all of my
GM Pontiac Grand Prix Repair & Maintenance Guides. |
||
| If you found this guide to be helpful,
please consider making a small donation by clicking on the PayPal.com
"Donate" button located to the right of this paragraph. Thank you!
(Note: I am not a registered charity. Donations are not tax deductible.) |