
GM Pontiac
Grand Prix Overhead Map Light Bulbs Replacement Guide
Pictures illustrated how-to instructions
for replacing the overhead map light bulbs in a 1997 to 2003 GM Pontiac Grand
Prix.

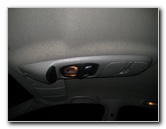 Overhead Storage & Lights |
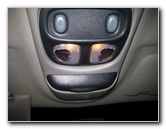 Two Overhead Map Lights |
 Phillips Head Screwdriver |
| This
automotive "how-to" guide was specifically written to assist owners of
the 2001 GM Pontiac Grand Prix in replacing one or both of the
overhead map light bulbs. Owners of other sixth generation Pontiac Grand Prix coupes or sedans in the SE, GT, & GTP trim levels from 1997, 1998, 1999, 2000, 2001, 2002 and 2003 should also find this guide to be helpful. The overhead map light bulb replacement procedure may be similar on other General Motors or Pontiac vehicles such as the Grand Am, Sunfire, G6, G8, Vibe, Bonneville, Buick Regal, Chevy Malibu, Olds Aurora, TransAm, Buick LeSabre, Firebird, GTO, Monte Carlo, Century, and Intrigue. To access the bulbs, you'll need a Phillips head screwdriver and a small Torx T-10 screwdriver. The bulbs in my car are part # 562 which Sylvania refers to as "Dome Lights". If you would like to have brighter map lights, install some compatible replacement 562 LED bulbs. |
||
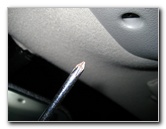
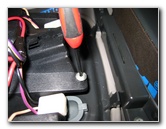
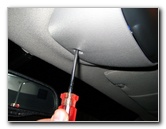 Unscrew Phillips Screw |
 |
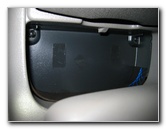
 Sunglasses & Clicker Storage |
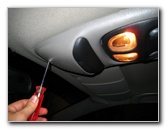
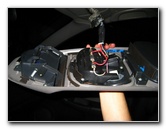
| The overhead
console is held in place by four Phillips head screws.
One is near the front of the car by the rear view mirror. Two are inside the sunglasses storage and the fourth is inside the garage door clicker storage. |
||
 Two Screws In Sunglass Holder |
 One Screw In Clicker Box |
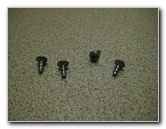
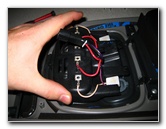
 Overhead Console Drops Down |
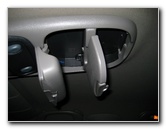
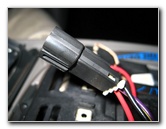
| After removing all
four screws, keep one hand on it, because the overhead console should drop
down by itself.
The console is held up by several wires that power the two map lights. To disconnect the electrical connector, gently lift the plastic tab until you can separate the power socket and plug. |
||
 Map Lights Connector Clip |
 Four Phillips Screws Removed |
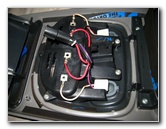 Backside of Map Lights |
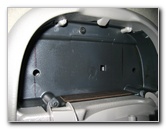
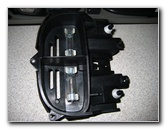
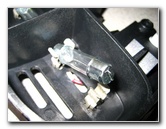
|
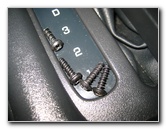
Once the overhead console is free from the rest of the car, locate the four small Torx screws that hold the two map light bulbs, lenses and switches in place. I didn't have a small enough Torx screwdriver, so I just used a small flat head screwdriver to remove the four Torx screws. I believe that the size is Torx T10 or T8. |
||
 Torx Screws / Flathead Screwdriver |
 Four Torx Screws Removed |
 Lift Up Map Light Bulbs Cover |
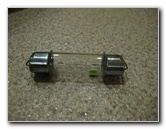
| With the four Torx
screws removed, you can lift up the black vented plastic housing that holds
the two # 562 map light bulbs.
Underneath you'll see the clear plastic map lights lens and the underside of the two grey plastic buttons. Flip over the black vented plastic housing to reveal the two map light bulbs. They are held in place by two metal clips. Pop the bulbs out using your fingers or gently with a small screwdriver. To complete the map light bulb replacement procedure, reverse the steps above. Push in a new # 562 bulb, replace the black plastic cover, screw back in the four Torx screws, hold the console up to the roof, and screw back in the four Phillips screws. If you want brighter map lights, install some compatible 562 LED bulbs. |
||
 Two # 562 Light Bulbs |
 Pull Bulb From Holder |
 # 562 Light Bulb Removed |
| For more of my
related automotive how-to guides or reviews click on the following links:
GM Pontiac Grand Prix Headlight Bulbs Replacement Guides,
GM Pontiac Grand Prix Tail Light Bulbs Replacement Guide,
Zaino Bros Show Car Polish Review,
WeatherTech FloorLiner Car Mats Review,
GM 3800 II Power Steering Whine Repair Guide,
GM Pontiac Grand Prix Front Brake Pads Replacement Guide,
GM Brake Line Bleeding Guide,
GM Pontiac Grand Prix Rear Brake Pads Replacement Guide,
Headlight & Tail Light Condensation Solution Guide,
GM Pontiac Grand Prix GTP Supercharger Belt Replacement Guide,
GM Pontiac Grand Prix Serpentine Belt Replacement Guide,
GM 3800 II Idler & Tensioner Pulleys Replacement Guide,
Corroded Car Battery Terminal Replacement Guide,
GM 3800 II Alternator Replacement Guide, GM
Pontiac Grand Prix PCV Valve Replacement Guide,
GM ABS/TCS/SES Warning Lights Solution Guide,
GM Pontiac Grand Prix Power Window Motor & Regulator Replacement Guide,
GM Wheel Bearing Hub Replacement Guide,
GM 3800 Series II Engine Oil Change Guide,
Buffing Old Faded Headlights Guide,
K&N Air Filter Cleaning Guide,
GM 3800 Series II Eaton M90 Supercharger Oil Change Guide,
GM Pontiac Grand Prix 3rd Brake Light Bulb Replacement Guide, and
Meguiar's Headlight Restoration Kit Review.
For more, check out all of my
Pontiac Grand Prix DIY Repair & Maintenance Guides. |
||
| If you found this guide to be helpful,
please consider making a small donation by clicking on the PayPal.com
"Donate" button located to the right of this paragraph. Thank you!
(Note: I am not a registered charity. Donations are not tax deductible.) |