
Chevrolet
Impala Front Brake Pads Replacement Guide
How to replace the front brake pads on a
2006 to 2011 GM Chevrolet Impala with picture illustrated instructions.

By Paul B. Michaels Author & Photographer Auto Mechanic Since 1989 |
||
| Please note, I am not a professional automotive mechanic. If you have any doubts, please do not proceed and consult with your local repair shop or General Motors dealership. I assume no responsibility for damage to your property, persons or pets. | ||
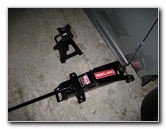 Floor Jack & Jack Stand |
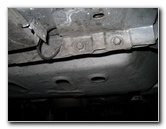 Front Jack Point |
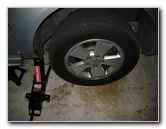 Loosen Lug Nuts |
| This
automotive "how-to" guide was specifically written to assist owners
of the 9th generation (2006, 2007, 2008, 2009, 2010 & 2011) Chevy Impala in replacing the
front brake pads. Owners of other General Motors vehicles such as the Buick Regal, Century, LaCrosse, Allure, Monte Carlo, Lumina, Monte Carlo, Pontiac Grand Prix, Olds Cutlass Supreme, and Intrigue may also find this guide to be helpful. A few compatible new brake pads with their part numbers are as follows: Wagner QC1159, ACDelco 14D1159CH, ACDelco 17D1159CH, Dura International BP1159 C, Bosch BE1159H and Wagner ZD1159. The tools needed to complete this procedure include a lug nut wrench, a floor jack, jack stands, a 13mm socket or wrench, and a "C" or "F" clamp. |
||
|
|
||
 Remove Lug Nuts |
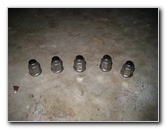 5 Lug Nuts Removed |
 Pull Off Front Wheel |
| I'd recommend
using jack stands to support the vehicle and putting blocks behind the rear
wheels for extra safety.
Optional items include a breaker bar or rubber mallet for loosening a stubborn caliper bolt, CRC Disc Brake Quiet Gel, brake parts cleaner spray, high pressure moly brake caliper grease for the caliper pin, blue medium strength "Permatex" brand threadlocker for the caliper bolts, and string or rope to secure the brake caliper to the suspension spring. |
||
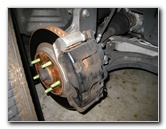
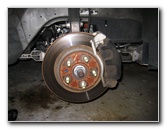 Front Brake Rotor |
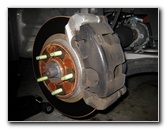 Front Brake Caliper |
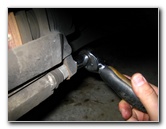 Remove Lower Caliper Bolt |
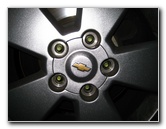
| The first step is
to slightly loosen the 5 lug nuts on the front wheel before raising the
vehicle off the ground with a floor jack.
Place your jack stands under the side of the vehicle for extra safety. Then spin off the lug nuts, remove the wheel and roll it out of the way. Use wheel chocks or wood blocks behind the rear wheels and engage the emergency brake to prevent the vehicle from moving. |
||
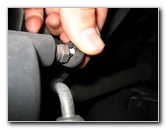
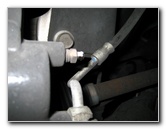
 13mm Caliper Bolt |
 Lower Bolt Removed |
 Swing Caliper Upwards |
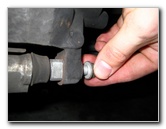
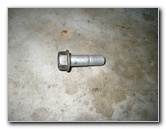
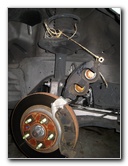
| To access the front
brake pads, remove the lower of the two caliper bolts using a 13 mm socket or
wrench.
I had trouble breaking the OEM Threadlocker on the lower caliper bolt so I had to hit the socket wrench with a large rubber mallet a few times to loosen it. Once the lower caliper bolt is removed, swing the caliper body upwards and off the brake pads. Support the brake caliper with some twine or rope to prevent it from crashing down on your fingers or the rotor while you replace the pads. |
||
 Brake Pads Exposed |
 Tie Caliper To Suspension |
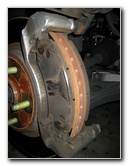 |
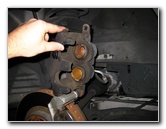
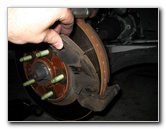
| To remove the two old brake pads,
wiggle them off the face of the rotor and out of the anti rattle clips
located at the top and bottom.
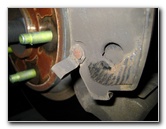
I recommend buying the Wagner ThermoQuiet QC1159 front brake pads since they have excellent reviews on Amazon. I also like how they don't require any backing plates, shims or disc brake quiet gel due to the integrated insulators. If your new brake pads came with replacement anti-rattle clips you can remove the olds ones. If your new pads didn't come with new anti-rattle clips, you can re-use the original ones if they are still in good shape. Be sure to take note of where the "squeal" or wear indicator bar is located on the old pads and move it to the same location on the new pads. On this Impala, it was located at the bottom of the outer brake pad. |
||
 Pull Off Both Brake Pads |
 Wear Indicator Bar |
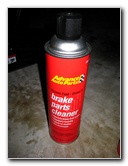 Brake Parts Cleaner |
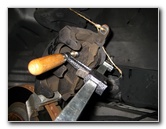
| Next, remove the
cap on the brake fluid reservoir in the engine bay.
This allows the brake fluid to flow freely back into the reservoir when you compress the two brake caliper pistons. Use the "C" or "F" clamp and the back of one of the old brake pads to slowly compress the two pistons on the caliper. Don't compress the two pistons any more than necessary to accommodate the larger size of the new pads. The furthest back they should be compressed is until they lie flush with the rubber dust boots around them. Periodically check the level of the brake fluid in the reservoir to make sure that it doesn't overflow. Remove any excess brake fluid with a turkey baster, spray pump from a household cleaner bottle, or just soak some up with a paper towel. |
||
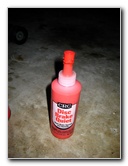 CRC Disc Brake Quiet Gel |
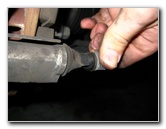 Pull Out Caliper Pin |
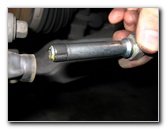 Grease Lower Caliper Pin |
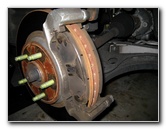
| Before installing
the new pads, clean off the rotor and caliper body with brake parts cleaner
spray.
If your vehicle is prone to brake noise, you may want to apply a product such as the CRC Disc Brake Quiet gel to the rear of the pads where they come in contact with the caliper. Do not apply anything to the friction material side of the new pads. |
||
 Attach "F" Clamp |
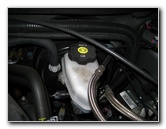 Brake Fluid Reservoir |
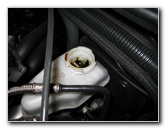 Remove Brake Fluid Cap |
| With the new pads
in place, cut the twine supporting the caliper and carefully lower it down
over the pads.
Check that the lower caliper bolt's rubber dust boot is lined up with the bolt hole on the caliper. If the caliper won't fit over the thicker new pads, compress the caliper pistons some more with the "C" or "F" clamp. The smooth end of the caliper bolt or the caliper "pin" needs to slide freely inside the caliper. Lubricate it with some high pressure moly grease and apply a tiny bit of blue "medium" Permatex threadlocker to the threads on the bolt to keep it from vibrating out. Then insert the bolt into the caliper and tighten it down with the 13mm socket and ratcheting wrench. Torque the caliper bolt to the torque setting specified in the service manual for your vehicle. If the lower caliper bolt wasn't already well lubricated, you should remove the upper bolt and lubricate the upper caliper pin. If your vehicle's brake pedal feels mushy or the brakes exhibit "fading" (loss of braking ability), it would be advisable to "bleed" the brake lines to replace the old contaminated brake fluid with fresh DOT 3 brake fluid. For more on that topic, check out my Brake Line Fluid Bleeding Guide. |
||
 New Pads In Place |
 Bleeder Valve Dust Cover |
 Brake Fluid Bleeder Valve |
| To finish the job,
reattach the wheel and spin on the lug nuts by hand.
Then lower the vehicle off the jack stands and tighten the five lug nuts to about 100 ft-lbs of torque. It would be best to use a torque wrench. Check the level again in the brake fluid reservoir, add or remove fluid until it reaches the "MAX" cold line, and replace the brake fluid reservoir cap. Pump the brake pedal a few times to restore brake line pressure. To "break-in" the new brake pads, just drive the vehicle normally for a few hundred miles and try to avoid any hard or "panic" stops. Hard braking during the break-in period may cause the pads to glaze over and lead to squealing and/or reduced braking ability.
Please check out all of my
GM
Chevrolet Impala DIY Repair & Maintenance Guides. |
||
| For more of my
related automotive maintenance or repair guides, click on the following
links:
Chevy Impala Cabin Air Filter Replacement Guide,
Chevy Impala
Headlight Bulbs Replacement Guide,
Chevy Impala Tail Light Bulbs Replacement
Guide,
Chevy Impala
3.5L V6 Engine Oil Change Guide,
Chevy Impala Key Fob
Remote Control Battery Replacement Guide,
How To Reattach Car Door Molding,
GM Power Window Door Tracks Lubrication Guide,
GM Power Window Switch Contacts Cleaning Guide,
GM Key Fob Battery Replacement Guide,
GM A/C Condensate Drain Elbow Cleaning Guide,
Meguiar's Headlight Restoration Buffing Kit Guide,
Zaino Show Car Polish Review,
GM Power Steering Whine Repair Guide,
GM Brake Line Fluid Bleeding Guide,
GM Rear Brake Pads Replacement Guide,
Tail Light & Headlight Condensation Repair Guide,
GM Power Window Motor & Regulator Replacement Guide,
GM Wheel Bearing Hub Assembly Replacement Guide,
Falken Ziex ZE-512 Tire Review,
K&N Air Filter Cleaning Guide, and
Fuzion ZRi Tire Review. |
||
| If you found this guide to be helpful,
please consider making a small donation by clicking on the PayPal.com
"Donate" button located to the right of this paragraph. Thank you!
(Note: I am not a registered charity. Donations are not tax deductible.) |