
Dodge Caravan
Overhead Map Light Replacement Guide
A pictures illustrated how-to guide for
replacing a burnt out overhead map light bulb in a 2001 to 2007 Dodge Caravan.

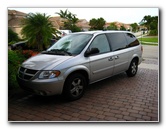 2006 Dodge Caravan |
 Minivan Overhead Map Lights |
 Burnt Out Map Light |
| This
automotive "how-to" instruction guide was specifically written to
assist owners of the 2006 Dodge Caravan minivan in replacing a burnt
out overhead map light bulb. Owners of other fourth generation Dodge Caravans, Grand Caravans, Chrysler Voyager or Chrysler Town & Country minivans from 2001, 2002, 2003, 2004, 2005, 2006 and 2007 may also find the guide to be useful. We purchased a new overhead map light bulb for this 2006 Dodge Caravan at a Dodge dealership. A replacement bulb from Sylvania is part # PC579. If you would like to have brighter map lights, install some compatible PC579 LED bulbs. The tools needed to complete this procedure include a small flathead screwdriver, and something to remove plastic on the new part such as a Dremel rotary tool or a file. The new version of the bulb has extra plastic on the base that prevents it from fitting in the socket in the older models. |
||
|
|
||
 Pop Out With Screwdriver |
 Light Cover Removed |
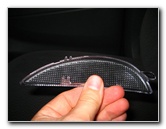 Clear Plastic Light Cover |
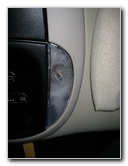
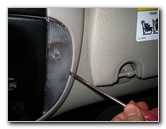
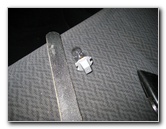
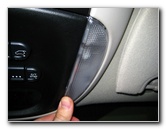
| In order to access
the overhead map light bulb in a 2006 Dodge Caravan, you'll need to pop off
the clear plastic light cover by using a flat head screwdriver.
Gently place the tip of the screwdriver in between the plastic and the tan interior panel on the outer middle of the cover. (See the pictures above.) Then pry the cover out until it pops free and falls from the overhead console. |
||
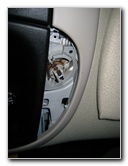
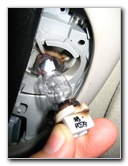
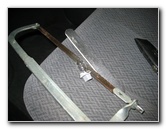
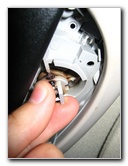 Twist 1/4 Turn |
 Counter Clockwise |
 Remove Old Bulb |
| To remove the old overhead map light bulb, twist the plastic base of the bulb a 1/4 turn counter clockwise and pull it straight out from the socket. | ||
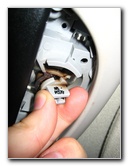
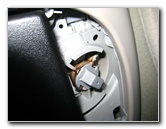
 |
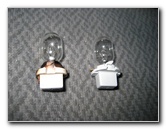 Sylvania Part # PC579 |
 New Bulb & Old Bulb |
| The new
PC579 light bulb that
we purchased at the parts counter of a Dodge car dealership is slightly
different than the old bulb.
If you study the new part and the old one, you'll see that there is a small piece of plastic that prevents the new bulb from twisting into place in the light socket. |
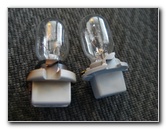
||
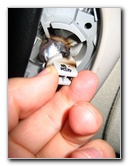
 Removing Extra Plastic |
 |
 Plastic Removed |
| In order to install the new overhead map light bulb, I had to remove that extra piece of plastic with pliers, a file and a hand saw. I kept on removing a tiny bit of plastic from the new bulb and trying to twist it into the socket until finally it fit. | ||
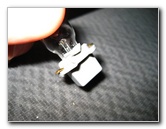
 Nail File - Removing Plastic |
 Hand Saw |
 1/4 Turn Clockwise |
| Once the new
PC579 bulb
fits into the socket, twist it a quarter turn clockwise to lock it into
place.
Then pop the clear plastic light cover back into place by first inserting the tab on the end that points towards the rear of the minivan. To secure the plastic cover, gently push on it until you hear a click from the retaining clips. I f the new light bulb doesn't work at first, try removing it and re-installing it to make a better connection. |
||
 Re-Installing Map Light Cover |
 Snap Cover In Place |
 New Map Bulb Installed |
| For more of my automotive how-to
guides and reviews, click on the following links:
Dodge Caravan
Headlight Bulbs
Replacement Guide,
Dodge Caravan Third Brake Light Bulb Replacement Guide,
Dodge Caravan
Tail Light Bulbs Replacement Guide,
Zaino Bros Show Car Polish Review,
WeatherTech FloorLiner Mats Review,
Headlight & Tail Light Condensation Solution Guide,
Sunforce Solar Battery Maintainer Review,
Corroded Car Battery Terminal Replacement Guide,
Garmin Nuvi 260W GPS Review,
Car Interior Carpet Replacement Guide,
Falken Ziex ZE-512 Tire Review,
Buffing Faded Headlights,
K&N Engine Air Filter Cleaning Guide,
Fuzion ZRi Tire Review, &
HP iPAQ HX-4700 PDA Garmin GPS. |
||
| If you found this guide to be helpful,
please consider making a small donation by clicking on the PayPal.com
"Donate" button located to the right of this paragraph. Thank you!
(Note: I am not a registered charity. Donations are not tax deductible.) |