
Toyota
Corolla Coolant Change Guide - Radiator Drain & Refill
How to change the engine coolant
(antifreeze) in a 2003 to 2008 Toyota Corolla by draining and refilling the
radiator.

By Paul B. Michaels Author & Photographer Auto Mechanic Since 1989 |
||
|
|
||
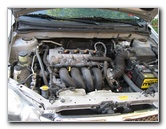 Toyota Corolla 1.8L I4 Engine |
 Radiator Cap & Overflow Tank |
 Cold Engine! - Remove Cap |
| This
automotive "how-to" maintenance guide was specifically written to
assist owners of the 9th generation (2003, 2004, 2005, 2006, 2007, &
2008) Toyota Corolla in changing the engine coolant by draining and
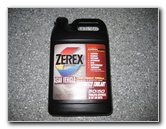
refilling the radiator. Owners of other Toyota, Scion and Lexus vehicles with similar cooling systems such as the Camry, Matrix, Yaris, Avalon, Venza, RAV4, FJ Cruiser, Prius, Sienna, Tacoma, tC, xA, xB, xD, and IS 250 may also find this guide to be helpful. The Corolla comes equipped with Toyota's pink SLLC (Super Long Life Coolant) that is supposed to last 10 years or 100,000 miles. Rather than wait that long, I decided to replace about half of the 6.9 quarts of coolant in the system after just 6 years and 85,000 miles by performing a simple radiator drain and refill. To complete this procedure, you'll need the following items: a gallon of Toyota SLLC or Zerex Asian Vehicle coolant (both of them are pink & 50/50 pre-mixed with distilled water), an automotive funnel, a catch container and a pair of pliers. |
||
|
|
||
 Radiator Cap Removed |
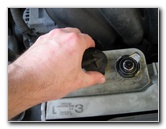 Remove Overflow Tank Cap |
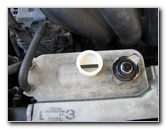 Coolant Overflow Tank Removed |
| I purchased a
gallon of the Zerex Asian Vehicle coolant with free shipping
on Amazon.com.
The Toyota SLLC coolant costs anywhere from about $20 to $30 at your local Toyota dealership's parts department or online at Amazon. Some people would recommend draining the entire cooling system and flushing it out with distilled water. This is not recommended when using the pink pre-mixed super long life coolant since it will be very difficult to achieve a 50/50 mixture of coolant and water in the system without using a cost prohibitive amount of new coolant. Simply draining the radiator and refilling it with new pre-mixed 50/50 coolant every 3-5 years or after about 50,000 miles is more than enough preventative maintenance to keep the cooling system working at optimum efficiency. Another important reason for renewing the cooling system with fresh coolant is to restore the water pump lubricants and rust inhibitors that wear out over time. Step # 1 - Allow the engine to cool down for at least a few hours before removing the radiator cap. Opening the radiator cap while the engine is still hot could cause hot coolant to spray out and result in skin or eye injuries. Also remove the cap from the white plastic radiator overflow tank in preparation for topping it off with new coolant later on. |
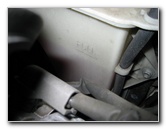
||
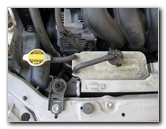
 Remove Plastic Pop Rivets |
 Lower Radiator Hose |
 Spring Hose Clamp |
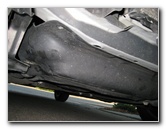
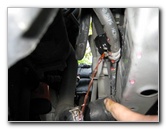
| Move to below the
front of the engine and remove the black plastic fasteners or "pop rivets"
that hold the lower plastic engine bay covers in place.
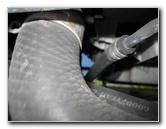
Attached to the bottom of the radiator on the passenger side, you'll see a large rubber hose held in place by a spring hose clamp. |
||
 Zerex Asian Vehicle 50/50 |
 Automotive Catch Container |
 Radiator Hose Clamp |
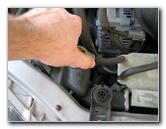
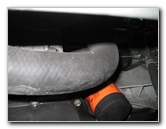
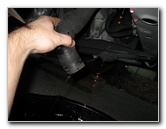
| Place an automotive
fluids catch container or a bucket below the point where the lower radiator
hose is attached to the radiator. Some people prefer to drain the radiator by unscrewing the plastic drain plug or "petcock valve" located on the bottom of the radiator. Draining the radiator by using the drain plug is not recommended since a radiator plug that has been stuck in place for several years tends to leak coolant after it is removed. This happens because the old or dried out rubber o-ring or gasket on the drain plug can rip or tear when the plug is unscrewed for the first time in years. The method preferred by professional automotive mechanics is to loosen the hose clamp on the lower radiator hose. Then drain out as much coolant as possible from the radiator and also the engine block. |
||
 Pliers - Loosen Hose Clamp |
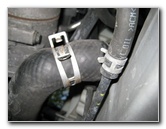 Move Clamp Off Radiator |
 Pull Off Lower Radiator Hose |
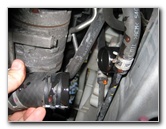
| Use some regular
pliers or the special "spring hose clamp pliers" if you have them, to loosen
the spring hose clamp and slide it backwards on the hose until it is off the
spout on the radiator. Carefully and slowly pull off the lower radiator hose from the spout on the radiator. If you have trouble removing it, try wiggling the hose while pulling on it. Some old coolant will splash out so be prepared to move out of the way and aim the hose down towards the catch container. |
||
|
|
||
 Allow Old Coolant To Drain |
 ~ 3.5 Quarts Old Coolant |
 Point Radiator Hose Down |
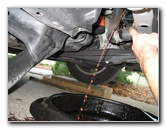
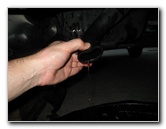
| Let the old engine
coolant drain out of the radiator and out of the engine block from the open
end of the lower radiator hose.
I found that I could allow the open end of the hose to rest in the raised position and then turn it down towards the catch container every 5-10 seconds to remove another splash of old coolant from the engine block. |
||
 |
 |
 Still Draining From Hose |
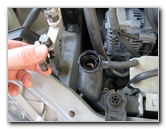
| When you're
satisfied that enough old coolant has been removed, push the lower radiator
hose back on to the spout on the radiator until it is flush against the
radiator.
Then reattach the spring hose clamp. I chose to replace the spring hose clamp with a traditional steel metal hose clamp with hex head bolt since it seemed much easier to work with than the spring hose clamp. |
||
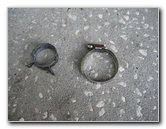 Spring Clamp - Regular Clamp |
 Steel Hose Clamp Installed |
 Funnel In Radiator Fill Hole |
| Double check that
the lower radiator hose is attached securely to the radiator by pulling on
it firmly to see if it moves.
If it does move, you may want to add an additional hose clamp or replace the old spring clamp with a new one. |
||
 Pour In New Coolant |
 Pink Zerex Asian 50/50 |
 Turn On Car - Blast Heat |
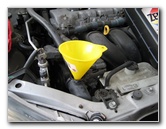
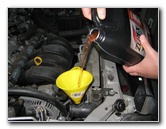
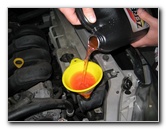
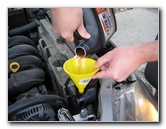
| Move to the engine
bay and place the automotive funnel into the radiator's fill hole. Slowly pour in the new Toyota SLLC or the Zerex Asian vehicle coolant into the funnel. When the coolant reaches the very top of the radiator fill hole, stop pouring and take out the funnel. |
||
 Engine Running - Cap Off |
 Bring To Operating Temperature |
 Less Than 1 Quart Left |
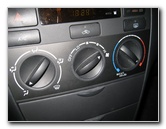
| Start the Corolla's engine, move the HVAC system's temperature knob to the maximum heat setting and turn the blower motor setting knob to "HI". | ||
 Coolant Level Dropping |
 Engine Almost Warmed Up |
 Top Off With More Coolant |
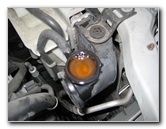
| Watch the coolant
level in the radiator fill hole as the engine heats up.
When you see the level begin to drop down out of sight, use the funnel to add a little bit more new coolant into the radiator. You may need to add more coolant two or three times as the engine reaches operating temperature. Then turn off the engine, remove the funnel, and replace the radiator cap. If the rubber seals on the radiator cap look worn or damaged, replace the cap with a new one. You can purchase a new radiator cap at any auto parts store for about $10. |
||
 Coolant Filled To Top |
 Fill Overflow With Coolant |
 Replace Radiator & Overflow Caps |
| The Toyota Corolla
has an "open" cooling system that can vent trapped air bubbles to the
outside.
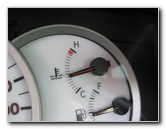
So it's important that you remember to fill up the radiator overflow bottle with coolant to the "Full" line when the engine is hot. If the system vents out some air, it will suck in fluid from the overflow tank and you may notice the level drop. A tiny amount of coolant will also evaporate out of the overflow tank each month so you should check it at least once a year and top it off with new coolant. Replace the coolant overflow cap, close the hood, and take the car for a short test drive to make sure that the cooling system is working properly. The temperature gauge's needle on this 2005 Corolla tends to always stay exactly in the middle of the range between "H" and "C". If you spilled any coolant while draining the radiator or re-filling it, rinse it away with a garden hose or a bucket filled with water. Automotive coolant/antifreeze is toxic to animals and they are attracted to its sweet taste. Keep an eye on your Corolla's temperature gauge for the next few days and do not continue driving if you see the needle start to quickly rise towards the "H". You can also double check the coolant level in the radiator and/or coolant overflow tank a few days later but only when the engine is cold. For more, check out my other Corolla DIY tutorials at the links below - |
||
| For more of my
automotive how-to guides and product reviews, click on the following links:
Toyota Corolla Engine Oil Change,
Toyota Corolla Front Brake Pads Replacement Guide,
Toyota Corolla Cabin Air Filter Replacement Guide,
Toyota Corolla Headlight Bulbs Replacement Guide,
Toyota Corolla Tail Light
Bulbs Replacement Guide,
Toyota Corolla Dome Light Bulb Replacement Guide,
Toyota Corolla Overhead
Map Light Bulbs Replacement Guide,
Toyota Corolla Fog Light Bulbs Replacement Guide,
Toyota Corolla Key Fob Remote Battery Replacement Guide,
Meguiar's Headlight Buffing & Restoration
Kit Review,
K&N Air Filter Cleaning Guide,
WeatherTech FloorLiner Interior Mats Review,
Tail Light & Headlight Condensation Repair Guide,
Garmin Nuvi 260W GPS Review,
Buffing Old Faded Headlights, and
Interior Carpet Replacement Guide. |
||
| If you found this guide to be helpful,
please consider making a small donation by clicking on the PayPal.com
"Donate" button located to the right of this paragraph. Thank you!
(Note: I am not a registered charity. Donations are not tax deductible.) |