
GM Pontiac G6
Headlight Bulbs Replacement Guide
A pictures illustrated guide for
replacing the headlights, turn signal, and sidemarker light bulbs in a GM
Pontiac G6 GT.

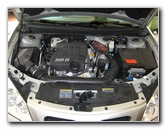 GM G6 - 3500 3.5L V6 |
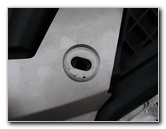
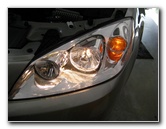
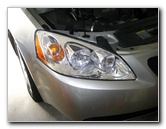 Pontiac G6 GT Headlight |
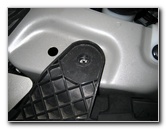
 1 of 2 Headlight Bolts |
| This
automotive "how-to" guide was specifically written to assist owners of
the 1st generation (2005, 2006, 2007, 2008, 2009 and 2010) Pontiac G6 GT in replacing the high beam headlight, low beam
headlight, turn signal (parking), and side marker light bulbs. Owners of other Pontiac G6 vehicles from 2005 to 2010 in base V6, SE, GT, and GTP trim levels featuring the 2.4L, 3.5L, 3.6L and 3.9L engines should also find this guide to be useful. The Pontiac G6 headlight assembly contains four bulbs and their replacement part numbers from Sylvania and other manufacturers are as follows: Low Beam Headlight # H11, High Beam Headlight # H9, Front Turn Signal # 3057 and Front Sidemarker # 194. To replace one or more of these light bulbs requires a 7mm socket or wrench and a small flat head screwdriver. |
||
|
|
||
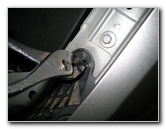 7mm Socket / Wrench |
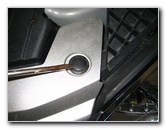
 Two 7mm Screws Removed |
 7mm Headlight Screw Out |
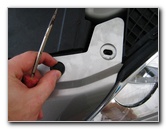
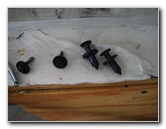
| All I had handy was
a pair of pliers which were able to remove the two 7mm headlight screws with
minimal damage.
A 7mm socket and ratcheting wrench would have made the job a lot easier. |
||
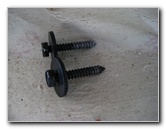
 Pop Up Plastic Rivet |
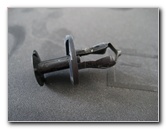 Plastic Pop Rivet Removed |
 Fascia Rivet Removed |
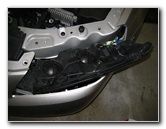
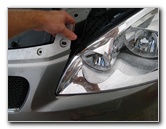
| Even with the two
7mm headlight screws removed, the headlight assembly will not just slide
out.
It is necessary that you remove at least two of the black plastic pop rivets located adjacent to the headlight towards the center of the car. |
||
 2nd Pop Rivet Removed |
 Pull Up Front Fascia Corner |
 Pull Out Headlight Assembly |
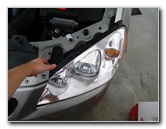
| The black plastic
pop rivets are easily removed by using a small flat head screwdriver to lift
up the center piece (see picture # 007).
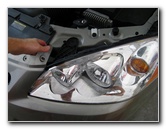
Then you can lift the entire pop rivet from the top of the fascia. The headlight assembly is held in place by a ball joint located at the rear center of the housing and also by the bumper fascia. It's best to get another person to help you remove the headlight, although it is possible to do it by yourself. Start by pulling back the plastic fascia a few inches and then pulling straight forward on the headlight assembly until the ball joint pops out.
Try to avoid scratching the painted area on the lip of the bumper by pulling slightly upward when dislocating the headlight assembly. |
||
 Headlight Resting On Bumper |
 Turn Signal & Sidemarker |
 Turn Signal Socket |
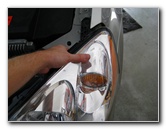
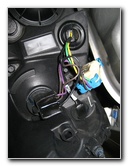
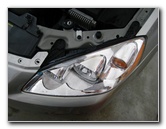
| Once you have the
headlight housing freed from the rest of the car, rest it on top of the
bumper's lip.
Place a towel underneath first to help protect your paint. From the left to the right the bulbs are in the following order: High Beam, Low Beam, Turn Signal (Parking) and Sidemarker Light Bulb. |
||
 Signal/Parking # 3057 Bulb |
 Pull Bulb Straight Out |
 Sidemarker Bulb Socket |
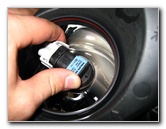
| To remove the front
turn signal (parking) or side marker light bulbs, just grasp the bulb's
socket and turn it a 1/4 turn counter clockwise.
Then pull the power connector, socket and light bulb straight out from the headlight housing. The bulb itself can be removed by pulling it straight out from the socket. If you have any trouble, try wiggling while pulling on the bulb. A replacement front turn signal bulb is Sylvania part # 3057 and the side marker light bulb is Sylvania part # 194. |
||
 Front Sidemarker # 194 |
 Sylvania # 194 Bulb |
 High Beam & Low Beam |
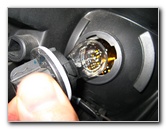
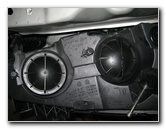
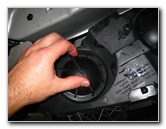
| The low beam head
light and high beam headlight bulbs are located under round black plastic
covers.
To remove the covers, twist them a 1/4 turn counter clockwise and pull it straight off the assembly. |
||
 Low Beam Cover |
 1/4 Turn Counter Clockwise |
 Philips H11 LL Low Beam |
 1/4 Turn Counter Clockwise |
 Remove Low Beam Bulb |
 Pull Old H11 Bulb Out |
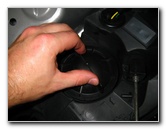
| Underneath one round black plastic cover you'll find the Phillips H11 low beam headlight bulb and the Phillips H11 high beam headlight bulb under the other one. | ||
 Two Plastic Retaining Clips |
 Pop Clips With Screwdriver |
 H11 Low Beam Removed |
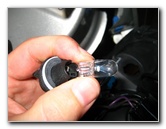
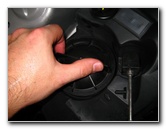
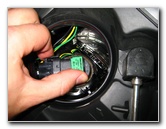
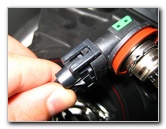
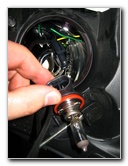
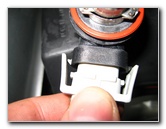
| To remove either the high beam or low beam headlight bulb/socket/connector from the headlight housing, turn the base a 1/4 turn counter clockwise and pull it straight out from the assembly. | ||
 High Beam Light Bulb Cover |
 H9 High Beam Headlight |
 Turn 1/4 Counter Clockwise |
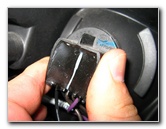
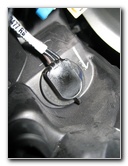
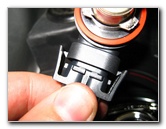
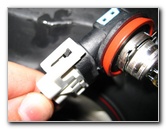
| Both the high beam
and low beam headlight bulbs are held in place by two plastic retaining
clips on either side of the power connector.
You can either pop them up with your fingers or by using a small flathead screwdriver. |
||
 Pull Out H9 Bulb & Connector |
 |
 Plastic Retaining Clips |
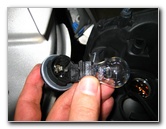
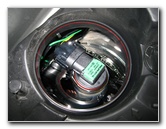
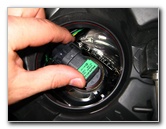
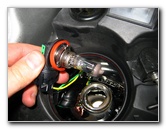
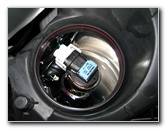
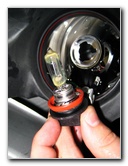
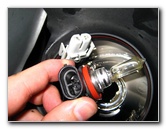
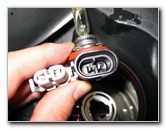
| The H9 high beam or
H11 low beam headlight bulb is permanently attached to the black plastic
base, so don't try to remove the actual glass bulb.
The replacement H9 and H11 bulbs include the base and plug right into the power connector. |
||
 Pop Up Clip With Screwdriver |
 Phillips H9 High Beam Bulb |
 Bulb & Power Connector |
 Pull Back Front Bumper Fascia |
 Insert Corner of Headlight |
 Push Headlight Into Ball Joint |
| Once you have
replaced the faulty high beam, low beam headlight, parking/signal or
sidemarker bulb(s), re-install the headlight assembly.
To do this, pull back on the top of the bumper's fascia and gently place the headlight housing back into its cavity. When you are satisfied with the headlight assembly's placement, push on it until you hear the ball joint and connector snap back into place. This may require several attempts and some repositioning. To finish the job, turn on the headlights and hazard signals to verify that the new bulbs are working. |
||
 Double Check Placement |
 2 7mm Screws & 2 Pop Rivets |
 Check New Bulbs |
| For more of my
automotive maintenance guides or product reviews, click on the following
links:
Pontiac G6
Engine Air Filter Replacement Guide,
Pontiac G6 Tail Light
Bulbs Replacement Guide,
GM Front Brake Pads Replacement Guide,
GM Rear Brake Pads Replacement Guide,
GM Brake Line Fluid Bleeding Guide,
Zaino Bros Show Car Polish Review,
WeatherTech FloorLiner Car Mats Review,
Headlight & Tail Light Condensation Solution Guide,
Sunforce Solar Battery Maintainer Review,
GM Serpentine/Accessory Belt Replacement Guide,
GM Idler & Tensioner Pulleys Replacement Guide,
Corroded Car Battery Terminal Replacement Guide,
GM Alternator Replacement Guide,
GM 3800 II PCV Valve Replacement Guide,
GM Power Window Motor & Regulator Replacement Guide,
GM Wheel Bearing Hub Replacement Guide, and the
K&N Air Filter Cleaning Guide. |
||
| If you found this guide to be helpful,
please consider making a small donation by clicking on the PayPal.com
"Donate" button located to the right of this paragraph. Thank you!
(Note: I am not a registered charity. Donations are not tax deductible.) |