
Mazda Mazda6
I4 2.3L Engine Oil Change Guide
A pictures illustrated instruction guide
for changing the motor oil in a Mazda 6 with the 2.3 Liter four cylinder engine.

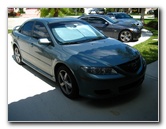 2004 Mazda 6 |
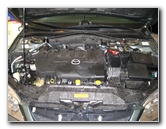 MZR 2.3 Liter 4 Cylinder |
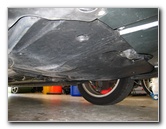 Plastic Underbody Panel |
| This
automotive how-to guide was specifically written to assist owners of
the 2004 Mazda Mazda6 equipped with the MZR 2.3L I4 L3 DOHC engine in
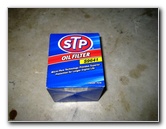
changing the motor oil and oil filter element. Owners of other first generation Mazda 6 or "Atenza" vehicles from 2002, 2003, 2004, 2005, 2006, 2007 & 2008 should also find this guide to be useful. The procedure may be similar in additional Mazda vehicles such as the MX-5 Miata, Mazda5, Mazda2, Mazda3, RX-8, Tribute, CX-7 and CX-9. To change the engine oil in a 2002-2008 Mazda 6 requires a 10mm socket, a 15mm socket, a 3/8" drive ratchet, a 76mm oil filter wrench with 14 flutes, an oil catch container, a new oil filter element, a 6mm Allen wrench or 6mm hex head socket, and about 4.25 quarts of SAE 5W-20 motor oil. A few compatible replacement filters with their part numbers are as follows: Mann-Filter ML1019, Wix 57203, Fram CH9641, Purolator PL15505, Proline PPL15505, Motorcraft FL2017B, K&N PS-7013 and Mazda L321-14-302A-9U. |
||
|
|
||
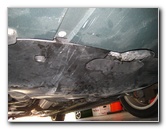
 Removing 10mm Bolts |
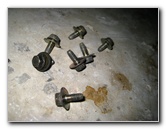 7 10mm Panel Bolts |
 Underbody Panel Removed |
|
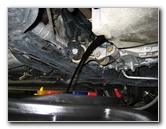
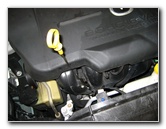
First I raised up the Mazda 6 with a 2.5 ton floor jack and secured the vehicle off the ground with two jack stands for extra safety. To access the oil filter cartridge housing and the oil drain bolt, you have to remove a large black plastic underbody panel. The panel is held in place by seven (7) ten millimeter (10mm) bolts. A few of the underbody panel bolts require a socket extension piece to reach. |
||
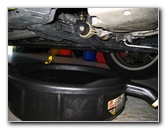
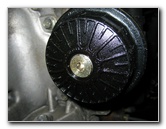
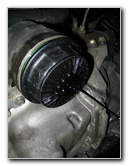
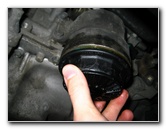
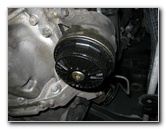 Oil Filter Cartridge Housing |
 15mm Oil Drain Bolt |
 Bottom of Oil Pan |
|
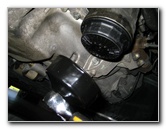
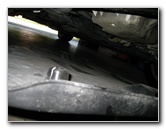
Now that the underbody cover is out of the way, you'll be able to see the black plastic cover on the oil filter housing and the 15mm oil drain bolt on the rear end of the oil pan. |
||
 Oil Catch Container In Place |
 Remove 15mm Drain Bolt |
 Old Oil Draining Out |
|
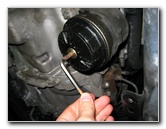
The next step is to place the used oil catch container in place and remove the 15 mm oil drain bolt located at the rear of the oil pan facing the back end of the car. The oil will spray out a few inches, so be prepared to adjust the oil catch container if necessary. Allow the old oil to drain out for at least a few minutes, 15 to 30 minutes would be even better. |
||
 New ProLine 5W-20 Oil |
 STP Oil Filter S9641 |
 Oil Filter Housing Cover |
|
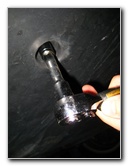
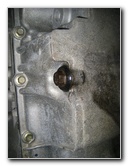
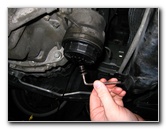
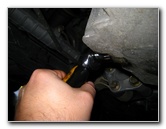
While the old oil is draining out from the main oil drain bolt, remove the Allen key oil drain bolt located in the center of the oil filter housing cover. You can use a 6mm hex head socket or a 6mm Allen Key wrench. |
||
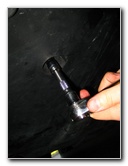
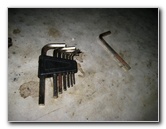 Allen Key Wrench Set |
 Removing Oil Filter Drain Bolt |
 Draining Oil Filter Housing |
|
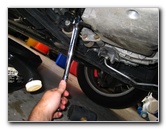
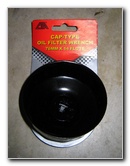
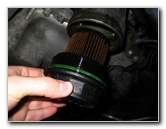
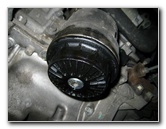
After a minute or two of letting the oil drain from the oil filter housing drain bolt, remove the oil filter housing cover by using the 76mm "14 Flute" cap type oil filter wrench attached to a regular ratcheting wrench handle. The 76mm socket only cost a few dollars at a local auto parts store, so I'd recommend purchasing one rather than struggling with out it. A few compatible oil filter wrenches with their part numbers are as follows: Lisle 61570, Steelman 95985, Tool Connection 3117 and KTI KTI-73615. |
||
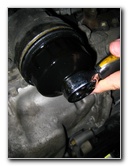
 76mm Oil Filter Wrench |
 76mm Tool On Ratcheting Wrench |
 Removing Oil Filter Cover |
| Once the oil filter housing cover is loosened, twist it the rest of the way off by hand with the oil catch container underneath because some more oil will leak out. | ||
|
|
||
 Oil Draining Out |
 Oil Filter Cover Removed |
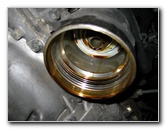 Oil Filter Receptacle |
|
Remove the old paper oil filter element by pulling it straight off from the black plastic cage attached to the oil filter housing cover. I recommend buying the Mann-Filter ML1019 oil filter since it has excellent reviews on Amazon. Replace the old filter element with the new one by sliding it into place over the round plastic cage. |
||
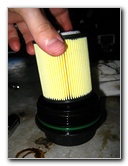
 Oil Filter Element Holder |
 New Paper Oil Filter Element |
 New Rubber O-Rings |
| The new
STP oil filter element also came with a small rubber o-ring for the Allen
key drain bolt and a large o-ring for the oil filter housing cover.
Both original o-rings looked great, so I just saved the new ones for the future. But you may want to remove the old ones, lubricate the new gaskets with some fresh oil and install them on to the filter housing. |
||
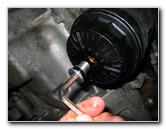
 Inserting New Oil Filter |
 Screwing On Filter Housing Cap |
 Tightening With 76mm Tool |
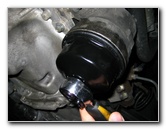
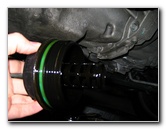
| Once the
new oil filter element is securely in place, raise the oil filter housing
cover into the oil filter receptacle and screw it into place by hand.
Then tighten it with the 76mm oil filter wrench. If you have a torque wrench, use the torque setting printed on the oil filter housing cover. If you don't have a torque wrench, just tighten the cover about a 1/4 to 1/2 turn clockwise past hand tight. Don't over tighten the cover or you may crack the plastic and cause an oil leak. |
||
 Re-Installing Filter Drain Bolt |
 Allen Key Drain Bolt Secured |
 Re-Installing Oil Drain Bolt |
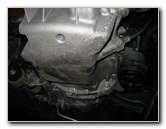
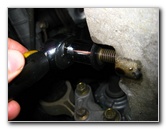
| Next
replace the Allen key oil filter housing drain bolt and tighten it 1/4 to
1/2 turn past hand tight.
Then replace the 15mm oil drain bolt and again tighten it about 1/4 turn past hand tight. Note - The service manual's torque specification for tightening the 15mm drain bolt is 23 to 30 lb-ft (or 30 to 41 N*m). Don't over tighten the oil drain bolt or you may crack the oil pan. |
||
 Tightening 15mm Drain Bolt |
 Underbody Panel |
 Re-Installing 10mm Bolts |
| Double
check the 15mm oil drain bolt, 76mm oil filter housing cover, and the Allen
key bolt in the center of the oil filter cover before re-attaching the
underbody panel.
To re-attach the underbody panel, use a 10mm socket with an extension piece. Be sure to insert the two plastic tabs near the rear of the car into the underside of the car before tightening any of the 7 10mm bolts. |
||
 7 10mm Bolts - Underbody Panel |
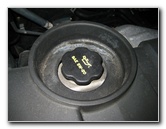 SAE 5W-20 Oil Filler Cap |
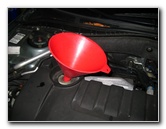 Funnel In Oil Filler Hole |
|
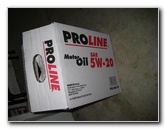
With all of the steps under the car completed, lower the car off the floor jack and jack stands. Note - The owner's manual oil capacity specification for the 2.3L I4 engine is 4.5 U.S. quarts (or 4.3L) of new SAE 5W-20 oil for an oil change with an oil filter replacement. This 2004 Mazda 6 with the 2.3 liter inline 4 cylinder engine required about 4.5 quarts of SAE 5W-20 oil. Check your owner's manual or consult with a professional mechanic if you have any doubts about how much oil your engine requires before proceeding. Using an automotive funnel, pour in 3.5 to 4 quarts of new 5W-20 oil and check the dipstick. Keep adding oil until the oil level on the dipstick reaches the "Max" or "Maximum" level at the upper of two holes in the dip stick. I used just over 4 and 1/4 quarts of oil to reach that mark. Then run the engine for a few minutes, turn it off, let the oil settle for 5 to 15 minutes and check the oil level on the dipstick again. I'd also recommend checking the oil level again after your first trip and watching for oil drips on your driveway. |
||
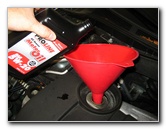 Pouring In New 5W-20 Oil |
 ~ 4.25 Quarts @ $2.99/Each |
 Check Oil Dipstick |
|
For more of my automotive
maintenance guides or product reviews, click on the following links:
Mazda Mazda6 Cabin Air Filter Replacement Guide,
WeatherTech FloorLiner Car Mats Review,
Zaino Bros Show Car Polish Review,
Headlight & Tail Light Condensation Solution Guide,
Sunforce Solar Battery Maintainer Review,
Corroded Car Battery Terminal Replacement Guide,
Garmin Nuvi 260W Portable GPS Review,
Automotive Interior Carpet Replacement Guide,
Falken Ziex ZE-512 Tire Review,
Buffing Old Faded Headlights,
K&N Air Filter Cleaning Guide,
Fuzion ZRi Tire Review, and the
iPAQ HX4700 PDA & Garmin GPS system. |
||
| If you found this guide to be helpful,
please consider making a small donation by clicking on the PayPal.com
"Donate" button located to the right of this paragraph. Thank you!
(Note: I am not a registered charity. Donations are not tax deductible.) |