
Marantec
Garage Door Opener Receiver Replacement Guide
How to replace the receiver or install an
external 315MHz receiver for a Marantec or Broten garage door opener.

By Paul B. Michaels Author & Photographer Auto Mechanic Since 1989 |
||
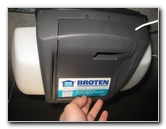
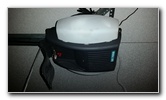 Marantec MR-4700 |
 Open Cover - Program Remote |
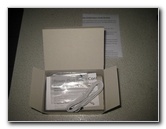 External Receiver Unit |
| If the
remote controls or "clickers" for your Marantec or Broten garage
door opener have suddenly stopped working, you probably need to
replace the receiver antenna. Our Broten model number BR7000 garage door opener is a re-branded Marantec MR4700. The old 315MHz receiver antenna was part number ML-831, which was out of stock or backordered at every garage door opener supply store or website that I could find. The easiest solution to get our old garage door opener working again was to purchase the Marantec 75424 external 315MHz receiver unit. (It is also known as part # 73870.) The external receiver kit includes one M3-2312 315MHz remote control and the programming jumper. |
||
|
|
||
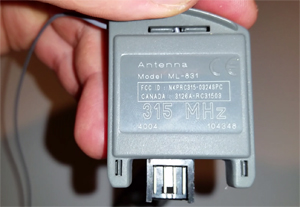 Marantec ML-831 Antenna |
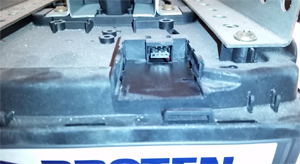 Receiver Antenna Slot On Opener |
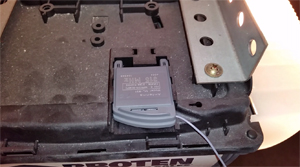 ML-831 In Slot On Top of Opener |
| If you would like
to try re-programming your M3-2312
remote controls before you purchase a new receiver antenna or an external
receiver, follow these steps. It's always a good idea to do some basic
troubleshooting steps before spending money. 1. Open the control panel access door on the bottom of your garage door opener. 2. Press and hold the "P" button for at least a few seconds to enter programming mode. You should see the buttons arranged in a circle on the left light up with one or more of them flashing. 3. Press the "P" button again several times until just the # 7 remote control programming button is flashing. 4. Press and hold the button on the remote control (clicker) until the # 7 button flashes rapidly. If the # 7 button does not flash rapidly, your ML-831 receiver antenna unit is not receiving a signal from the remote control and has most likely burnt out. To replace the receiver antenna, look on the top of the garage door opener. Locate the small receiver with a grey antenna wire sticking out of the back. Slide the old receiver straight out of its slot. Push the new receiver in to the slot. If you were unable to purchase a new OEM (original equipment manufacturer) receiver for your garage door opener, your best option would be to purchase the Marantec 75424 universal external receiver which will work with any two wire garage door opener including old 40MHz frequency openers. The external receiver will work with any Marantec garage door operators that use 315MHz remote controls which may include the following model numbers: M4900e, M4500e, M4500, Q7900, M50, M55, Q7700, Q7500, EX-2005, EX-2007, RV 8000, AZ4500, AZ4700, Synergy 270, 370 and 380. Once you receive the external receiver, continue below for the installation instructions. |
||
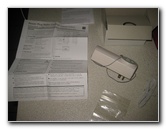 Marantec 75424 Receiver |
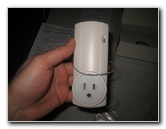 Program Button - Top Right |
 Power Prongs & Ground |
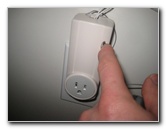
| I recommend
programming your first remote control to the new external receiver inside
your home with the instructions in front of you. Plug the external receiver in to a wall outlet. Press and release the small oblong shaped grey programming button on the front of the external receiver. Press and hold the button on the remote control. The LED program light on the external receiver should light up for a few seconds and then turn off. Release the button on the remote control. Please remember that this is your # 1 remote control that will need to be used for programming any other M3-2312 remote controls later on. |
||
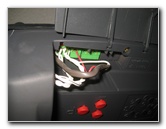
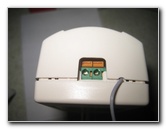 Two Wire Slots |
 Push Tab To Open Slot |
 Press Programming Button |
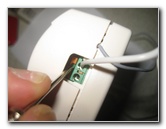
| Use a small
screwdriver to gently push down the tan / orange colored plastic tab near
the terminals on the bottom of the external receiver. Hold down the tan / orange plastic tab to keep the terminal socket open and push in one of the wires. Repeat the process for the other wire. Double check that both of the wires are securely attached to the external receiver terminals. |
||
|
|
||
 Press Remote Button |
 Receiver In Ceiling Outlet |
 Opener Wire Terminals |
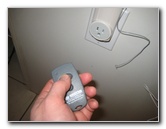
| An optional step is
to push the external receiver back in to a wall outlet and then push the
button on the remote control to test that it was programmed correctly. If the remote control was successfully programmed to the external receiver, you should hear a distinct "Tick - Tock" sound come from the receiver. |
||
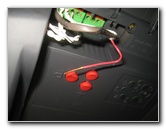 Terminals # 3 & # 4 |
 Strip Receiver Wires |
 Wrap Wires |
| Move to the garage
and position a step ladder below the garage door opener. I recommend having an assistant with you to keep the ladder steady and make sure you don't lose your balance while installing the external receiver. The directions from Marantec ask you to push the two external receiver wires in to the # 3 and # 4 terminals on the garage door opener which are also for the wall mounted garage door opener control unit. I found that the two wires for the wall mount garage door opener pad were so thick that I couldn't push the external receiver wires in to the same socket with them. So instead, I pushed on the orange tab to release the # 3 wire, wrapped the external receiver wire around the bottom of the exposed wiring and then re-inserted it in to the socket. You may need a wire stripper tool to remove some of the insulation from the end of the external receiver wire. The plain white wire for the external receiver should be attached to the # 3 terminal wire. The wire with grey dashes on it should be wrapped around the # 4 terminal wire. |
||
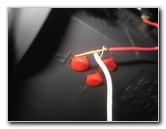
 Push Release - Insert Wire |
 Repeat - Other Wire |
 Wires In Wall Switch Terminals |
| I recommend only
removing one terminal wire at a time to prevent from mixing up the wires.
Make sure that the external receiver wire is coiled tightly around the wall pad opener unit wire several times. Push in the orange terminal release button with a small screwdriver to open the socket. Push the wall mount opener control unit wire firmly back in to the correct socket. |
||
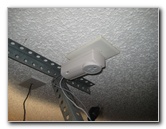
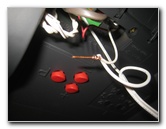
 Close Control Panel Cover |
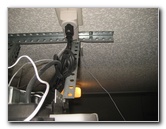 External Receiver Installed |
 Programming Jumper |
| Route the external
receiver unit wire out of the edge of the control panel access cover. Gently close the control panel access cover. If any of the wires are near the garage door opener track, move them safely out of the way. To test the new external receiver, push the button on the #1 remote control that you had programmed earlier. You should hear the external receiver make a "Tick - Tock" sound and the garage door will begin to open or close. To program any additional M3-2312 remotes, you will need the programming jumper. You could also try making your own with three small paper clips taped together. (Compatible remotes include the M3-3313, M3-2314, Digital 382 and Digital 384.) Attach the # 1 remote that was already programmed to another M3-2312 remote with the programming jumper. The three pins can go in to the three holes on the sides of each remote on either side. It doesn't matter which side you choose. Just remember which is the # 1 remote and which is the # 2, # 3 or # 4, etc remote control. To complete the additional remote control programming process, follow these steps. Press and hold the button on the # 1 remote control. Press and hold the button on the other remote control until its LED light flashes or flickers rapidly. Release the buttons on both remote controls. The # 2 remote control should now be programmed. For more, check out my other
Home Repair & Maintenance Guides. |
||
| If you found this guide to be helpful,
please consider making a small donation by clicking on the PayPal.com
"Donate" button located to the right of this paragraph. Thank you!
(Note: I am not a registered charity. Donations are not tax deductible.) |