
Broken Plastic Toilet Flange
Replacement Guide
How to chisel out an old broken toilet
closet flange and install a new one to fix a leaky or wobbly toilet with
pictures.

By Paul B. Michaels Author & Photographer Auto Mechanic Since 1989 |
||
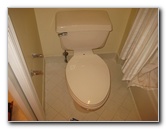 1995 Toilet - Cracked Flange |
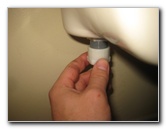
 Pry Off Plastic Bolt Caps |
 Plastic Cap Removed |
| If your
toilet has been wobbling or rocking excessively and there is water
leaking out at the bottom, you probably need to replace a faulty
plastic closet flange. The toilet closet flange is the plastic fitting that attaches the toilet to the waste water sewer drain pipe. If you are replacing the closet flange, you will probably also need to view my Toilet Wax Seal Replacement Guide. There are a variety of toilet closet flanges available at hardware stores such as The Home Depot, Lowes and Ace Hardware that range in price from just a few dollars to over $20. I chose a standard Sioux Chief Model # 886-PPK which was only a few dollars and looked exactly the same as the 20 year old flange that I was replacing. The tools needed to complete this procedure include a flathead screwdriver, an adjustable wrench or pliers, a small wrench set or socket set with a ratcheting wrench, a hack saw (optional), a hammer, PVC pipe cement and a rubber mallet. |
||
|
|
||
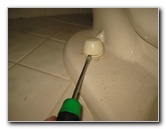
 Hard Water Mineral Deposit |
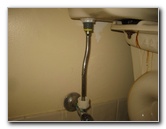
 Loosen Compression Nut |
 Disconnect Water Supply |
| Gently pry off the
plastic caps that cover the closet bolt ends holding the toilet bowl in
place to the floor. Disconnect the water supply line from the bottom of the toilet tank by turning the compression nut at the top of the hose in the counterclockwise direction. |
||
 Water Line Disconnected |
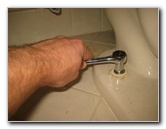 Loosen Toilet Nuts |
 Saw Off Corroded Bolt End |
| Loosen the two
toilet nuts in the counterclockwise direction with a wrench or a socket and
a ratcheting wrench. This toilet had 11mm nuts. Your toilet may have slightly larger or smaller nuts. If the old bolt is corroded and you can't remove the nut with a wrench, you may need to cut through it with a hack saw. |
||
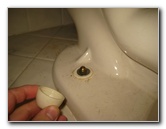
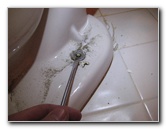 Pry Off Old Metal Washer |
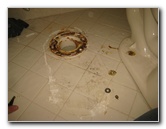 Old Cracked Closet Flange |
 Broken On Left Side |
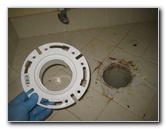
| Pry off the old
metal washers from the end of the closet bolts. Carefully lift the toilet off the floor and set it aside in a safe place. The closet flange on this waste water drain pipe was broken on the left side which caused the wax seal to break and led to a water leak. |
||
|
|
||
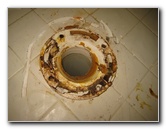
 Chip Out With Screwdriver |
 Old Flange Chiseled Out |
 New Plastic Flange |
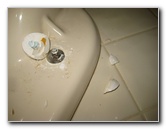
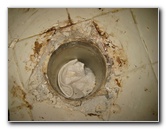
| Very carefully chip
out the old plastic closet flange that is glued to the 4" waste water sewer
pipe by using the flathead screwdriver as a chisel.
Try to avoid hitting the chisel with the hammer too hard to prevent from damaging the 4" drain pipe. Clean up the inside of the drain pipe with a towel and then sand it smooth with some sandpaper. |
||
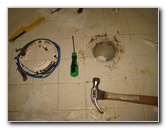
 Oatey PVC Cement |
 Apply Glue To New Flange |
 Tap Level With Mallet |
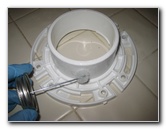
| Try to match the
orientation of the closet bolt slots on the new
Sioux Chief flange with how they were
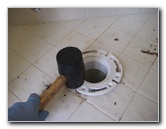
positioned on your old flange. Have your rubber mallet ready because you won't have much time to position the flange before the glue sets. Apply some PVC cement liberally to the outer edge of the closet flange and also some to the inside of the drain pipe. Quickly push the flange in to the drain pipe and tap it down flush with the floor by hitting it with the rubber mallet. If you need to replace your old wax seal, take a look at my Sani Seal Polyurethane Toilet Flange Gasket Install Guide. For more,
check out my other
Home Repair &
Maintenance DIY Guides. |
||
| If you found this guide to be helpful,
please consider making a small donation by clicking on the PayPal.com
"Donate" button located to the right of this paragraph. Thank you!
(Note: I am not a registered charity. Donations are not tax deductible.) |