
Chevrolet
Cruze Serpentine Accessory Belt Replacement Guide
How to change the serpentine accessory
belt on a 2nd generation 2016 to 2019 GM Chevy Cruze with the 1.4L I4.

By Paul B. Michaels Author & Photographer Auto Mechanic Since 1989 |
||
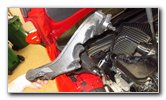
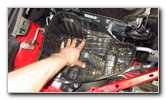
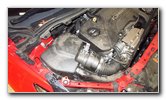
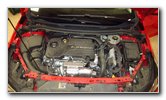 2018 Ecotec Turbo 1.4L |
 Passenger Side Engine Bay |
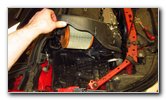
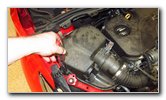
 Loosen Air Box Screws |
| This automotive
maintenance tutorial was specifically written to assist owners of the second
generation 2016, 2017, 2018 and 2019 GM Chevrolet Cruze in changing the
serpentine accessory belt on the Ecotec LE2 1.4 liter turbocharged inline
four cylinder gasoline engine. (The procedure should be the same or very
similar for the LH7 1.6L L4 diesel engine.) Owners of other General Motors vehicles from Chevrolet, Buick, GMC, Cadillac and Holden such as the Sonic, Spark, Malibu, Impala, Volt, Bolt, Camaro, Corvette, Trax, Equinox, Blazer, Suburban, Tahoe, Traverse, Colorado, Silverado, Express, TrailBlazer, Encore, Regal TourX, Envision, Enclave, LaCrosse, Cascada, Sierra, Canyon, Acadia, Terrain, Yukon, Savana, XT4, XT5, XT6, Escalade, CT5, CTS-V, XTS, CT6, ATS, Astra and Commodore may also find these DIY instructions to be helpful. The OEM (original equipment manufacturer) belt on this 2018 Cruze LT was marked as part number GM 12638808 (also known as ACDelco 12638808). Another compatible replacement serpentine accessory belt for the GM 1.4L turbo I4 is part number Gates K050660. The compatible replacement belt may vary depending on your car's model year, trim level and whether or not it is equipped with A/C (air conditioning). Please verify the correct replacement part number for your Cruze by using the Amazon Part Finder website. The tools needed to access and replace the belt include a Phillips head screwdriver, a 3/8" drive breaker bar or a 3/8" drive ratchet. In order to easily access the belt on the left (passenger) side of the engine bay, you'll first need to remove the engine air filter housing. |
||
|
|
||
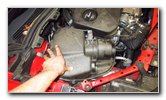
 Turn Counterclockwise |
 Right Rear Corner Screw |
 Air Intake Tube |
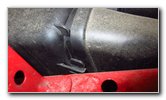
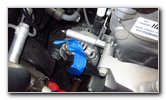
| Loosen the three
screws on the top half of the air box by turning them in the
counterclockwise direction with a Phillips head screwdriver. The screws are "captured" and will remain attached to the top half of the air box housing. Locate the two tabs on the rear edge of the black plastic air intake tube where it is attached to the engine air filter box. |
||
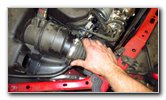
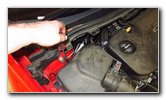
 Two Release Tabs |
 Squeeze Together Tabs |
 Lift Out Air Intake Tube |
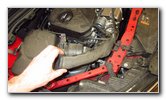
| Squeeze or "pinch"
together the two tabs on the air intake tube to release the retaining clips. Lift the rear of the air intake tube off the engine air filter box. Pull the front edge of the air intake tube out of the front of the engine bay. Set the air intake tube aside in a safe place. |
||
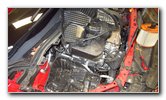
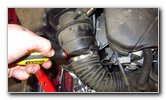
 4th Screw Exposed |
 Loosen Fourth Screw |
 Lift Top of Air Box |
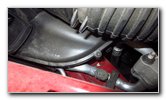
| Once the air intake
tube has been removed, you'll be able to see the fourth screw that secures
the top half of the air box in place. Loosen the fourth screw by turning it in the counterclockwise direction with the Phillips head screwdriver. Lift the top half of the air box to detach it from the bottom half and access the engine air filter. If you'd like to change the filter, take a look at my 2016-2019 Chevrolet Cruze Engine Air Filter Replacement Guide. |
||
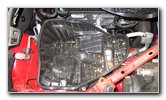
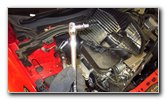
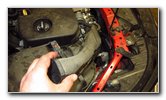
 Loosen Hose Clamp |
 Pull Off Rubber Hose |
 Top Air Box Removed |
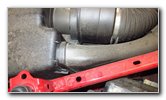
| Loosen the
stainless steel silver metal hose clamp that secures the rubber air intake
hose for the turbocharger to the engine air filter box.
Turn the hose clamp screw in the counterclockwise direction with a flat head screwdriver. Pull the rubber hose off the top half of the air box housing. Set the top half of the air box housing aside in a safe place. |
||
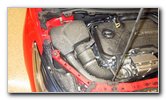
 Lower Half of Air Box |
 Pull Up To Remove |
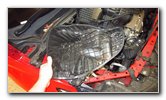 Lower Half Removed |
| The bottom half of
the air box is secured in the engine bay by plastic pegs attached to rubber
friction fasteners. Gently pull up on the lower half of the air box to detach the pegs on the underside of the air box from the rubber grommets in the engine bay. |
||
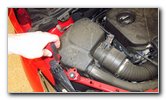
 Plastic Pegs |
 Rubber Friction Fasteners |
 Old Serpentine Belt |
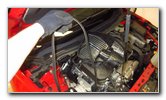
| Set the lower half
of the air box assembly aside in a safe place. Take a moment to study how the old belt is routed around the various pulleys including the alternator, crankshaft, A/C compressor, tensioner pulley and coolant (water) pump pulley. I've also included a belt routing diagram further down on this page. |
||
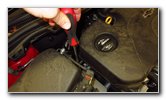
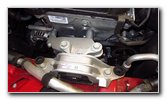
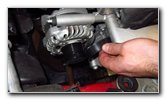
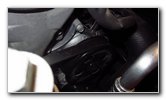
 Alternator & Pulley |
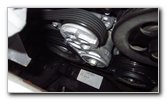 Tensioner Assembly |
 Tensioner Pulley |
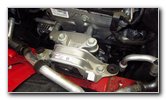
| The tensioner arm and pulley are situated near the center of the engine. | ||
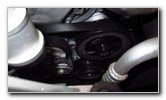
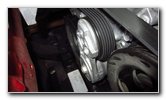
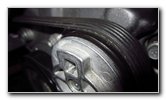
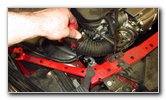
 3/8" Drive Ratchet |
 Attach Ratchet - Tensioner |
 Lift Up - Towards Back |
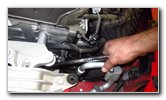
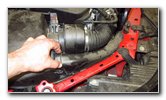
| I chose to use a
3/8" drive adapter attached to a long 1/2" drive breaker bar. Insert the 3/8" drive into the square opening on the outer edge of the tensioner arm. I found it easiest to have the handle of the breaker bar pointing towards the front of the car and near the radiator by the passenger side headlight housing. Carefully lift the breaker bar or ratchet handle up and rotate it back towards the rear of the vehicle. Hold the tensioner arm in the released position with one hand. Use your other hand to carefully slip the old belt off the pulleys. Do NOT place your fingers or hand in between the belt and any of the pulleys! If the old belt seemed very loose or the tensioner arm was very easy to roate back into the released position, it may need to be replaced with a new assembly. The OEM GM drive belt tensioner part number is as follows: ACDelco 12638689. |
||
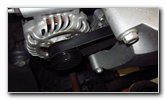
 Slip Old Belt Off Pulleys |
 Lift Belt Out of Engine Bay |
 Old Belt Removed |
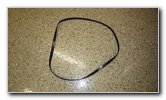
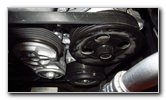
| Continue slipping
the old belt off the alternator, crankshaft, air conditioner compressor,
water pump and tensioner pulleys. Lift the old belt out of the engine bay. Inspect the old drive belt for any cracks, rips, fraying, exposed metal cables or chunks of missing rubber. If the old belt is in relatively good condition, consider keeping it in your trunk or garage as an emergency back up part just in case the new belt fails prematurely. Check the pulley on the tensioner assembly. If the pulley doesn't spin easily, wobbles or makes a grinding or squeaking sound, the bearing might be worn out and the pulley should be replaced. A compatible replacement tensioner pulley part number is as follows: Dayco 89052. |
||
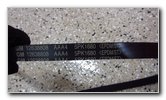 GM 12638808 5PK1680 |
 Lower In New Belt |
 Wrap Belt On Alternator |
| I recommend buying
the original General Motors OEM belt which is part number
GM 12638808 ( It is also known as the ACDelco 12638808. A good guideline to remember is that the ribbed side of the belt should be routed around the ribbed pulleys and the smooth side should be situated against the smooth pulleys. Lower the new belt down into the left (passenger) side of the engine bay. |
||
|
|
||
 Tape - Hold Belt In Place |
 Route Belt Over Tensioner |
 Rotate Tensioner Assembly |
| First, wrap the
ribbed side of the new belt around the alternator pulley located at the rear
of the engine bay. I used some blue painter's tape to loosely attach the new belt to the alternator pulley so that it wouldn't fall off as I was attempting to route the rest of the new belt. Continue routing the new belt around the other pulleys and hold the last loop near the tensioner pulley. |
||
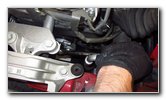
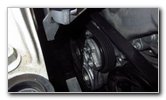
 Slip Belt Over Last Pulley |
 Check New Belt Routing |
 Water / Coolant Pump |
|
Insert the 3/8" drive peg into the square socket on the tensioner assembly. Rotate the ratchet up and towards the rear of the car to move the tensioner arm back into the released position. Carefully slip the last loop of the new belt over the tensioner pulley. Avoid placing your fingers in between the new belt and any of the pulleys. I've included a serpentine belt routing diagram for the Ecotec LE2 1.4L Turbocharged I4 engine below.
|
||
 Belt On Tensioner Pulley |
 Serpentine Belt Installed |
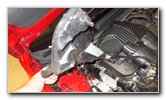 Lower Half Air Box |
| If you used tape to
temporarily secure the belt to the alternator, remove the tape. Double check that the new belt has been routed properly. Make sure that the belt is fully seated on all of the ribbed pulleys and not hanging off the edge off the smooth idler pulley. Lower the bottom half of the air box down into the engine bay. Line up the plastic pegs with their corresponding rubber grommets. |
||
 Push Down To Secure |
 Replace Top Half Box |
 Slide On Rubber Hose |
| Firmly push down on
the bottom half of the air box to secure the friction fasteners in place. Lower the top half of the air box down into place. Slide the rubber turbocharger air intake hose back on to the front of the air box. |
||
 Rubber Hose On Air Box |
 Tighten Hose Clamp |
 Tighten Air Box Screws |
| Tighten the screw
on the hose clamp by turning it in the clockwise direction with a flat head
screwdriver. Make sure the hose clamp is snug. Tighten the four screws on the air box cover by turning them in the clockwise direction with a Phillips head screwdriver until they are snug. |
||
 Left Side Screw |
 Rear Edge Screw |
 Right Edge Screw |
| Try to avoid over tightening the screws to prevent from cracking the engine air filter housing. | ||
 Line Up Air Intake Tube |
 Push Down - Secure Clips |
 Serpentine Belt Replaced |
| Re-insert the front
edge of the plastic air intake tube into the opening in the front of the
engine bay near the radiator and the passenger side headlight housing. Lower the rear edge of the air intake tube down into the bracket on the air box. Push on the rear edge to secure the two retaining clips. You should feel or hear the retaining clips "click" securely into place. Start the engine and listen closely for any strange sounds that might indicate a problem such as a mis-routed belt or a worn out pulley bearing. If you hear any strange noises, immediately turn off the engine and check the belt routing again. Be sure to write down the belt change in your car's service records. For more,
please check out all of my
2016-2019 GM Chevrolet Cruze DIY Repair & Maintenance Guides. |
||

| If you found this guide to be helpful,
please consider making a small donation by clicking on the PayPal.com
"Donate" button located to the right of this paragraph. Thank you!
(Note: I am not a registered charity. Donations are not tax deductible.) |