
How To Remove
& Stop Tail Light Or Headlight Condensation
A pictures illustrated guide to removing
water condensation from a car's headlights or tail lights and preventing it.

| This "how to" step
by step instruction guide was specifically written to assist owners of the
6th generation (1997, 1998, 1999, 2000, 2001, 2002 & 2003) GM Pontiac Grand Prix GTP in removing condensation or rain water from
the vehicle's headlights or tail lights and keeping the moisture from
entering the light assembly again.
Owners of other General Motors vehicles or any other American or foreign vehicle may also find this guide to be useful. I am not a professional mechanic. I take no responsibility for damages or injuries. Proceed with caution. |
||
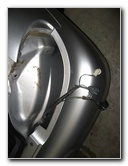
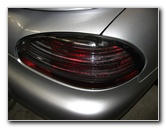 GM Grand Prix Tail Light |
 Water Condensation |
 Humidity Droplets In Light |
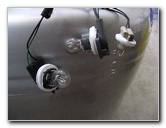
| I recently
noticed some water droplets clinging to the inside wall of the tail
lights on my 2001 Pontiac Grand Prix GTP sedan. The moisture must have entered the tail light assembly due to the rubber seals around the light bulb housings becoming old and brittle. The high humidity and heavy rains in South Florida don't help the situation either. I had this same problem with water condensation inside my car's headlights a few years ago. To correct the problem, I had to completely remove the headlights from the car and dry them out indoors with a hair dryer. To prevent the humidity or rain water from entering again, I wrapped the outer ring of the headlight bulb sockets with some Teflon Tape (a.k.a. Plumber's Tape). I repeated this procedure with my tail lights as detailed below. |
||
|
|
||
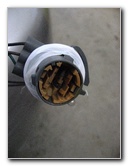
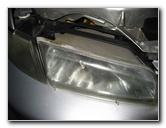 GM Headlight Housing |
 Headlight Bulb Socket |
 Socket Wrapped In Teflon Tape |
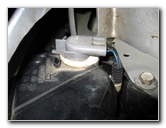
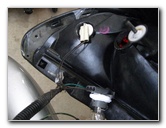
| Before heading back
to start working on my tail light affected with condensation, I checked the
Teflon tape seal on my headlight bulb sockets.
The headlights were still free of any water droplets or mist since I wrapped them a few years ago to re-create the seal. I didn't remove them to check the condition of the OEM original rubber gasket for fear of damaging the Teflon tape's barrier to our area's high humidity and torrential rain storms. |
||
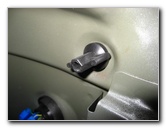
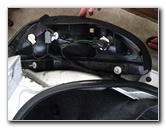
 Inside Grand Prix Trunk |
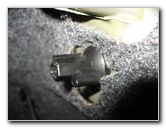 Upper Tail Light Thumb Screw |
 Upper Thumb Screw Removed |
| If you need to
remove your headlights, most GM cars require a
10mm wrench to loosen the two
bolts holding the headlight assembly to the vehicle.
To take out the three headlight bulb sockets (low beam, high beam, & signal), just hold the small tab and turn the grey socket housing a 1/2 turn counter clockwise and lift it straight up. |
||
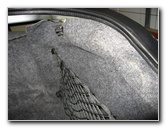
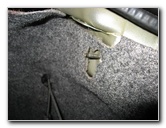
 Trunk Carpet Peeled Back |
 Lower Tail Light Thumb Screw |
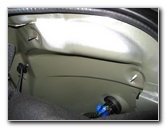 Both Tail Light Screws Removed |
| After inspecting my
headlights, I moved back to the rear of the car.
To remove the tail light in a 2001 Pontiac Grand Prix or any General Motors car, you'll need to open the trunk and locate the large black plastic thumb screws. In my car, the top tail light thumb screw was visible at the top rear corner of the trunk. I removed this screw by rotating it counter clockwise with my fingers. To access and remove the second of two tail light thumb screws, I peeled back the trunk's carpeting. |
||
|
|
||
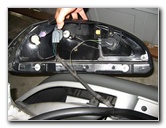 Tail Light Off Car |
 Tail Light Cavity |
 Bulb Sockets In Assembly |
| Now that both of
the tail light thumb screws were removed, I jiggled out the tail light
assembly away from the rear of the car.
The three bulb sockets (parking, brake, reverse) on the rear of the tail light housing can be removed in the same manner as the headlight bulbs by holding down the plastic arm and rotating them counter clockwise. |
||
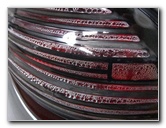
 Unscrew Bulb Sockets |
 3 Bulb Sockets Hanging |
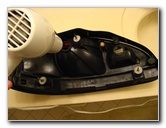 Hair Dryer, Drying Tail Light |
| Once all the bulb
sockets were removed from the tail light housing, I took the housing inside
to the low humidity environment to dry it out.
To help speed up the water removal from the tail light, I used a hairdryer set on high heat and blew hot air into the socket holes. Be sure to periodically move the hair dryer to different sections of the housing or take short breaks so that you don't melt the plastic. I didn't have time to wait overnight for the tail light assembly to dry, but that would have been a much easier and safer method for completely removing all the water. |
||
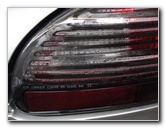
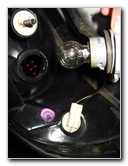
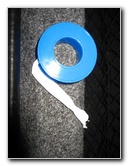 Teflon (Plumber's) Tape |
 Bulb Socket Wrapped In Tape |
 Teflon Tape On Tail Light Sockets |
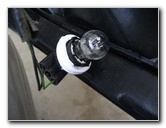
| I left the heated
up tail light assembly in the bathroom to let it dry out some more while I
went back to the garage.
To create a new airtight and water tight seal around the tail light bulb sockets, I wrapped the outer ring of the socket with the Teflon tape. For the best seal, it's important to wrap a turn or two of plumber's tape on the inside surface of the socket where the old rubber gasket rests. It's better to have too much Teflon tape on the bulb socket than not enough. Putting on too much Teflon tape may require either more force to twist the socket into the housing or you'll have to remove some of it little by little. If the socket turns into the tail light housing too easily, you probably don't have a good enough seal and should add more tape. |
||
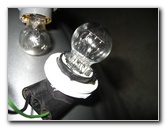
 Re-Inserting Bulbs |
 Socket Sealed With Tape |
 Dust Off - Blow Out Sockets |
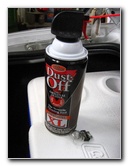
| While I was
wrapping the Teflon tape around the tail light bulb sockets, I noticed that
there was some water inside the sockets themselves.
To remove that moisture, I thoroughly blew them out with a can of "Dust Off" compressed air. Then I inserted the tail light bulb sockets back into the dried out housing with firm pressure and twisted clockwise a half turn to the locked and closed position. To finish up the job, I put the assembly back on to the car and secured the two thumb screws. If you've done a good job of applying the Teflon tape, there should be a tight enough seal to prevent rain water, humidity or condensation from getting inside your automobile's headlights or tail lights. Update - This initial repair attempt did not work completely. The tail light eventually gathered some more moisture inside of it over the course of a few weeks. I believe that my second attempt has permanently fixed the main cause of the issue. I removed the tail light, and dried it out over night. I made a note of where water was leaking out from between the clear plastic lens and the black body of the tail light when it was drying out in the bathroom. The next day, I used several tubes of crazy glue to re-seal the lens to the tail light assembly. For extra reassurance, I sealed the open areas of the bulb sockets with high temperature silicon sealant to keep water from entering that area and rusting out the contacts. |
||
 Dried Out Bulb Seat |
 3 Bulbs Screwed Back In |
 Dry & Sealed Tail Light |
| For more of my
automotive instructions, check out the following links:
Buffing Faded Headlights Guide,
K&N Air Filter Cleaning Guide,
Car Interior Carpet Replacement Guide,
GM Wheel Bearing Hub Assembly Replacement Guide,
GM 3800 II PCV Valve Replacement Guide,
GM Power Window Motor & Regulator Replacement Guide,
WeatherTech FloorLiner Review,
GM Power Steering Whine Fix,
GM Grand Prix Front Brake Pads Replacement Guide,
GM Brake Line Fluid Bleeding Guide,
GM 3800 Series II L67 Engine Oil Change Guide, and
Pontiac Grand Prix Alternator Replacement Guide.
For more, check out all of my Pontiac
Grand Prix DIY Repair & Maintenance Guides. |
||
| If you found this guide to be helpful,
please consider making a small donation by clicking on the PayPal.com
"Donate" button located to the right of this paragraph. Thank you!
(Note: I am not a registered charity. Donations are not tax deductible.) |