
Volvo XC60 T5
2.0L Engine Oil Change Guide
How to change the motor oil and replace
the filter on the 2.0L turbo I4 engine in a 2015, 2016 or 2017 Volvo XC60 T5.

By Paul B. Michaels Author & Photographer Auto Mechanic Since 1989 |
||
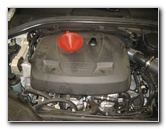
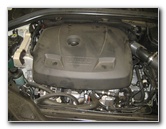 2017 XC60 T5 Turbo 2.0L |
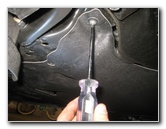 Remove Skid Plate |
 Loosen Counterclockwise |
| This
automotive maintenance tutorial was specifically written to assist
owners of the first generation (2010, 2011, 2012, 2013, 2014, 2015,
2016 and 2017) Volvo XC60 T5 SUV in changing the motor oil and
replacing the oil filter on the 2.0 liter turbocharged inline four
cylinder B4204T11 engine. Owners of other Volvo vehicles with the 3.0L L6, 3.2L L6 and 2.5L L5 engines such as the XC90, XC70, S90, S80, S60, S40, C30, C70, V90, V70, V60 and V40 may also find these DIY instructions to be helpful. The tools and other items needed to complete this procedure include a Torx T30 star bit screwdriver, a 17mm socket with a 3/8" drive ratchet, an 86mm oil filter wrench with 16 flutes, an automotive funnel and 6.2 U.S. quarts (5.9 liters) of new synthetic SAE 5W-30 motor oil. The compatible replacement OEM oil filter for the 2.0L Turbo I4 engine with its part number is Volvo 31372212. |
||
|
|
||
Please verify the correct replacement oil filter part number for your Volvo XC60 by consulting with your dealership or by using the Amazon Part Finder website. A few compatible replacement oil filters for the 2.5L L5 engine include the following: K&N PS-7010, Volvo 8692305, Mann-Filter HU 719/8 X, Mobil 1 M1C-451, Bosch 72256WS, Fram CH9954, Wix 57186 and ACDelco PF2257GF. Some compatible replacement oil filters for the 3.0L L6 or 3.2L L6 engine with their part numbers are as follows: Mann-Filter HU 925/4 Y, K&N PS-7016, Fram XG10415, Volvo 30750013, Wix 57806, Bosch 72252WS and Hastings LF627. |
||
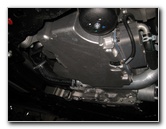
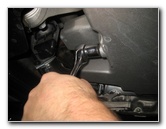
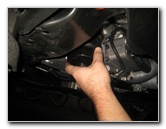
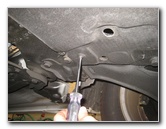 Remove Rear Driver Screw |
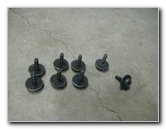 8 Screws Removed |
 Metal Friction Fastener |
| The first two steps
are to warm up the engine for a few minutes and park the SUV on a level
surface. Warming up the engine will help suspend any contaminants within the old oil and also allow it to drain out more quickly. Engage the emergency / parking brake and place wheel chocks on both sides of the rear tires to prevent the vehicle from moving. Slide under the engine bay with the Torx T-30 star bit screwdriver. Remove the eight screws that secure the skid plate (A.K.A. splash guard or under engine cover) in place to the bottom of the engine bay by turning them counterclockwise. Set the eight screws aside in a safe place. The skid plate is also held in place by a metal friction fastener clip on the driver side. Set the under engine cover aside in a safe place. |
||
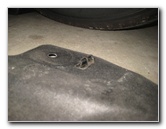
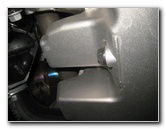
 |
 Slot For Metal Clip |
 Bottom of Engine Exposed |
| Locate the silver metal oil pan. | ||
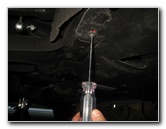
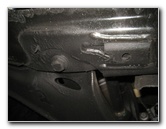
 Oil Drain Bolt |
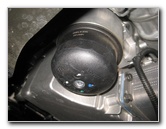 Oil Filter Cap |
 Loosen Counterclockwise |
| The oil drain bolt
is located at the rear edge of the oil pan with the bolt head facing towards
the back of the SUV. The round black plastic oil filter cap is located just in front of the oil pan. Slide the used oil catch basin to just below the oil drain bolt. Loosen the oil drain bolt by turning it counterclockwise with the 17mm socket and a 3/8" drive ratchet. |
||
|
|
||
 Drain Out Old Oil |
 Replace Drain Bolt |
 86mm Oil Filter Cup |
| Be careful when you
remove the oil drain bolt. The old oil might still be hot enough to burn your fingers. Spin out the oil drain bolt by hand. Allow the old oil to drain out for at least a few minutes or until the flow slows to just an occasional drip. If the oil drain bolt is equipped with a washer or "gasket", inspect it and replace it if necessary. The replacement oil drain plug gasket part number is Volvo 977751. Wipe away any debris from the oil drain port with a clean rag or paper towel. Make sure that the old washer is not still attached to the engine. Spin in the oil drain bolt by hand a few turns in the clockwise direction to prevent from having it become cross threaded. Tighten the oil drain bolt with the 17mm socket and a 3/8" drive ratchet to just past hand tight or about 28 lb-ft (~38Nm) with a torque wrench. Double check that the oil drain bolt is tight before moving on to the next steps. |
||
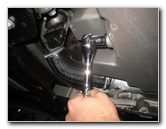
 Loosen Counterclockwise |
 Replace Filter & Cap |
 Insert Automotive Funnel |
| Slide the used oil
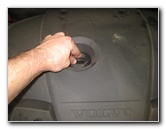
catch container to below the oil filter housing. (An optional step is to remove the small silver drain bolt on the bottom of the oil filter cap. Use a 6mm Allen key or 6mm hex wrench to remove the drain plug.) Use the 86mm (16 flutes) oil filter wrench and a 3/8" drive ratchet to loosen the oil filter cap in the counterclockwise direction. The next few steps are not pictured since it was such a messy process. Spin off the oil filter cap, pull out the old oil filter and discard it. Allow the old oil to drain out for at least a few minutes. Remove the old rubber o-ring gasket from the oil filter cap. Lubricate the new rubber o-ring gasket with some fresh 5W-30 oil and slide it on to the bottom of the threads on the filter cap. Push the new oil filter cartridge in to the filter cap until it clicks securely in to place. Spin on the oil filter cap in the clockwise direction to about 1/4 to 1/3 turn past hand tight. Double check that the filter cap is tight before moving on to the next steps. Move to the engine bay and twist off the oil filler cap, located in the center of the rubber engine cover, by turning it counterclockwise. Set the oil filler cap aside in a safe place. Insert the automotive funnel in to the oil filler hole. |
||
 Pour In New Oil |
 Replace Oil Filler Cap |
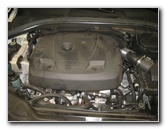 Oil Change Complete |
| The B4204T11 2.0
liter turbocharged inline four cylinder engine's total oil capacity
specification for an oil change with a filter replacement is 6.2 U.S.
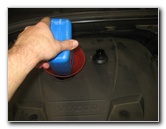
quarts (5.9L). Slowly pour in the new synthetic SAE 5W-30 oil in to the funnel. Please note, you may not need to pour in the entire 6.2 U.S. quarts to reach the "Max" (maximum or "full") line on the oil level display on the driver information center LCD screen. Replace the oil filler cap by twisting it on in the clockwise direction. |
||
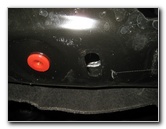
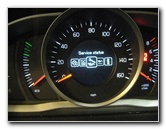
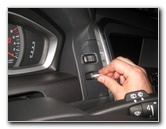 Turn On Ignition |
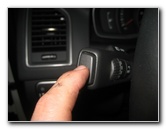 Enter System Menu |
 Driver Information Center |
| This 2017 Volvo
XC60 is not equipped with a traditional dipstick to check the oil level. It
has an electronic oil level sensor. To check the oil level, follow these steps: 1. Place the smart key fob in to its slot on the dashboard. 2. Press and hold the "Start/Stop button to place the ignition in "Key Position II (2)" (A.K.A. "Run" mode) but do not start the engine. Release the "Start/Stop" button once you see the warning / indicator lights illuminate. 3. Navigate through the driver information system ("combined instrument panel") with the thumbwheel on the left stalk until you reach the "Oil Level" option. 4. Press the "OK" button at the end of the left stalk to view the oil level display screen. The owner's manual indicates that the oil level system may not be fully accurate after the oil has been drained or filled until the car has been driven about 30km (18.64 miles) or the car has been stationary for two hours. |
||
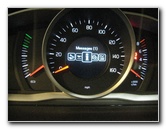
 Rotate Switch |
 |
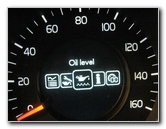 Oil Level Indicator |
| Be sure to record
the oil change in your SUV's service records.
I also recommend that you regularly check your parking spot, garage or driveway for drops of fresh oil which may indicate a leak from the drain bolt or the filter cap. For more,
check out all of my
2010-2017
Volvo XC60 DIY Repair & Maintenance Guides. |
||
| If you found this guide to be helpful,
please consider making a small donation by clicking on the PayPal.com
"Donate" button located to the right of this paragraph. Thank you!
(Note: I am not a registered charity. Donations are not tax deductible.) |