
Toyota
Corolla Rear Drum Brake Shoes Replacement Guide
How to replace the rear drum brake shoes
and springs on a 2003-2008 Toyota Corolla with picture illustrated instructions.

By Paul B. Michaels Author & Photographer Auto Mechanic Since 1989 |
||
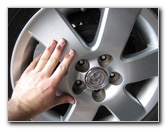
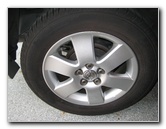 Corolla Rear Wheel |
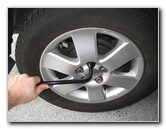 Loosen Five Lug Nuts |
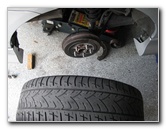
 Raise Rear of Vehicle |
| This
automotive "how-to" guide was specifically written to assist owners
of the ninth generation (2003, 2004, 2005, 2006, 2007 & 2008) Toyota Corolla in replacing
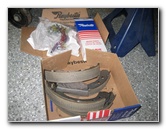
the rear drum brake shoes and springs. Owners of other Toyota, Lexus, Scion or related Pontiac vehicles with rear drum brakes such as the Camry, Sienna, Tercel, Tacoma, Hilux, X-Runner, RAV4, Solara, 4Runner, Land Cruiser, Yaris, Matrix, Prius, Celica, Tundra, Paseo, Echo, Pickup and Vibe may also find these DIY instructions to be helpful. The tools needed to complete this rear brake job include a floor jack, jack stands, a lug nut wrench or tire iron, pliers, needle nose pliers or brake spring pliers, brake caliper grease, brake cleaner spray, and a flathead screwdriver. You'll need a new set of rear brake shoes and I'd also recommend buying a drum brake "spring kit" or "hardware kit" such as the Wagner H17254 so that you can replace the worn out old springs. |
||
|
|
||
A few of the compatible aftermarket brake shoes for the 2003-2008 Toyota Corolla include the following with their respective part numbers: Dura International BS753, Raybestos 801PG, Monroe BX801, Beck Arnley 081-3167 or 081-3146, Centric 111.07530, Wagner ThermoQuiet PAB801, Wearever NB801 or NB832, Toyota 04495-02050 and Bendix R753. Please note that some of these brake shoes are specific to Corolla models built in Japan which have VIN numbers that start with a "J". Most of them are for USA/Canada built Corollas which have VIN numbers that start with a "1". Please use the Amazon Part Finder website to verify the correct replacement part numbers. Two other compatible "brake hardware" spring kits include the Raybestos H17378 and Beck Arnley 084-1560. |
||
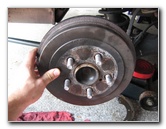
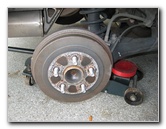 Rear Drum Brakes |
 Raybestos 801PG Shoes |
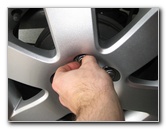
 Tap Brake Drum |
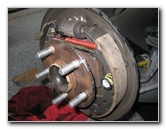
| The first steps are
to chock the front wheels to prevent the vehicle from moving, slightly
loosen the five lug nuts on each rear wheel with a tire iron, raise the rear
of the car with a floor jack and securely support it with
jack stands. Then spin off the lug nuts, remove the rear wheels and mark the relationship of the rear brake drum to the wheel hub (center circle) with a Sharpie marker. This is done so that you can re-install the drum in the same position without changing the dynamic balance of the assembly. |
||
 Spray Drum With WD-40 |
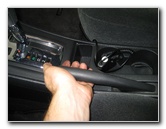
 Spare Tire Screw |
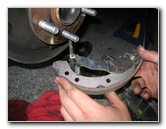
 Insert 12mm Bolt In Hole |
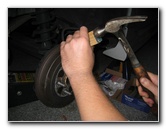
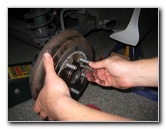
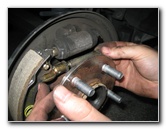
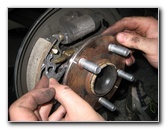
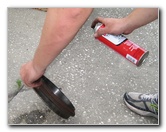
| The next step is to
remove the drum from the rear wheel hub.
You may be able to just pull off the drum, but chances are it won't be that easy due to corrosion and rust. First try tapping the brake drum with a rubber mallet or a hammer and a piece of wood to break it free from the hub. Spraying the area where the hub meets the drum with WD-40 can also help. If that doesn't work, remove the 12mm spare tire hold-down screw from the trunk and insert it into one of the two holes on the front of the brake drum. Slowly turn the screw in clockwise until you hear the drum begin to make popping noises. Please note, we used a regular 12mm hex head bolt with a socket and ratcheting wrench. If you use the spare tire hold down screw, turn it by hand as far as possible and then use a pair of locking pliers or regular pliers to continue turning it clockwise. |
||
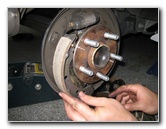
 Use 12mm Bolt - Push Off Drum |
 Remove Brake Drum |
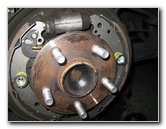
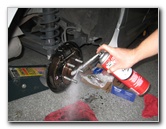 Brake Cleaner Spray |
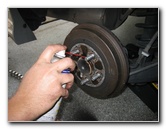
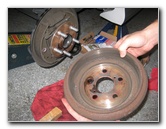
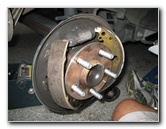
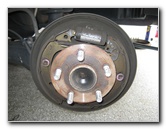
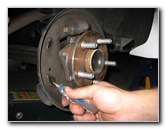
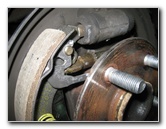
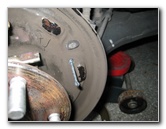
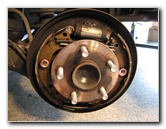
| Once the brake drum
is free, pull it off the hub and set it aside in a safe place.
Thoroughly clean off the rear brake assembly with some brake cleaner spray and allow it to dry for a few minutes. Place some shop rags or a pan below the assembly to catch the fluids. Do not use compressed air to clean off the brakes to help avoid inhaling the brake dust. |
||
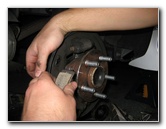
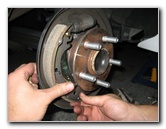
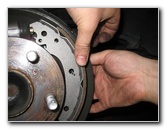
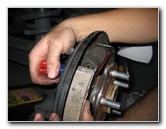
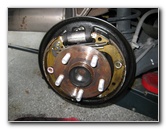 Ready To Replace Shoes |
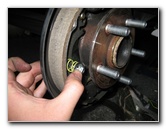
 Remove Hold Down Spring |
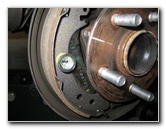
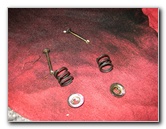 Hold Down Springs Removed |
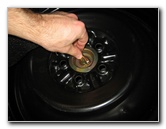
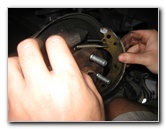
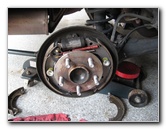
| I'd recommend
studying how the rear drum brake assembly is put together before taking
anything apart.
It's also a good idea to remove the drum on the other side of the car to have that assembly as a reference when installing the new brake shoes. Release the two hold down springs/cups with a pair of needle nose pliers. Push in on the cup to compress the spring and rotate it until the flat part of the pin can be passed through the small rectangular hole in the cup. Place the old parts down on the floor or a rag in the same position as they were installed on the assembly to help yourself with the re-assembly later. |
||
|
|
||
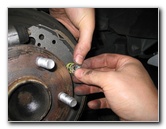
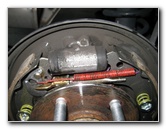
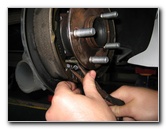 Remove Lower Spring |
 Retract Adjuster Mechanism |
 Reducing Tension On Springs |
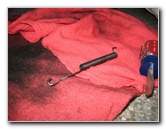
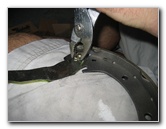
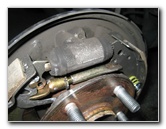
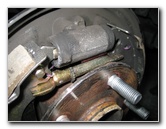
| Then unhook the
lower spring that holds the bottom parts of the two old brake shoes
together. Next remove the rubber cap from the rear of the backing plate and use a short flathead screwdriver to turn the splines on the automatic adjuster mechanism until it retracts and the tension on the two upper springs is reduced. |
||
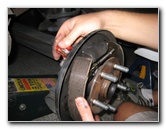
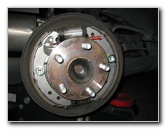
 Remove Outer Spring |
 Release Inner Spring |
 Brake Shoes Released |
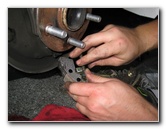
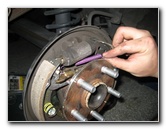
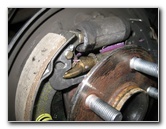
| Use the needle nose
pliers or spring pliers to release the outer top spring.
Remove the small metal automatic adjuster lever. Release the inner top spring and pull the front shoe away from the backing plate. |
||
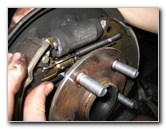
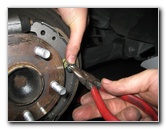
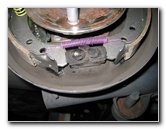
 Parking Brake Lever |
 Open "C" Clip |
 Old "C" Clip Removed |
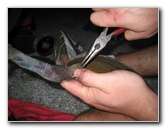
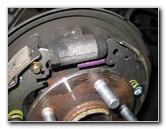
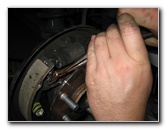
| The rear brake shoe
is held to the assembly by the parking brake lever and the parking brake
cable. Pop the parking brake cable out of the hook on the parking brake lever. Open the old "C" washer with a pair of pliers and separate the parking brake lever from the old rear brake shoe. |
||
 Other Side - For Reference |
 Crimp New "C" Washer |
 Attach Parking Brake Cable |
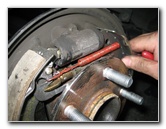
| Attach the parking
brake lever to the new rear brake shoe with a new "C" washer and crimp it
closed with the pliers. Pop the parking brake cable back into the hook at the end of the parking brake lever. |
||
 Rear Brake Shoe Assembled |
 Test Fit Rear Brake Shoe |
 Lubricate 6 Contact Points |
| Lubricate the six raised contact points on the surface of the backing plate with small dabs of brake caliper grease. | ||
 Install Rear Shoe |
 Insert Hold Down Pin |
 Hold Down Spring & Cup |
| Install the rear
brake shoe on to the backing plate so that the hole in the middle of the
shoe lines up with the hole in the backing plate. Push the hold down pin through the rear of the backing plate and through the middle of the new rear brake shoe. Place the spring and cup over the shoe until the flat tip of the pin passes through the rectangular hole in the cup. Rotate the cup 90 degrees or 1/4 turn to secure the pin in place. |
||
 Rear Shoe Installed |
 Lubricate Adjuster Assembly |
 Install Adjuster |
| Lubricate the
moving parts of the automatic adjuster assembly with some
brake caliper
grease. Test fit the automatic adjuster on to the rear brake shoe using the other side or the picture above as a reference. Please note, there may be some minor differences between 2003-2004 and 2005-2008 Corolla models. Always use the other side of your vehicle as the definitive point of reference when re-assembling the drum brakes. |
||
 Install Adjuster Lever |
 Metal Lever Installed |
 Front Shoe Hold Down Pin |
| Install the adjuster lever on to the rear brake shoe and into the outer slot on the automatic adjuster. | ||
 Install Front Brake Shoe |
 Install Hold Down Spring/Cup |
 Rotate Pin To Secure Cup/Spring |
| Install the front brake shoe and secure it with the hold down pin, spring and cup. | ||
 New Shoes Installed |
 Automatic Adjuster & Lever |
 Install New Rear Spring |
| Match up the old
springs with the new springs in the brake hardware kit before continuing to
the next steps. Install the inner top spring on the brake shoes by first hooking it into the front shoe and then pulling it to the rear shoe with a pair of needle nose pliers or spring pliers. Double check that you have installed it into the correct holes by referencing the other side of the car. If you have trouble installing the inner top spring, try temporarily removing the automatic adjuster to give yourself more working room. |
||
 Rear Upper Spring Installed |
 Install Lower Spring |
 Lower Spring Installed |
| Then move to the bottom of the brake assembly and install the lower spring. | ||
 |
 |
 Installing Upper Outer Spring |
| Move back to the
top of the brake assembly and install the top outer spring by hooking it to
the front shoe and then pulling the other side over to the adjuster lever on
the rear shoe. Double check that you have installed the two top springs and one lower spring in the correct positions by referencing the drum brake assembly on the other side of the car. |
||
 Upper Outer Spring Installed |
 Turn Adjuster Screw |
 Putting Tension On Springs |
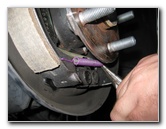
| Insert the short
flathead screwdriver through the access hole in the rear of the backing
plate and turn the teeth on the automatic adjuster mechanism.
Expand the adjuster mechanism until there is some tension on the two upper springs. |
||
 New Brake Shoes Installed |
 Upper Springs |
 Lower Spring |
| Do one last final
check to ensure that the drum brake assembly on this side of the car matches
the other side.
You will be using this side as a reference for completing the procedure correctly on the other side of the vehicle. |
||
 |
 Cleaning Brake Drum |
 Double Check Other Side |
| Once the brake
shoes and springs have been replaced on both sides of the vehicle, you can
clean off the brake drums and re-install them over the rear hub assemblies. If you'd like to replace the brake drums, check out the options available at Amazon.com. |
||
 Everything Installed Correctly |
 Replace Brake Drum |
 Pull Parking Brake Handle |
| Slide the brake
drums back over the wheel hub assemblies with the Sharpie marker lines
aligned together. Go into the passenger cabin of the vehicle and pull on the emergency / parking brake handle several times. The automatic adjuster mechanism should make the handle a bit harder to pull each time and have less travel. The automatic adjuster mechanism also adjusts the rear drum brake tension every time you drive in reverse and press down on the brake pedal. If necessary, you can manually adjust the tension of the drum brake shoes by rotating the teeth on the star gear near the center of the automatic adjuster mechanism (the gold metal piece just below the red spring in the pictures above). Rotate the star adjuster manually by using a flat head screwdriver until you see the adjuster mechanism expanding and pushing the brake shoes outwards. Then place the drum cover back on and test fit the tension by rotating the drum. You could also remove the rubber cover on the back side of the drum brake assembly (closer to the trunk) to turn the adjuster from the rear of the drum. The drum shoes should be very close to the drum with out actually touching it. There should be only a very small amount of clearance so that the drum shoes will engage firmly when you step on the brake pedal or use the emergency / parking brake. Although, keep in mind that in most cars with front disc brakes and rear drum brakes, the front brakes account for about 70% to 90% of the total braking force. |
||
 Replace Wheel |
 Spin On Five Lug Nuts |
 Tighten Lug Nuts |
| Replace the rear
wheels, spin on the lug nuts by hand to prevent them from becoming cross
threaded.
Slightly tighten them in a criss cross or "star" pattern. The service manual for the 2003-2008 Toyota Corolla specifies 76 lb-ft of torque for the wheel lug nuts. It would be best to use a torque wrench or an electric impact wrench with a torque stick to properly tighten the lug nuts. Lower the vehicle from the jack stands and remove the chocks from the front wheels. Sit in the driver seat of the vehicle and pump the brake pedal a few times to ensure that there is adequate brake line pressure. If the pedal is overly soft or "mushy", you may need to bleed the brake lines. For more, check out my other 2003-2008 Toyota Corolla Repair & Maintenance Guides.
If you have a newer model check out my
2009-2013 Toyota Corolla Repair & Maintenance Guides. |
||
| If you found this guide to be helpful,
please consider making a small donation by clicking on the PayPal.com
"Donate" button located to the right of this paragraph. Thank you!
(Note: I am not a registered charity. Donations are not tax deductible.) |