
Toyota Camry
Engine Oil Change Guide
How to replace the motor oil and
cartridge filter in a 2007 to 2011 Toyota Camry with picture illustrated
instructions.

By Paul B. Michaels Author & Photographer Auto Mechanic Since 1989 |
||
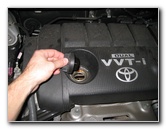
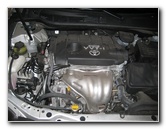 2010 Camry 2.5L I4 Engine |
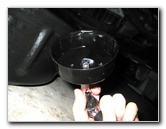
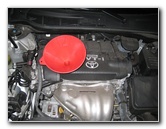
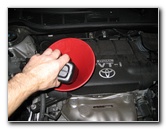
 Oil Filler Cap - 0W-20 |
 Remove Oil Filler Cap |
| This
automotive maintenance "how-to" guide was specifically written to
assist owners of the 2010 and 2011 Toyota Camry SE equipped with the
newer 2AR-FE 2.5L I4 engine in changing the motor oil and cartridge
style oil filter element. Owners of other XV40 generation Camry vehicles equipped with the 2.4 liter 2AZ-FE inline four cylinder (2007, 2008 & 2009) or 3.5L V6 engines ('07-'11) should also find this guide to be helpful. To complete this oil change procedure requires the following tools: a floor jack, jack stands, a 14mm socket with 3/8 drive ratcheting wrench, a 3/8" drive extension bar, a 64mm 14 flute cap type oil filter wrench (AST Tools # TOY 640), a used oil catch container, and an automotive funnel. The 2007-2009 Camry with the 2.4L I4 requires 4.5 quarts of new SAE 0W-20 or SAE 5W-20 oil with a filter change. The 2010-2011 Camry with the 2.5 I4 engine requires 4.7 quarts of new 0W-20 synthetic oil with a filter change. (3.5L V6 = 6.4 Quarts). A few of the cartridge style oil filter elements compatible with the 2010-2011 2.5L I4 and 2007-2011 3.5 V6 engines include the following with their respective part numbers: Toyota 04152-YZZA1, Fram XG9972, K&N PS-7020, Purolator PL25608, Purolator Classic L25608, Beck Arnley # 041-8190, Fram Extra Guard CH9972, Wix 57047, Hastings LF607 and also the Mobil 1 M1C-251. |
||
|
|
||
| I
bought the Purolator brand of cartridge oil filter which had a handy
screw-in drain tool for the filter housing included along with the
two replacement rubber o-rings. The tool is made of white plastic with a hex
head, a threaded top that screws in to the filter housing drain plug opening
and a spout at the bottom to allow the old oil to easily drain out without
creating a mess. The 2007-2009 Toyota Camry with the 2.4L I4 engine is compatible with the following canister style spin-on oil filters: Purolator PL14477, Purolator Classic L14477, Mobil1 M1-103, Fram PH4386, K&N HP-1003 and Bosch D3325. |
||
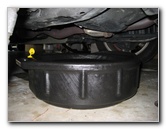
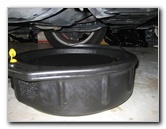
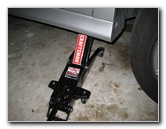
 Raise Passenger Side |
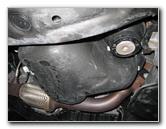 Drain Bolt, Oil Pan, Filter |
 Oil Drain Bolt |
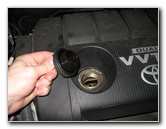
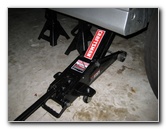
| The first step is
to warm up the engine for a few minutes and then turn it off. Bringing the engine up to operating temperature will help suspend any contaminants within the old motor oil and cause it to drain out more quickly. Next engage the parking brake and chock the rear wheels to keep the vehicle from moving. Open the hood and remove the oil filler cap by turning it counter clockwise. Removing the oil filler cap will prevent a vacuum from forming when the drain bolt is removed and allow the old oil to drain out faster. Raise the front passenger side of the vehicle with a floor jack and secure it with at least two jack stands. Automotive ramps may also be used to raise the vehicle for easy access to the underside of the engine. If you are small enough, you might be able to reach the oil drain bolt and oil filter housing without raising the vehicle. Slide in below the passenger side of the engine and locate the black metal oil pan, silver metal oil drain bolt and black plastic oil filter cartridge housing. (Or traditional spin-on canister oil filter for the 2007-2009 2.4L I4 engine.) The oil drain bolt faces towards the rear of the vehicle and the oil filter housing is on the other side of the oil pan closer to the front bumper. |
||
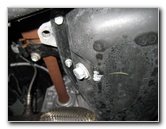
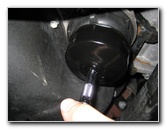
 Oil Filter Housing |
 Remove 14mm Drain Bolt |
 Used Oil Catch Container |
| Use a 14mm socket
attached to a ratcheting wrench to loosen the oil drain bolt by turning it
counter clockwise.
Move the used oil catch container below the oil pan and unscrew the drain bolt the rest of the way with your fingers.
Allow the old motor oil to drain out for at least a few minutes before replacing the oil drain bolt and tightening it to just past hand tight with the 14mm socket. (About 18 ft lbs of torque for the I4 engines and 33 ft lbs of torque for the V6 engines.) If the washer or "gasket" on the oil drain bolt looks damaged, replace it with a new one. The replacement drain bolt washer part number is Toyota 90430-12031. |
||
|
|
||
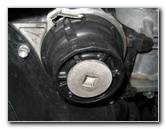
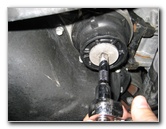
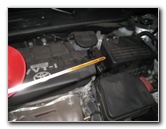
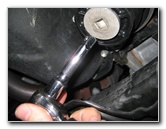 3/8" Drive Extension Bar |
 Remove Filter Drain Bolt |
 Move Catch Container |
| Attach the 3/8"
extension bar to the 3/8" drive ratcheting wrench and remove the oil filter
housing drain plug by turning it counter clockwise.
Put it aside in a safe place. Move the used oil catch container to below the filter housing. If your new cartridge filter element came with a drain tool, screw it into the drain plug opening and allow the oil to drain from the filter housing. |
||
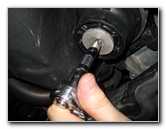
 Cap Type Oil Filter Wrench |
 Remove Housing, Replace Filter |
 Tighten Housing & Drain Bolt |
| Use a 64 mm 14
flute cap or "cup" type oil filter wrench, such as the
AST TOY 640, attached to the 3/8" drive
ratcheting wrench to spin off the filter housing by turning it counter
clockwise.
(The next few steps can be quite messy and are not pictured here in this guide.) Remove and discard the old cartridge filter element. Pull or pry off the old rubber o-rings with a pair of tweezers, needle nose pliers, or a small flathead screwdriver. The larger o-ring is located below the filter housing's threads and the smaller o-ring is at the bottom by the drain plug's threads. I recommend buying the genuine OEM Toyota 04152-YZZA1 oil filter since it has excellent reviews on Amazon. Lubricate the new rubber o-rings with fresh motor oil and install them on to the filter housing. Insert the new cartridge filter element into the filter housing. Spin the filter housing back into place on the engine and tighten it either by hand or with the 64mm oil filter wrench to about 1/2 to 3/4 turn past hand tight. Do not over tighten the filter housing which may damage it and cause leaks. Re-install the oil filter housing drain bolt and tighten it to just past hand tight or about 25 ft lbs of torque. |
||
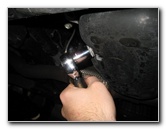
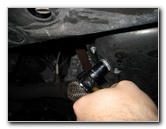 Tighten 14mm Drain Bolt |
 Lower Car From Jack Stands |
 Insert Automotive Funnel |
| Double check that
the oil drain bolt is securely tightened with the 14mm socket to just past
hand tight. (About 18 ft lbs of torque for the I4 engines and 33 ft lbs of
torque for the V6 engines.)
Remove all of your tools and the used oil catch container from below the vehicle. Carefully lower the car from off the jack stands and the floor jack. |
||
 Pour In New Motor Oil |
 Check Oil Level On Dipstick |
 Replace Oil Filler Cap |
| Insert the
automotive funnel into the oil filler hole and pour in about 4 quarts of the
4.5 quarts (2.4L I4) or 4.7 quarts (2.5L I4) total capacity of the engine
when performing an oil change with filter replacement.
(For the 3.5L V6, pour in about 6 quarts of the 6.4 quart total capacity.) It is much better to have slightly less oil than needed in the engine than to overfill it. Having too much oil in an engine can put pressure on the seals or gaskets and cause leaks or other damage. Run the engine for a minute, shut it off, and allow it to rest for a few minutes with the vehicle parked on a level surface. Pull out the engine oil dipstick (bright yellow handle) and check the oil level. Slowly add more oil and repeatedly check the dipstick until the oil level on it reaches the upper dot. You may not need to pour in the entire 4.5, 4.7 or 6.4 quarts of new SAE 0W-20 oil to reach the upper dot on the dipstick that indicates it is full depending on how long you allowed the old oil to drain out. Be sure to check the oil level on the dipstick at least a few times over the next week and watch your driveway for oil spots that may indicate a leak from the oil drain bolt or oil filter housing.Record the mileage and oil change details in your service record book. To turn off or reset the Maintenance Required light (Maint. Reqd.) on the car's instrument panel, turn the key forward to the "accessory" position (first stop). Press and hold the reset button before turning the key one stop further to the "On" position without starting the engine. The "Maint Reqd" light will flash a few times before turning off. For more,
check out my
Toyota
Camry Repair & Maintenance Guides page. |
||
| If you found this guide to be helpful,
please consider making a small donation by clicking on the PayPal.com
"Donate" button located to the right of this paragraph. Thank you!
(Note: I am not a registered charity. Donations are not tax deductible.) |