
Toyota Avalon
PCV Valve Replacement Guide
How to change the PCV valve in a 4th
generation 2013 to 2017 Toyota Avalon with the 2GR-FE 3.5L V6 engine.

By Paul B. Michaels Author & Photographer Auto Mechanic Since 1989 |
||
 2016 Avalon 3.5L V6 |
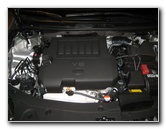
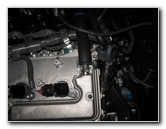
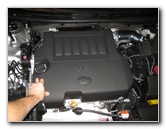
 Remove Plastic Engine Cover |
 Engine Cover Removed |
| This
automotive maintenance tutorial was specifically written to assist
owners of the fourth generation (2013, 2014, 2015, 2016, 2017 and
the refreshed 2018 model year) Toyota Avalon sedan in checking or
changing the PCV (positive crankcase ventilation) valve in the
2GR-FE 3.5 liter V6 engine. Owners of other Toyota, Lexus and Scion vehicles such as the Yaris, Corolla, Matrix, Prius, Camry, RAV4, Sienna, Tacoma, Tundra, FJ Cruiser, Venza, Highlander, 4Runner, Sequoia, Land Cruiser, IS 250, IS 200t, IS 300, NX 200t, NX 300h, RX 350, RX 450h, LS 460, LS 600h, ES 350, ES 300h Hybrid, RC F, GS 350, CT 200h, LX 570, GX 460, tC, iA, iM, xB, xD, iQ and FR-S may also find these DIY instructions to be helpful. A few compatible replacement PCV valves with their part numbers are as follows: Toyota 12204-31120, Airtex 6P1376 and Standard Motor Products V505. The tools needed to complete this procedure include a 19mm wrench or a deep well 19mm socket with a 3/8" or 1/2" drive ratchet. |
||
|
|
||
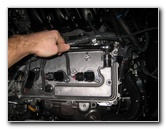
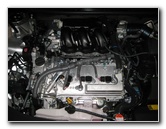 Front of 2GR-FE Motor |
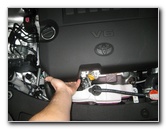
 Front Right (Driver) Side |
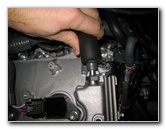 Pull Off PCV Valve Hose |
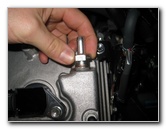
| The first two steps
are to open the hood and then gently pull off the plastic engine cover. Set the engine cover aside in a safe place. The PCV valve is located on the right (driver) side of the engine near a spark plug ignition coil. You'll see it attached to an "L" shaped piece of metal with a black rubber hose extending back towards the rear of the vehicle. Pinch the two tabs on the metal hose clamp to release the tension before sliding the rubber tube off the old PCV valve. |
||
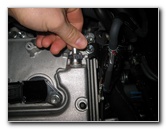
 Rubber Tube Removed |
 Silver Metal PCV Valve |
 19mm Socket & Ratchet |
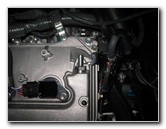
| Loosen the old PCV
valve by turning it counterclockwise with a
19mm wrench or a
deep well 19mm socket and a
ratchet. I was able to use a standard size 19mm socket pushed half way on to the ratchet drive head. |
||
 Loosen Counterclockwise |
 Spin Out Old Valve |
 Old Valve Removed |
|
|
||
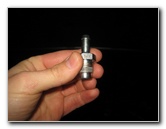
| Once the old PCV
valve is loose, spin it out the rest of the way by hand to help prevent from
having it fall down in to the engine bay. Check the old PCV valve by shaking it vigorously. If the old valve makes a healthy rattling sound, it is probably still good. Since new PCV valves are so inexpensive, I'd recommend just changing it with a new one. I prefer to buy the genuine OEM Toyota 12204-31120 PCV valve. If necessary, you can clean the old PCV valve with some carburetor or "carb" cleaner spray and then re-install it until you can purchase a new one. |
||
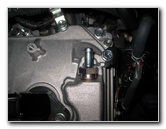
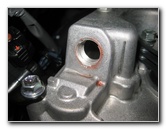 PCV Valve Receptacle |
 Spin In New Valve |
 Tighten Clockwise |
| Spin in the new PCV
valve a few turns by hand in the clockwise direction to prevent it from
becoming cross threaded. Use the 19mm wrench or a deep well 19mm socket to tighten the new PCV valve in the clockwise direction until it is snug or to about 20 lb-ft of torque. The PCV valve might not go all the way down with some of the threads still visible even though it is properly installed. |
||
 New PCV Valve Installed |
 Push On Rubber Hose |
 Push On Engine Cover |
| Firmly push the
rubber hose on to the nipple at the top of the new PCV valve.
Pinch the metal hose clamp to release the tension and slide it over the end of the hose to secure it in place. Line up the friction fasteners on the underside of the plastic cover and push it back in to place on the top of the engine. Start the engine and listen closely for any strange sounds that might indicate a problem such as a loose PCV valve or a disconnected vacuum line. For more,
check out all of my
Toyota Avalon DIY Repair & Maintenance Guides. |
||
| If you found this guide to be helpful,
please consider making a small donation by clicking on the PayPal.com
"Donate" button located to the right of this paragraph. Thank you!
(Note: I am not a registered charity. Donations are not tax deductible.) |