
Subaru
Forester Serpentine Belt Replacement Guide
How to change the serpentine accessory
belt on the FB25 2.5L boxer engine in a 2014 to 2018 Subaru Forester.

By Paul B. Michaels Author & Photographer Auto Mechanic Since 1989 |
||
 2017 Forester FB25 2.5L |
 Front of Boxer Engine |
 Loosen Counterclockwise |
| This automotive maintenance tutorial
was specifically written to assist owners of the fourth generation
(2014, 2015, 2016, 2017 and 2018) Subaru Forester SUV in changing
the serpentine accessory (A.KA. "fan" or "v-rib") belt on the FB25
2.5 liter four cylinder boxer engine. Owners of other Subaru vehicles such as the Outback, Impreza, Legacy, XV Crosstrek, WRX, BRZ, SVX, Tribeca, Exiga, Trezia, Levorg and Baja may also find these DIY instructions to be helpful. A few compatible replacement belts with their part numbers include the following: Subaru 80922 1210, Gates K060772, Continental Elite 4050347 and Dayco 5060770. The tools needed to complete this procedure include a 10mm socket with a 1/4" drive ratchet, a 14mm socket and a 3/8" or 1/2" drive ratchet. |
||
|
|
||
 10mm Bolt Removed |
 Pull Out Friction Fastener |
 Peg & Rubber Grommet |
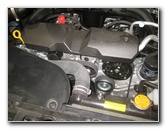
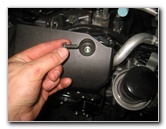
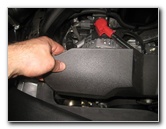
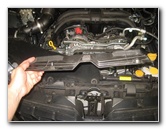
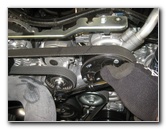
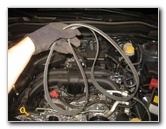
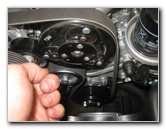
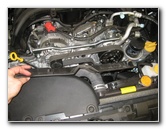
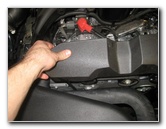
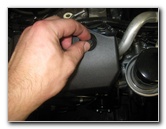
| The first step is
to locate the single bolt on the plastic cover on the front part of the
engine. Remove the bolt by turning it counterclockwise with a 10mm socket and a 1/4" drive ratchet. Set the bolt aside in a safe place. The plastic cover is still held in place by a plastic peg or "spike" on the left (passenger) side that is inserted into a rubber grommet. Pull up on the left side of the cover to release the peg from the grommet. Set the plastic cover aside in a safe place. |
||
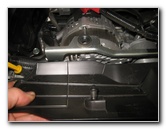
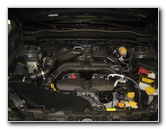
 Plastic Cover Removed |
 Alternator - Top Left |
 Study Belt Routing |
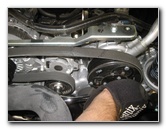
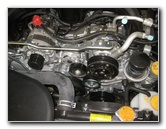
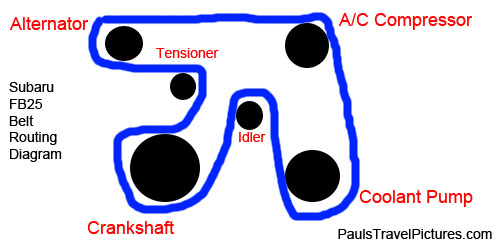
| I recommend taking a minute to examine the old belt and how it is routed around the various pulleys including the alternator, tensioner, idler, A/C compressor, crankshaft and the coolant (water) pump. | ||
 Silver Idler Pulley |
 Tensioner - Below Alternator |
 Socket On Tensioner Pulley |
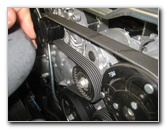
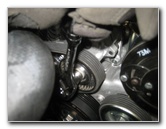
| The smooth black
metal pulley on the tensioner assembly is located just above and to the left
of the silver metal idler pulley. The tensioner pulley is situated just below and to the right of the alternator. Attach a 14mm socket to a 3/8" or a 1/2" drive ratchet. Place the 14mm socket securely over the bolt head on the tensioner pulley. |
||
 Turn Ratchet Clockwise |
 Slip Old Belt Off Pulleys |
 Remove Belt From Pulleys |
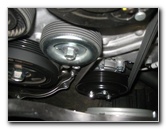
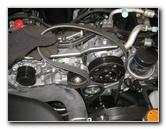
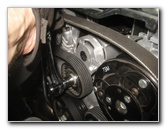
| Firmly push down on
the ratchet handle to rotate it in the clockwise direction. As you rotate the ratchet in the clockwise direction (towards the right or driver side), the tensioner assembly will swing up and towards the left to release the tension on the old belt. Avoid placing your fingers anywhere that they could be pinched in between the belt and a pulley. Hold the ratchet handle down with one hand and carefully slip the old belt off the tensioner or alternator pulleys. |
||
|
|
||
 |
 |
 Old Belt Removed |
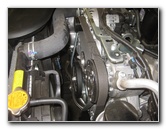
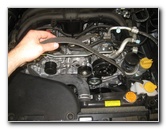
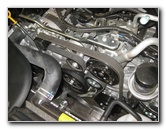
| Continue pulling
the old belt off the various pulleys and remove it from the engine bay. Inspect the old belt for any wear, chunks of missing rubber, fraying or exposed metal wires. If the old belt is in relatively good condition, consider keeping it in your cargo area or garage as an emergency backup just in case the new belt fails prematurely. Check to make sure that the tensioner and idler pulleys can be spun easily. If they don't spin easily or wobble, they should be replaced. A replacement idler pulley is part number Subaru 23770 AA070. A compatible replacement aftermarket tensioner pulley is part number Dayco 89505. If the tensioner assembly seemed far too easy to rotate / release and the old belt appeared to be loose, consider replacing the entire tensioner assembly. The replacement OEM part numbers are Subaru 23769AA040 or Subaru 23769AA05A. |
||
 Check Pulleys |
 Lower In New Belt |
 Route New Belt On Pulleys |
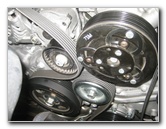
| I recommend buying
the Continental Elite 4050347
replacement belt. If you prefer to have the genuine OEM part, the part number is Subaru 80922 1210. I created a very crude belt routing diagram to assist you in properly installing the new belt.
A good rule to remember is that the smooth part of the belt should be against the smooth pulleys and the ribbed side of the belt should be wrapped around the ribbed pulleys. Lower the new belt down into the front of the engine bay. I started by wrapping the ribbed side of the belt around the large ribbed crankshaft pulley, then up and over the smooth silver idler pulley, around the ribbed coolant pump pulley, up and over the ribbed A/C compressor, over to the left and around the ribbed alternator pulley and then pull the last loop towards the tensioner pulley. |
||
 Pull Towards Tensioner |
 Socket On Tensioner Pulley |
 Rotate Ratchet Clockwise |
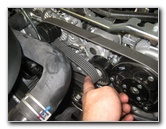
| Hold the final loop
of the new belt taut near the tensioner pulley. Place the 14mm socket over the bolt head on the tensioner pulley. Rotate the ratchet down and to the right (driver) side in the clockwise direction to move the tensioner assembly up and to the left. Hold the ratchet in place with your right hand. Carefully slip the last loop of the new belt over the tensioner pulley with your left hand. Slowly release the tensioner to place tension on the new belt. |
||
 New Belt Installed |
 Line Up Plastic Cover |
 Push Peg In Grommet |
| Double check that
the new belt is routed properly and is fully seated on the ribbed pulleys. Line up the black plastic cover and push it down into place. Push on the left side of the cover to secure the plastic peg on the underside of the cover into the rubber grommet on the top of the engine. |
||
 Spin In 10mm Bolt |
 Tighten Bolt Clockwise |
 Start Engine - Test Belt |
| Replace the 10mm
bolt by turning it in the clockwise direction until it is snug. Try to avoid over tightening the bolt to prevent from cracking the plastic cover. Start the engine and listen closely for any strange sounds. If you hear an intermittent "chirp, chirp, chirp" noise, the tensioner assembly might be worn out and is unable to apply the correct tension on the new belt. For more,
please check out all of my
2014-2018 Subaru Forester DIY Repair & Maintenance Guides. |
||
| If you found this guide to be helpful,
please consider making a small donation by clicking on the PayPal.com
"Donate" button located to the right of this paragraph. Thank you!
(Note: I am not a registered charity. Donations are not tax deductible.) |