
Sony CCTV
Security Cameras & EverFocus DVR Installation Guide
An illustrated instruction guide to
installing four Sony CCTV color IR security cameras and an EverFocus DVR system.

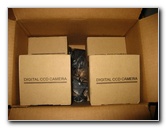 Sony CCD CCTV Cameras |
 Camera AC/DC Adaptors |
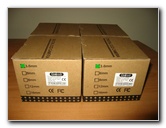 $189 eBay + Free Shipping |
| A few weeks
ago I helped a friend install a
Cheap eBay CCTV Security Camera & DVR System at a small shopping
plaza. It was a "proof of concept" experiment for us so we only spent about $200 on the most inexpensive generic "Made In China" components that were available on eBay. We weren't too happy with the picture quality from the $25 CMOS sensor Chinese cameras and the functionality of the $8 generic DVR PCI computer capture card. I did some research to find better quality equipment and purchased four new Sony CCTV security cameras for $189 with free shipping included. To replace the unreliable PC computer equipped with a DVR capture card, I purchased a stand alone EverFocus EDSR400H four channel DVR with remote viewing capability for about $500. |
||
|
|
||
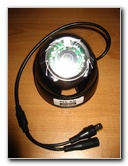
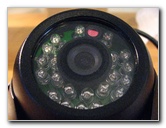
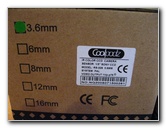 3.6 MM Wide Angle Lens |
 IR Night Vision Color Camera |
 1/3" Sony CCD Sensor |
|
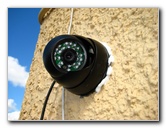
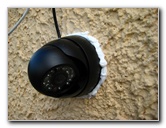
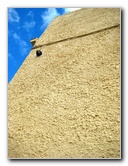
The new Sony CCTV security cameras feature 420 TV lines of resolution, IR (infrared) night vision capability, a 3.6 MM wide angle lens, a 1/3" Sony color CCD sensor, a weather & vandal proof metal dome casing, a Day/Night sensor, mounting hardware and an AC/DC power adapter. |
||
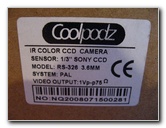
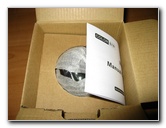
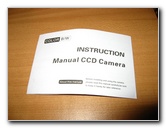 Model RS-326 Manual |
 Vandal & Weather Proof Dome |
 Pan 320, Tilt 90 Degrees |
|
These cameras were about $47.25 each which is approximately twice the amount paid for the generic cameras we originally purchased. The $25 cameras had CMOS sensors with only 380 lines of TV resolution. The difference in the image quality between the generic "Made In China" cameras for $25 and these $47 Sony CCD cameras was just amazing. The video from the cheap cameras was barely usable for anything but general foot & vehicle traffic monitoring while the video from the new Sony cameras made it possible to positively identify people from a short distance away. |
||
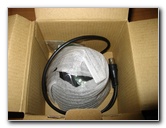
 Mounting Hardware |
 Infrared Light Diodes |
 BNC Connector & Power Plug |
| While I waited a few days for a persistent series of thunderstorms to pass through our area of South Florida, I played around with the cameras and the EverFocus DVR to familiarize myself with the equipment to avoid any surprises on installation day. | ||
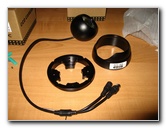
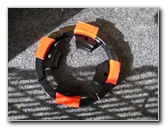
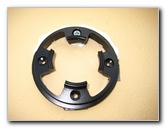
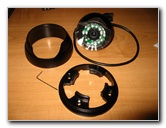 Camera Casing Pieces |
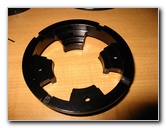 Camera Mounting Plate |
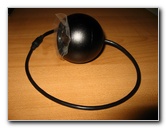 "Orb" Sony CCTV Camera |
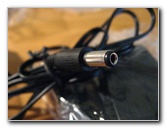
| The camera
assemblies consisted of a round metal "orb" with the imaging electronics
inside, a metal mounting plate, and a metal ring or collar which secures the
tennis ball sized camera to the mounting plate with Allen screws.
The wire coming out of the back of the camera has a female BNC video connection and a 2.1 MM female power plug. |
||
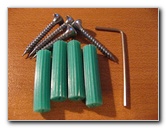
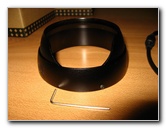 Allen Wrench & Screws |
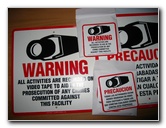 Warning Signs & Stickers |
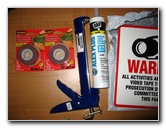 3M Double Sided Tape & Caulk |
| It's better to
prevent crime than to go through the process of trying to catch a criminal
after the damage is already done.
To help accomplish that goal, I bought some CCTV warning signs and stickers in both English and Spanish. I applied the small warning stickers, one in each language, on the back of every door in the rear access alley of the plaza. I mounted a larger warning sign on each side of the plaza using some 3M outdoor heavy duty double sided tape. |
||
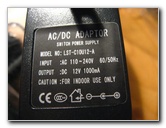 Output 12V 1000mA |
 2.1 MM Male Power Plug |
 EverFocus EDSR400H DVR |
| The power adapters
that were included for free with the Sony CCTV security cameras are model
number LST-C10U12-A.
They are "world voltage" ready with an input range of 110 to 240 V (Volts) 60/50 Hz (Hertz), an output of 12V at 1000mA (1 Amp), and a 2.1 MM male power plug. |
||
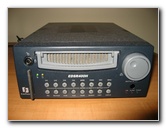
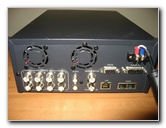 DVR Inputs & Outputs |
 Sony VX-2000 Test Monitor |
 Double Sided Tape On Plate |
| The EverFocus EDSR4H stand alone DVR (digital video recorder) features a 160GB hard drive, 4 BNC input channels, 60 IPS (images per second A.K.A. frames per second) capability, NTSC/PAL formats, an easy to use control panel, on screen setup menus, M-JPEG video compression/de-compression, various time lapse speed settings, custom area programmable motion detection function, alarm activated recording, audio recording, 1 BNC video main monitor output, 1 BNC video output for a call monitor, 4 BNC video outputs for looping, a CF (compact flash) memory card slot for saving still images from the video, a LAN internet port (for remote online viewing), a built in real time clock and 720 x 484 native video resolution. | ||
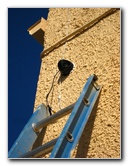 Camera Mounted On Wall |
 Caulk For Extra Support |
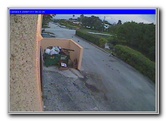
 View of Trash Dumpster |
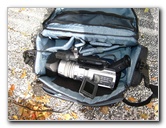
| To install the new cameras, I gathered some supplies such as electrical tape, plastic "zip" cable ties, clear adhesive caulk, double sided 3M heavy duty mounting tape, a Phillips head screwdriver, an electrical drill, a masonry drill bit, plastic screw anchors, screws and a Sony VX-2000 video camera to use as a test monitor for aiming the CCTV cameras properly. | ||
 Metal Weatherproof Dome |
 Illegal Dumping Prosecuted |
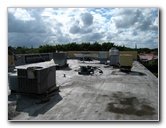 Roof of Shopping Plaza |
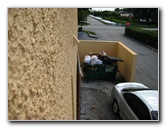
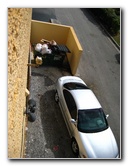
| I chose a location
for the new garbage dumpster camera which gave us a better view of any
illegal dumper's license plate and vehicle. I wanted to make as few holes as
possible into the sides of the building.
I used the masonry drill bit and the power drill to create one hole to attach the camera's metal mounting plate with one plastic screw anchor and one metal screw. For extra support, I applied four small pieces of the 3M heavy duty double sided mounting tape to the rear of the plate and also squeezed out a ring of the adhesive caulk all around the outside of the plate. The caulk is bright white in the pictures but it dried clear a few hours later. |
||
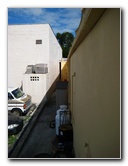
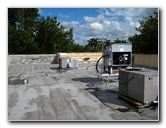 Avoid Wires Near A/C Units |
 Plaza Back Alley |
 Garbage Camera Complete |
| This installation
was fairly easy since I was just replacing the two cheap cameras in the
front of the plaza with the new Sony cameras and was able to re-use the old
mounting hardware.
I only had to drill a new hole for the dumpster camera because I had mounted the old one from the roof of the building pointed directly down at the dumpster. The new location gave us a much more useful view of the dumpster, the access road on the side of the building, and the cross street in front of the plaza. |
||
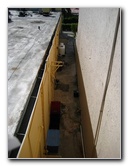
 |
 Back Alley Camera Mount |
 Back Alley of Plaza |
| I also had to drill
a new hole for the rear alley camera since the original location, located on
the top of the roof, left the camera exposed to enough direct sunlight to
fry the cheap CMOS sensor.
I didn't want to risk damaging the new Sony CCTV camera's CCD sensor with direct UV radiation so I installed it on to the side of the building below the rain gutters. The new Sony CCTV CCD sensor cameras have a wide angle 3.6 MM lens which gives us a much wider view than the 6 MM lens on the old Chinese CMOS sensor cameras. |
||
 |
 Front of Shopping Center |
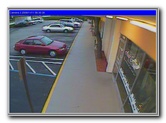 Front Camera # 2 |
| It only took about
an hour to swap out the old cameras with the new Sony cameras.
Using my well worn Sony VX-2000 Mini DV digital video camcorder as a CCTV test monitor to properly aim the new cameras made the installation process a breeze. I went inside the building, disconnected the old PC computer with the generic $8 PCI DVR capture card and hooked up the new EverFocus EDSR400H stand alone DVR machine. I had already set up all of the options on the EverFocus digital video recorder and programmed the username and password combinations at home the day before. I called the cable internet company and had them assign a fixed IP address to the EverFocus DVR's unique MAC address. The EverFocus DVR is plugged into an APC UPS (uninterruptible power supply) to prevent any damage from power surges, spikes, brown outs or power outages. If the power does fail for an extended period of time, the EverFocus DVR's LINUX based operating system will just auto-recover itself and the fixed IP address will remain the same when the Motorola Surfboard modem syncs back up again once power is restored. |
||
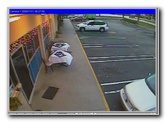
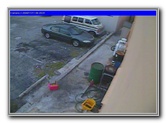 Plaza Rear Access Camera |
 Trash Dumpster Camera View |
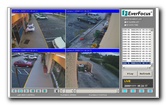 EverFocus DVR Remote Screen |
| I called a friend
who I knew would be near a computer and asked him to type the fixed IP
(internet protocol) address into both the Firefox and Internet Explorer
browsers to see if the EverFocus DVR's remote viewing feature was working properly. The "Java" application
immediately loaded up. He inputted the pre-determined username and password
that I had created and was able to see the crystal clear streaming video
feeds from all four of the new Sony CCD CCTV security cameras.
It was incredibly easy to get the remote viewing feature of the EverFocus DVR to work. If I ever install another CCTV & DVR system in the future, I'll definitely purchase another EverFocus DVR rather than dealing with an unreliable Windows based PC computer and DVR PCI capture card setup. It took me several trips to the installation location at the plaza and a few hours of online research to finally figure out how to enable the web server, FTP server and open up all of the necessary ports on the old PC computer running Win XP & DVR card combination. In the event of a power loss, the personal computer based digital video recorder with the generic PCI DVR capture card would require that I drive out to the plaza and turn everything back on. To compare the image quality and remote viewing features of the Cheap eBay Generic CMOS CCTV & DVR System to the new Sony CCD CCTV Camera & EverFocus DVR system, click on the preceding link in this sentence. The old "Made In China" system cost us about $180 total. The total cost of the new "upgraded" system was about $750, which includes the cost of the old parts we re-used such as the Siamese video/power wires and the BNC adapters. The total amount of money spent on all of the equipment from both systems was about $872. I'm glad that we bought the cheapest components possible for the first "proof of concept" CCTV/DVR installation because it was a great learning process. Two of the old cameras were damaged beyond repair. One of them suffered from water intrusion (not our fault) and the other was fried by direct UV radiation from the sun, which resulted from a poor choice of mounting location. If you're planning on setting up a CCTV/DVR
security camera system yourself, I'd highly recommend that you spend the
extra money for a stand alone digital video recorder such as one of the EverFocus models and brand name CCD sensor cameras from a reputable
manufacturer such as Sony or Sharp. |
||
| If you found this guide to be helpful,
please consider making a small donation by clicking on the PayPal.com
"Donate" button located to the right of this paragraph. Thank you!
(Note: I am not a registered charity. Donations are not tax deductible.) |