
Mercedes-Benz
ML 350 Serpentine Belt Replacement Guide
How to change the serpentine accessory
belt on the 3.5L V6 engine in a 2nd generation 2006 to 2011 ML 350.

By Paul B. Michaels Author & Photographer Auto Mechanic Since 1989 |
||
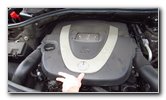
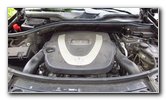
 Shredded OEM Belt |
 2008 ML350 3.5L V6 |
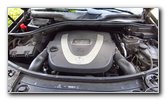
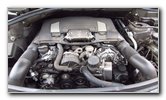
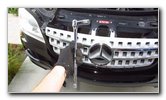
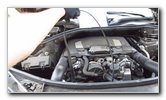
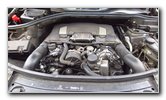
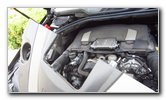
 Pull Up Engine Cover |
| This automotive
maintenance tutorial was specifically written to assist owners of the second
generation (2006, 2007, 2008, 2009, 2010 and 2011) Mercedes-Benz M-Class ML
350 SUV equipped with the M272 E35 3.5 liter V6 engine in changing the
serpentine accessory belt. Owners of other Mercedes Benz vehicles such as the SLK 350, CLS 350, CLK 350, C 350, E 350, S 350, SL 350, R 350, Viano, Sprinter, CLC 350, GLK 350, ML 250, ML 320, ML 230, ML 270, ML 430, ML 400, ML 55, ML 63, ML 300, ML 450 and ML 550 may also find these DIY instructions to be helpful. The OEM (original equipment manufacturer) serpentine accessory belt part number is Mercedes-Benz 003-993-72-96 (also known as # A 003 993 72 96 or 0039937296). A compatible replacement aftermarket belt with its part number is RSTFA 39937296. The tools needed to complete this procedure include a 17mm socket with a 1/2" or a long handled 3/8" drive breaker bar or a ratchet. The step is to open the hood. Then gently pull up the front edge of the black plastic engine cover. |
||
|
|
||
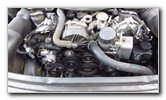
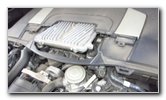
 Slide Cover Forward |
 2 Fasteners - Rear Edge |
 Engine Cover Removed |
| Release the rubber
friction fasteners at the front edge of the cover. Then gently slide the cover forward towards yourself to release the metal retaining clips from their slots on the rear half of the cover. Try to avoid breaking the two plastic tabs that point straight down near the rear of the removable engine cover. Set the plastic cover aside in a safe place. |
||
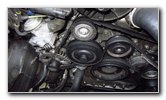
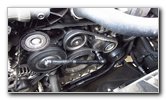
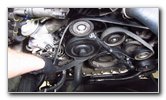
 Old Belt & Pulleys |
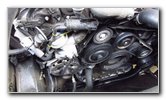 Inspect Pulleys |
 Study OEM Routing |
| Take a moment to
examine the old belt to see how it is routed around the various pulleys. On this 2008 Mercedes Benz ML350, the OEM belt lasted about 80,000 miles before half of it ripped off the pulleys while driving and creating a loud popping noise in the engine bay. |
||
 |
 |
 |
|
You'll notice that the ribbed side of the belt is wrapped around the ribbed pulleys while the smooth / flat side of the belt is routed against the smooth idler and tensioner pulleys. |
||
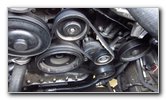
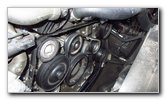
 Half of Belt Fell Off |
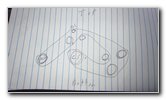 Rough Routing Diagram |
 Socket & Breaker Bar |
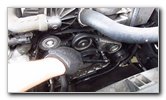
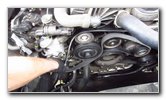
| Attach the 17mm
socket to the 1/2" drive breaker bar or a ratchet.
You may be also to use a 3/8" drive ratchet as long as it has a long enough handle to provide you with the leverage to rotate the tensioner arm. |
||
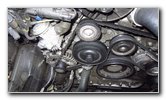
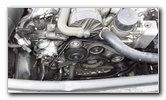
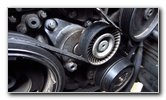 Tensioner Pulley & Arm |
 Socket On Tensioner |
 Push Down / To Left |
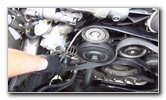
| Place the socket
over the hex head attachment on the tensioner assembly situated to the left
and below the smooth tensioner pulley. Carefully rotate the handle of the breaker bar or ratchet to the left (passenger side - USA model) and down towards the ground. The ratchet handle should rotate down towards the alternator (generator) as shown in the pictures above. As you rotate the tool's handle, you'll see the tensioner assembly rotate up and to the left. |
||
|
|
||
 Tension On Belt Released |
 Slip Old Belt Off Pulleys |
 New Belt Part Number |
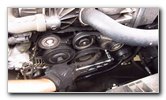
| Hold the tensioner
assembly in the released position with one hand.
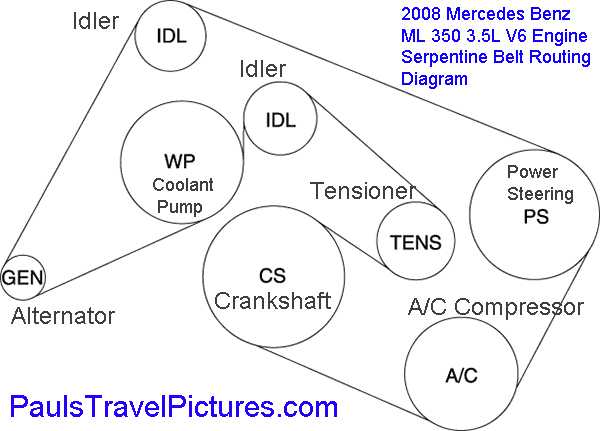
Then very carefully slip the old belt off one of the pulleys. Do NOT place your fingers in between the old belt and any of the pulleys! Carefully and slowly release the tensioner assembly and allow it to move back to the resting position. Continue pulling the old belt off the other pulleys including the two idler pulleys, water pump (coolant), tensioner, power steering, A/C (air conditioning) compressor, crankshaft and alternator (generator) pulley. I've included a serpentine accessory belt routing diagram for the M272 E35 3.5L V6 engine below.
|
||
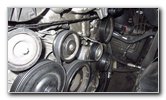
 Lower In New Belt |
 Wrap Belt Around Pulleys |
 Routing New Belt |
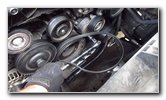
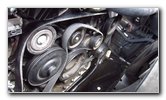
| Check to make sure
that the two idler pulleys and the tensioner pulley spin freely. If the
pulleys do not spin freely, wobble or make a noise when turning, they should
be replaced. Lower the new belt down into the front of the engine bay. I recommend buying the OEM part which is the Mercedes-Benz 003-993-72-96 serpentine accessory belt. Wrap the new belt around the various pulleys. The ribbed side should be wrapped around the ribbed pulleys and the smooth side should be placed against the smooth idler pulley and the tensioner pulley. |
||
 |
 Last Loop Near Alternator |
 Release Tensioner Arm |
| Hold the last loop
of the new belt near the alternator pulley. With your other hand, use the 17mm socket and ratchet to rotate the tensioner arm up and to the left. Hold the tensioner arm in the released / raised position. Carefully slip the last loop of the new belt over the alternator pulley. |
||
 New Belt Installed |
 Double Check Routing |
 Two Friction Fasteners |
| Double check that
the new belt is properly routed and fully seated on the ribbed pulleys. Start the engine and listen closely for any strange sounds that may indicate a problem. If you do hear any odd noises, immediately turn off the engine and re-check the belt routing. If the new belt is properly routed but it still seems loose or you hear a squeaking, chirping or screeching sound, you may need to replace the tensioner assembly. The OEM part number for the tensioner pulley and arm assembly is Mercedes-Benz 2722000270 (also known as # 272 200 02 70, A2722000270 or 89627). |
||
 Slots on Rear Cover |
 Slide Cover In Place |
 Engine Cover Secured |
| Line up the two
metal friction fasteners on the rear edge of the engine cover with their
corresponding slots. Slide the fasteners into their slots and lower the front edge of the cover. Try to avoid breaking the two plastic tabs that face straight down near the rear edge of the cover. Push down on the front edge of the cover to secure the rubber friction fasteners to the metal pegs on the top of the engine. Be sure to record the belt change in your
vehicle's service records. |
||
| If you found this guide to be helpful,
please consider making a small donation by clicking on the PayPal.com
"Donate" button located to the right of this paragraph. Thank you!
(Note: I am not a registered charity. Donations are not tax deductible.) |