
Mazda MX-5
Miata MAF Sensor Replacement Guide
How to clean or change the mass air flow
sensor in a 4th generation 2016 to 2021 Mazda MX-5 Miata with the 2.0L I4.

By Paul B. Michaels Author & Photographer Auto Mechanic Since 1989 |
||
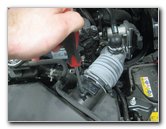
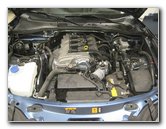 2018 Miata 2.0L I4 Engine |
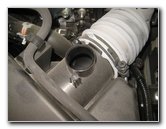
 Air Box & Intake Hose |
 MAF Sensor Location |
|
This automotive maintenance tutorial was specifically written to assist owners of the 4th generation ND (2016, 2017, 2018, 2019, 2020 & 2021) Mazda MX-5 Miata in checking and cleaning or changing a faulty MAF (mass air flow) sensor for the SkyActiv-G 2.0 PE-VPS 2.0 liter inline four cylinder engine. Owners of other Mazda vehicles such as the Mazda2 (Demio), Mazda3 (Axela), Mazda5, Mazda6 (Atenza), CX-3, CX-5, CX-7, CX-9, RX-8 and MPV may also find these DIY instructions to be helpful. The original OEM mass air flow sensor part number is Mazda PE01-13-215. A compatible replacement aftermarket MAF sensor is the Spectra Premium MA333. The only tool needed to remove the sensor is a Phillips head screwdriver. If you would like to try cleaning the old sensor before purchasing a new sensor, use some CRC MAF Sensor Cleaner Spray. The first two steps are to open the hood and then move to the center of the engine bay. The MAF sensor is located on the engine air filter box near the rubber air intake hose. |
||
|
|
||
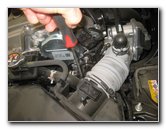
 Push In Release Tab |
 Loosen Counterclockwise |
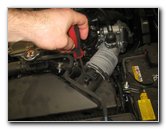 Remove Second Screw |
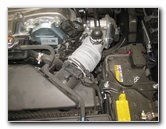
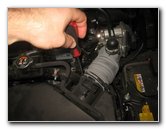
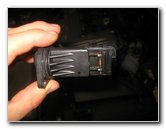
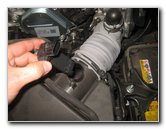
| Push in the release
tab on the electrical connector before sliding it straight off the base of
the old sensor. Loosen the two screws by turning them in the counterclockwise direction with a Phillips head screwdriver. Be careful when you loosen the screws and hold them with your fingers for the last few turns to prevent from having them fall down into the engine bay. |
||
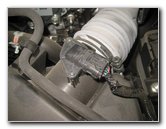
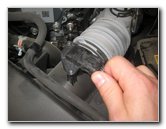
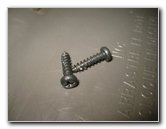 Two Screws Removed |
 Rotate To Loosen |
 Inspect Old Sensor |
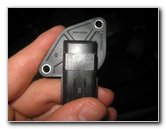
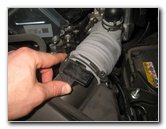
| Set the two screws
aside in a safe place to avoid loosing them. Gently rotate the sensor back forth to loosen it from its socket. Lift the old sensor out of the air box. |
||
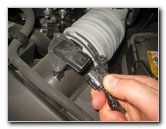
 Clean Sensor Wire |
 OEM Part Number |
 PE01 E5T62271 |
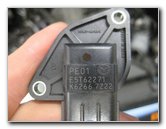
| Inspect the old
sensor.
Look for any build up of soot, grease, oil, dust or other debris or residue. Hold the can of CRC MAF Sensor Cleaner Spray about six to twelve inches away from the sensor wire. Lightly spray the sensor wire with the spray. The original OEM sensor was marked as part number Mazda PE01 E5T62271 K6266 7Z22. A new sensor is either part number Mazda PE01-13-215 or Spectra Premium MA333. |
||
|
|
||
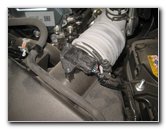
 Opening In Air Intake |
 Install New MAF Sensor |
 Line Up Screw Holes |
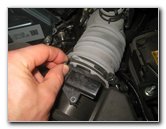
| Allow the sensor to
fully dry before re-installing it. Push the sensor into the port on the top of the air box near the rubber air intake hose. Line up the two screw holes on the sensor with their corresponding holes in the air box. |
||
 Spin In Two Screws |
 |
 Tighten Clockwise |
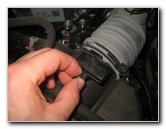
| Carefully spin in
the two screws a turn or two by hand to prevent from loosing them or having
them become cross threaded. Tighten the two screws in the clockwise direction with the Phillips head screwdriver. |
||
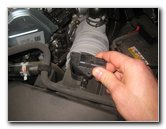
 Replace 2nd Screw |
 Push On Power Plug |
 MAF Sensor Replaced |
| Try to avoid over
tightening the two screws to prevent from cracking the plastic MAF sensor
housing. Slide the electrical connector back into place on MAF sensor's socket. The power plug should "click" securely into place. If you have an OBD2 Scan Tool, you can check to see if there are any DTC (diagnostic trouble codes) related to the MAF sensor. A few codes that may indicate a problem with the MAF include P0100, P0101, P0102, P0103, P0104, P0171 and P0174. Reset the codes, turn off the ignition and start the engine to see if the code or codes re-appear. Be sure to record the MAF sensor cleaning or replacement in your car's service records. For more,
check out all of my
2016-2021 Mazda MX-5 Miata DIY Repair & Maintenance Guides. |
||
| If you found this guide to be helpful,
please consider making a small donation by clicking on the PayPal.com
"Donate" button located to the right of this paragraph. Thank you!
(Note: I am not a registered charity. Donations are not tax deductible.) |