
Infiniti QX60
Vanity Mirror Light Bulb Replacement Guide
How to change a burnt out sun visor
vanity mirror light bulb in a first generation 2013 to 2020 Infiniti QX60.

By Paul B. Michaels Author & Photographer Auto Mechanic Since 1989 |
||
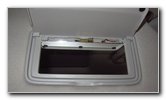
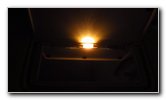
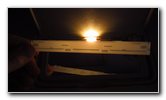
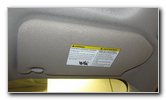
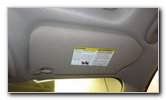 2020 QX60 Sun Visor |
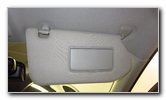 Plastic Mirror Cover |
 Vanity Mirror & Light |
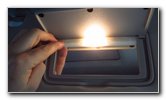
| This automotive
maintenance tutorial was specifically written to assist owners of the first
generation (2013, 2014, 2015, 2016, 2017, 2018, 2019 & 2020) Infiniti QX60
luxury SUV in changing a burnt out vanity mirror light bulb in the sun visor
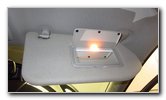
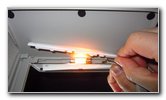
or upgrading it to a brighter LED unit. Owners of other Infiniti and Nissan vehicles such as the JX35, Q50, Q60, QX50, QX80, Pathfinder, Murano, Rogue, Armada, Kicks, Frontier, Titan, NV, NV200, 370Z, GT-R, Leaf, Maxima, Altima, Sentra and Versa might also find these DIY instructions to be helpful. The OEM (original equipment manufacturer) vanity mirror light bulb was a 12V 1.8W miniature fuse style. A few compatible replacement miniature fuse style bulbs with their part numbers are as follows: 6614F, TS-14V1CP and ACDelco 13502343. If you would like to have brighter lights that will also last much longer before burning out, install some 6614F LED bulbs. The only tool needed to access and replace the bulbs is either a small plastic pry bar tool a small flat head screwdriver. The first two steps are to swing down the sun visor and flip open the plastic cover on the vanity mirror. |
||
|
|
||
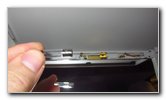
 Gently Pry Off Cover |
 Release Retaining Clips |
 Lens Cover Removed |
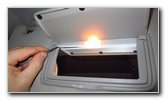
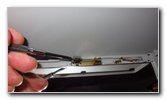
| To help prevent
from scratching the plastic surfaces or cracking the mirror, you can either
cover the tip of your screwdriver with a thin micro fiber cloth or use a
plastic trim panel removal tool. Carefully insert the blade of your screwdriver or a plastic tool in between the outer edge of the translucent plastic lens cover and the light housing. Avoid applying pressure on the mirror to prevent from cracking the glass. Gently lift the lens cover to release the retaining clips. Continue prying up the lens cover and releasing the clips until it can be fully removed. |
||
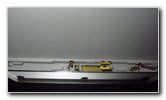
 Close Up View of Clips |
 Old Light Bulb Exposed |
 Pry Out Metal Base |
| Set the lens cover
aside in a safe place. If the old light bulb was recently illuminated, be careful when you remove it. The bulb might still be hot enough to burn your fingers. Use the blade of the screwdriver or your plastic tool to carefully and gently pry out one of the metal end caps of the light bulb from the socket. Do NOT apply pressure to the glass center part of the old bulb to prevent from having it shatter and send shards of glass flying into your eyes. |
||
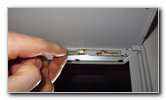
 Old Light Bulb Removed |
 12V 1.8W OEM Bulb |
 Empty Bulb Socket |
| The old OEM
(original equipment manufacturer) miniature fuse in this 2020 QX60 was only
marked with the part number "12V 1.8W" (1.8 watts).
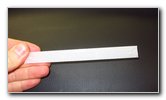
The most common traditional incandescent miniature fuse style light bulbs are part number 6614F. If you would like to have brighter vanity lights that will also last much longer before burning out, install some compatible replacement 6614F LED bulbs. The LED bulbs may vary in size including 28mm, 29mm and 30mm. The most common size is 29mm in length. |
||
 Push In New Light Bulb |
 Testing New Light Bulb |
 Line Up Lens Cover |
|
Gently push the new light bulb straight into the socket. If the new bulb doesn't immediately light up, try closing and opening the vanity mirror cover or press the "Unlock" button on the key fob to re-activate the interior lights. Tip - If you installed an LED bulb and it does not work, try removing it from the socket, rotating it 180 degrees and pushing it back into the socket. Some LED bulbs are polarized and will only work when the "+" positive and "-" negative electrical contacts are in the correct orientation. Line up the plastic lens cover with the light housing. If you look at Picture # 15 above, you'll see that the large retaining clips should be at the bottom of the lens cover and the much smaller retaining clips should be situated at the top of the lens cover. |
||
 Snap On Lens Cover |
 Lens Cover Secured |
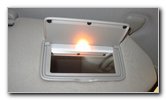
 Flip Up Sun Visor - Done! |
| Gently pop the lens
cover back into place. Make sure the lens cover is flush with the mirror and the plastic frame surrounding it. Be sure to write down the bulb change in your SUV's service records. Please
take a look at all of the
2013-2020 Infiniti QX60 DIY Repair & Maintenance Guides. |
||
| If you found this guide to be helpful,
please consider making a small donation by clicking on the PayPal.com
"Donate" button located to the right of this paragraph. Thank you!
(Note: I am not a registered charity. Donations are not tax deductible.) |