
Hyundai Veloster Windshield
Wiper Blades Replacement Guide
How to change the front windshield window
wiper blades on a 1st generation 2012 to 2017 Hyundai Veloster.

By Paul B. Michaels Author & Photographer Auto Mechanic Since 1989 |
||
 2017 Veloster Windshield Wipers |
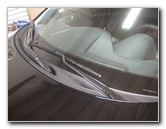
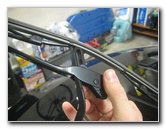
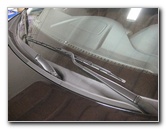
 Raise Wiper Arm off Window |
|
| This
automotive maintenance tutorial was specifically written to assist
owners of the first generation (2012, 2013, 2014, 2015, 2016 and
2017) Hyundai Veloster in changing the front windshield window wiper
blades. Owners of other Hyundai or Kia vehicles such as the Elantra, Sonata, Azera, Santa Fe, Tucson, Accent, Ioniq, Genesis, Tiburon, ix20, i20, i30, i40, Veracruz, Optima, Cadenza, K900, Soul, Niro, Sportage, Sorento, Sedona, Rio, Forte and Spectra may also find these DIY instructions to be helpful. The OEM wiper blade sizes in inches are as follows: Driver Side 26" and Passenger Side 18". A few compatible replacement wiper blades with their part numbers are as follows: Bosch ICON 26A & Bosch ICON 18A, Rain-X 5079281-2 & Rain-X 5079275-2, Aero 26" & 18", Anco 31-26 & Anco 31-18, Trico 25-260 & Trico 25-180, PIAA 95065 & PIAA 95045 and Valeo 900261B & Valeo 9001810B. No tools are needed to remove and replace the wiper blades. |
||
|
|
||
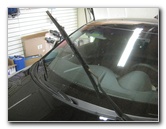
 Rotate Away Wiper Blade |
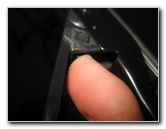
 Black Plastic Release Tab |
|
| The first step is
to lift the wiper arm off the windshield until it remains in the raised
position by itself. Then rotate the old wiper blade away from the wiper arm at a slight angle. Locate the black plastic release tab at the center of the old wiper blade. Gently push in the release tab towards the metal wiper arm. |
||
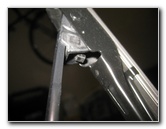
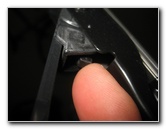
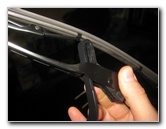
 Push In Release Tab |
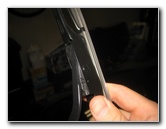 Pull Wiper Blade Down |
|
|
Continue holding in the release tab. Firmly pull down the wiper blade to release the mounting bracket from the metal hook at the end of the wiper arm. |
||
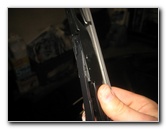
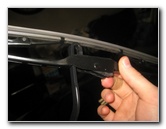 Rotate Blade Perpendicular |
 Remove Old Wiper Blade |
|
|
Rotate the old wiper blade away from the wiper arm until it is perpendicular (at a 90 degree angle). Lift the old wiper blade up and off the metal wiper arm. |
||
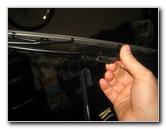
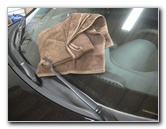 Towel - Protect Glass |
 Line Up New Wiper Blade |
|
| Place a towel on
the glass to protect the windshield from being cracked, chipped, scratched
or shattered just in case the metal wiper arm smacks down on to the window. I recommend buying the Bosch ICON 26A and Bosch ICON 18A wiper blades since they have excellent reviews on Amazon. Line up the new wiper blade with the wiper arm. The rubber wiper blade should be facing up and away from the windshield. |
||
 Pass Hook Through Opening |
 Rotate Blade Towards Arm |
|
| Pass the metal hook
at the end of the wiper arm through the hole in the center of the wiper
blade. Rotate the new wiper blade until it is almost parallel with the wiper arm. |
||
 Slide Bracket In To Hook |
 Lower Wiper Arm To Window |
|
| Pull the new wiper
blade up to secure the mounting bracket in to the hook at the end of the
wiper arm. You should hear or fell the mounting bracket "click" securely in to place. Double check that the new wiper blade is secure. Gently lower the wiper arm down to the windshield. For the best wiper performance, I highly recommend cleaning off the window and applying a glass treatment product that will repel water such as Rain-X. For more,
check out all of my
2012-2017 Hyundai Veloster DIY Repair & Maintenance Guides. |
||
| If you found this guide to be helpful,
please consider making a small donation by clicking on the PayPal.com
"Donate" button located to the right of this paragraph. Thank you!
(Note: I am not a registered charity. Donations are not tax deductible.) |