
Hyundai
Elantra Tail Light Bulbs Replacement Guide
How to replace the tail light bulbs
(brake, reverse, turn signal, parking & sidemarker) in a 2011-2016 Hyundai Elantra.

By Paul B. Michaels Author & Photographer Auto Mechanic Since 1989 |
||
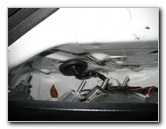
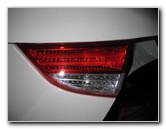
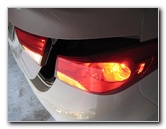
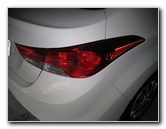 Elantra Tail Light Assembly |
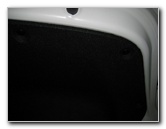
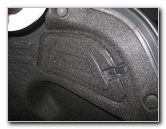 Open Truck - Locate Cover |
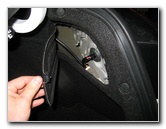 Open Tail Light Access Door |
| This
automotive maintenance "how-to" guide was specifically written to
assist owners of the 5th generation 2011, 2012 & 2013, 2014,
2015 & 2016 Hyundai Elantra
(also known as the Avante or i35) in replacing the brake, reverse,
turn signal, parking rear side marker light bulbs in the tail light assemblies. Owners of other Hyundai or Kia vehicles such as the Accent, Sonata, Azera, Veloster, Tucson, Santa Fe, Veracruz, Genesis, Forte, Optima, Rio, Soul, Sorento, Sportage, and Sedona may also find these DIY instructions to be helpful. Replacement tail light bulbs for the '11-'16 Elantra include the following with their part numbers: Brake # 2357, Turn Signal 1156A or 1156NA, Reverse 921 or W16W, and Parking or Rear Side Marker 168, 2825, 194 or W5W. The only tools needed to replace any of the tail light bulbs include a Phillips head screwdriver, a 10mm socket and a ratcheting wrench. |
||
|
|
||
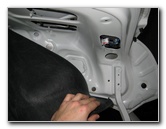
 Three Black 10mm Nuts |
 Remove With 10mm Socket |
 Three 10mm Nuts Removed |
| The larger tail
light assemblies at the rear corners of the '11-'13 Elantra contain the
brake, turn signal, side marker and one of the two parking light bulbs. Swing open the rectangular access panel inside the trunk and use a 10mm socket with a ratcheting wrench to remove the three black 10mm nuts that hold the tail light assembly to the rear of the vehicle. Be very careful when removing the 10mm nuts as they are easy to drop down into the rear bumper. Use a magnetic socket if you have one available. |
||
 Pull Off Tail Light Assembly |
 Turn Over Assembly |
 1/4 Turn Counter Clockwise |
| Once all three nuts
have been removed, you can gently pull the tail light assembly off the rear
of the vehicle. Turn it upside down and gently rest it on the bumper. Place a towel in between the tail light and the bumper to prevent scratching the paint on the bumper or the plastic housing. |
||
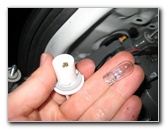
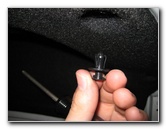
 Pull Out Sidemarker Bulb |
 1/4 Turn Counter Clockwise |
 Pull Out Brake Bulb |
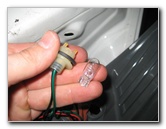
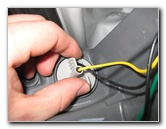
| To remove any of
the four bulbs in the tail light assembly, grasp the base of the socket and
rotate it 1/4 turn counter clockwise before pulling it straight out. The bulbs can be identified by the color of their sockets as follows: Turn Signal - Light Grey, Parking - White, Brake - Red / Orange and Rear Sidemarker - Light Tan / Yellow. |
||
 1/4 Turn Counter Clockwise |
 Pull Out Parking Light Bulb |
 1/4 Turn Counter Clockwise |
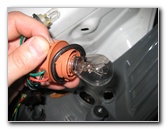
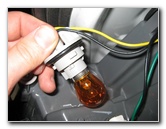
| The smaller Parking
and Rear Sidemarker light bulbs can be removed by pulling them straight out
of their sockets. To remove the larger Brake or Turn Signal light bulbs, push them down into their sockets and rotate 1/4 turn counter clockwise before pulling them straight out. |
||
|
|
||
 Turn Signal Bulb |
 Push Down & Turn |
 Line Up Assembly |
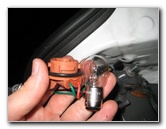
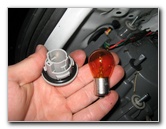
| To replace the smaller parking
and sidemarker bulbs, push the new bulb straight down into the socket. To replace the larger brake and turn signal light bulbs, insert the bulb into the socket, push down and rotate it 1/4 turn clockwise to lock it in place. Then insert any of the bulbs and sockets back into the tail light and rotate them 1/4 turn clockwise to lock them in place. The replacement part numbers are as follows: Brake # 2357, Turn Signal 1156A, Reverse 921, and Parking / Rear Side Marker 168, 2825, 194, W5W or an LED. |
||
 Push Tail Light In Place |
 Spin On Three Black Nuts |
 Tighten 3 10mm Nuts |
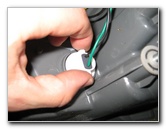
| To replace the tail
light assembly, line up the silver metal threaded screw ends and grey
plastic spikes with the holes in the rear corner of the vehicle.
Carefully push the tail light back on to the vehicle and spin on the three black metal nuts by hand. Tighten the 3 nuts with the 10mm socket and ratcheting wrench to just past hand tight. Then swing the access panel closed to complete the job. |
||
 Close Access Door |
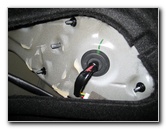
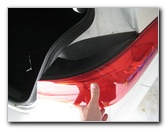
 Trunk Lid - Reverse & Parking |
 Trunk Lid Carpet Cover |
| The reverse light bulb and the other parking light are contained inside the trunk lid's tail light housing. | ||
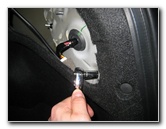
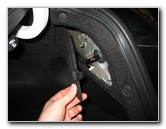
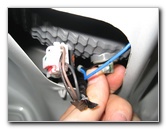
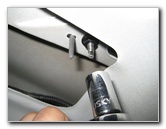
 Unscrew Pop Rivet |
 Pull Out Black Plastic Fastener |
 Remove Other Fasteners |
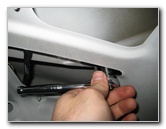
| To access either
bulb, you'll need to remove a few of the black plastic "pop rivet" fasteners
that hold the trunk lid carpeting in place.
Use a standard Phillips head screwdriver to unscrew the black plastic fasteners about 1/4 to 1/2 turn counter clockwise before pulling them straight out of the trunk lid carpet. |
||
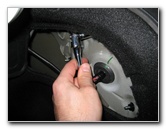
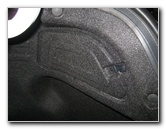
 Pull Back Trunk Lid Carpet |
 1/4 Turn Counter Clockwise |
 Trunk Lid Parking Light |
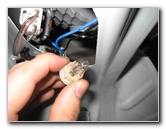
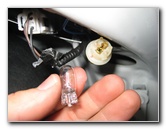
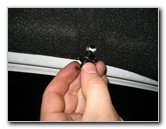
| Once a few of the
fasteners have been removed, you can pull back the carpet to reveal the
parking light bulb's socket. Turn the socket 1/4 turn counter clockwise and pull it straight out of the trunk lid tail light assembly. Pull the old parking light bulb straight out of the assembly. Replace it with a 2825 five watt T10 wedge base bulb (also known as part # 168 or 194). |
||
 Pull Out Parking Light Bulb |
 Remove 10mm Nuts |
 Four 10mm Nuts Total |
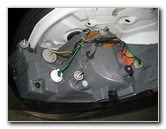
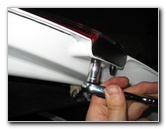
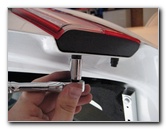
| If you need to
replace the reverse light bulb, you will have to remove the trunk lid tail
light housing by unscrewing four 10mm nuts using a socket and ratcheting
wrench. Two of the 10mm nuts are accessible from the edge of the trunk lid and the other two are in the recessed cut out. |
||
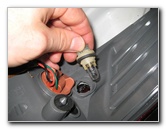
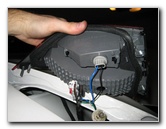 Pull Out Light Housing |
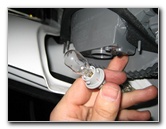 1/4 Turn Counter Clockwise |
 Pull Out # 921 Reverse Bulb |
| After all four 10mm
nuts are removed, you can gently pop out the trunk lid tail light housing. Rotate the light grey base of the reverse light bulb socket 1/4 turn counter clockwise and pull it straight out of the assembly. Push a new # 921 or W16W light bulb straight into the socket, insert the socket back into the tail light housing and rotate it 1/4 turn clockwise to secure it in place. |
||
 Replace Light Housing |
 Tighten 10mm Nuts |
 Tighten Other 2 10mm Nuts |
| Line up the screw
ends on the trunk lid tail light housing with their respective holes and
gently re-install the housing. Spin on the four 10mm nuts by hand to prevent them from becoming cross threaded and tighten them to just past hand tight with the 10mm socket and ratcheting wrench. |
||
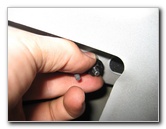
 Replace Carpet & Fasteners |
 Test Parking & Reverse Bulbs |
 Testing Brake & Sidemarker |
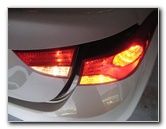
| Replace the trunk lid carpeting
and insert the black plastic pop rivet fasteners.
Turn the Phillips head screw inner piece of the fastener with the screwdriver clockwise (or just push it in with your finger) until it is flush with the outer part of the fasteners. Test the new tail light bulb(s) by turning on the headlights, activating the hazard signals, and then have someone step on the brake pedal while placing the transmission in reverse. For more, please check out my other
Hyundai Elantra Repair & Maintenance DIY Guides. |
||
| If you found this guide to be helpful,
please consider making a small donation by clicking on the PayPal.com
"Donate" button located to the right of this paragraph. Thank you!
(Note: I am not a registered charity. Donations are not tax deductible.) |