
Honda Fit
(Jazz) Headlight Bulbs Replacement Guide
How to replace the low/high beam, turn
signal, and sidemarker light bulbs in the headlights of a Honda Fit or Jazz.

By Paul B. Michaels Author & Photographer Auto Mechanic Since 1989 |
||
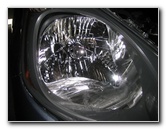
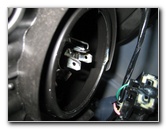
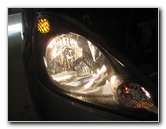
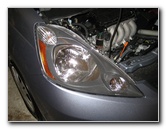 2011 Honda Fit Headlight |
 Parking / Turn Signal Bulb |
 Turn Signal Bulb Socket |
| This
automotive "how-to" guide was specifically written to assist owners
of the 2nd generation 2nd generation (2009, 2010, 2011, 2012, 2013 &
2014) Honda Fit or Honda Jazz vehicles in
replacing any of the bulbs in the headlight assemblies. Owners of previous generation 2001-2008 Fit or Jazz vehicles, or similar Honda Global Small Car vehicles such as the Airwave, Partner, Mobilio, Freed, Logo, City, and Aria may also find this guide to be useful. The headlight assembly of a Honda Fit or Jazz contains the following light bulbs with their corresponding part numbers: dual filament low beam & high beam bulb # 9003, turn signal / parking bulb # 7507, and front side marker bulb # 194NA. No tools are needed to replace any of the light bulbs in the headlight assembly of a 2009-2014 Honda Fit or Jazz. |
||
|
|
||
 1/4 Turn Counter Clockwise |
 Pull Turn Signal Bulb Out |
 Press Down & Turn CC |
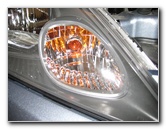
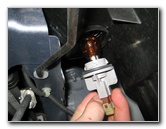
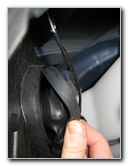
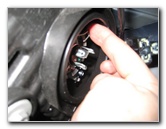
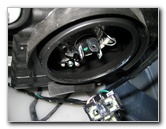
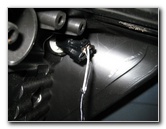
| The front turn
signal or "parking" light bulb is located at the corner of the headlight
assembly close to the center line of the vehicle.
To remove it, grasp the bulb socket on the back side of the headlight in the engine bay and rotate it 1/4 turn counter clockwise before pulling it straight out of the assembly. |
||
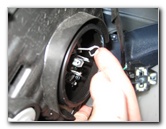
 Remove # 7507 Light Bulb |
 Replace Bulb In Headlight |
 1/4 Turn Clockwise |
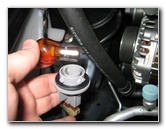
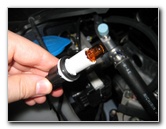
| To remove the bulb
from the socket, push down on the bulb and turn it 1/4 turn counter
clockwise.
Insert a new # 7507 turn signal bulb and rotate it 1/4 turn clockwise to secure it within the socket. Then insert the bulb back into the headlight assembly and turn the socket 1/4 turn clockwise to secure it inside the headlight assembly. |
||
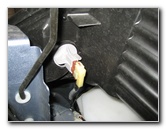
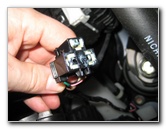
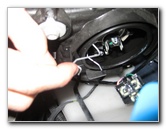
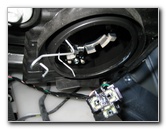
 Low Beam / High Beam |
 Remove Power Connector |
 Pull Off Rubber Cover |
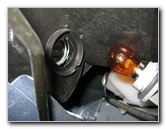
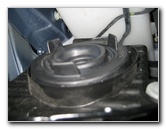
| The combination low
beam and high beam dual filament headlight bulb is located in the center of
the assembly.
Move to the rear of the assembly and remove the black power connector by gently wiggling it off. |
||
|
|
||
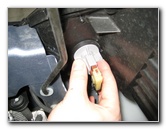
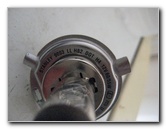
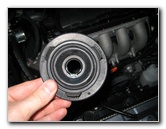 Headlight Rubber Dust Cap |
 Headlight Power Connector |
 Halogen Bulb Prongs |
| Next pull off the rubber headlight bulb dust cover and set it aside. | ||
 Press Metal Arm Down |
 Release Retaining Clip |
 Swing Metal Arm Open |
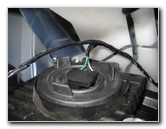
| To release the
headlight bulb, press down on the part of the metal retaining clip closest
to the exterior of the car and swing the arm out of the way.
Carefully pull out the headlight bulb by holding on to the metal prongs. |
||
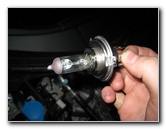 Remove Headlight Bulb |
 Stanley 9003 LL HB2 H4 |
 |
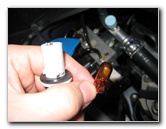
| Avoid touching the
glass portion of the halogen bulb with your fingers.
If you do touch the bulb or it becomes dirty while out of the headlight assembly, clean it off with a tissue moistened with rubbing alcohol. |
||
 Insert New Light Bulb |
 Close Metal Retaining Arm |
 Replace Rubber Dust Cover |
| Insert a new #
9003 bulb into the headlight assembly with the flat surface of the third metal
power prong facing up towards you.
Replace the black rubber headlight bulb dust cap and make sure it rests flush against the rear of the headlight assembly. |
||
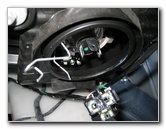
 Dust Cap Replaced |
 Power Connector |
 Push On Power Plug |
| To re-attach the headlight bulb power connector, orientate the plug so that the three slots line up with the three metal blades on the rear of the bulb and gently push them together. | ||
 Sidemarker Light |
 Sidemarker Bulb Socket |
 1/4 Turn Counter Clockwise |
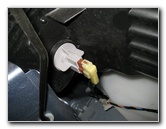
| The side marker
light bulb is located at the outer edge of the headlight assembly by the
side of the vehicle.
Remove it by turning the socket 1/4 turn counter clockwise and pull it straight out. Take out the old bulb by pulling it straight out from the socket. Replace it with a new # 194NA bulb by pushing it straight into the socket. Re-insert the bulb into the headlight assembly and turn the socket 1/4 turn clockwise to secure it. |
||
 Pull Bulb Straight Out |
 Test Low Beam & Turn Signal |
 Test High Beam Headlight |
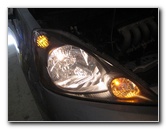
| Test the new light bulb(s) by turning on the headlights, activating the hazard signals, and flashing the high beams. | ||
For more, please check out my Honda Fit Maintenance & Repair Guides page. |
||
| If you found this guide to be helpful,
please consider making a small donation by clicking on the PayPal.com
"Donate" button located to the right of this paragraph. Thank you!
(Note: I am not a registered charity. Donations are not tax deductible.) |