
Honda CR-V
3rd Brake Light Bulb Replacement Guide
How to change a burnt out high mount
third brake light bulb in the tail gate of a 3rd generation 2007-2011 Honda
CR-V.

By Paul B. Michaels Author & Photographer Auto Mechanic Since 1989 |
||
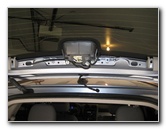
 2011 CR-V 3rd Brake Light |
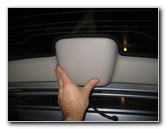
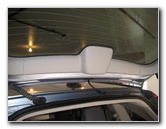 Open Cargo Tail Gate Door |
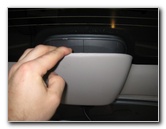 Pull Off Center of Cover |
| This
automotive maintenance tutorial was specifically written to assist owners of the
third generation (2007, 2008, 2009, 2010 & 2011) Honda CR-V in
changing a burnt out high mount third brake light bulb inside the
cargo tail gate door. Owners of other Honda or Acura SUV, minivan or hatchback vehicles with similar 3rd brake lamp housings such as the Pilot, Insight, CR-Z, Fit, Crosstour, Odyssey, TSX Sport Wagon, RDX and MDX may also find these DIY instructions to be helpful. A replacement bulb is part number 7440 which is available from various manufacturers such as Sylvania, GE, PIAA and Eiko. If you would like to have a brighter 3rd brake light, choose a compatible 7440 LED bulb. No tools are required to change the bulb. A small flathead screwdriver or plastic automotive panel pry bar tool may be useful if you have trouble removing the plastic trim piece by hand. |
||
|
|
||
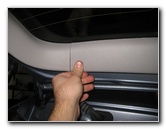
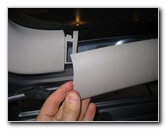 Pop Out Side Fasteners |
 Trim Panel Removed |
 Third Brake Housing Exposed |
| The first step is
to open the rear cargo tail gate. Locate the long rectangular plastic trim panel on the tail gate that covers the third brake light housing. Gently pull out the pop rivet friction fasteners at the center of the plastic panel with your fingers or use an automotive panel removal tool. Then move to each side and gently pull them out to release the pop rivet fasteners. Set the trim panel aside in a safe place. |
||
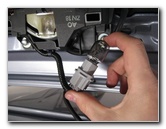
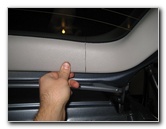
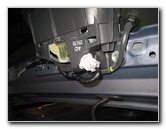 Light Grey Bulb Socket |
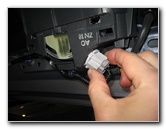 1/4 Turn Counter Clockwise |
 Bulb Socket Removed |
| Rotate the light grey bulb socket on the right (passenger) side of the housing 1/4 turn counterclockwise before pulling it straight out. | ||
|
|
||
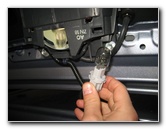
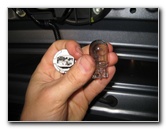 Pull Out Old # 7440 Bulb |
 Push In New # 7440 Bulb |
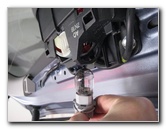 Re-Insert Socket In Housing |
| Pull the old bulb
straight out of the socket and gently push in a new number
7440 bulb. If you'd like a brighter third brake light, choose a 7440 LED bulb. Re-insert the socket in to the housing and rotate it 1/4 turn clockwise to secure it in place. I'd recommend testing the new bulb before replacing the plastic cover. |
||
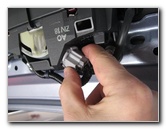 1/4 Turn Clockwise - Lock |
 Line Up Plastic Panel |
 Push In Pop Rivet Fasteners |
| Line up the plastic trim panel over the 3rd brake light housing and gently snap the pop rivets back in to place. | ||
 Pop In Side Friction Fasteners |
 Plastic Cover Replaced |
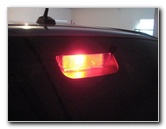 Test New 3rd Brake Bulb |
| Move to each side
of the cover and gently push in the pop rivets until they are flush with the
adjoining tail gate panels. Test the new third brake light bulb by having someone step on the brake pedal. For more,
check out my other
Honda CR-V Repair & Maintenance Guides. |
||
| If you found this guide to be helpful,
please consider making a small donation by clicking on the PayPal.com
"Donate" button located to the right of this paragraph. Thank you!
(Note: I am not a registered charity. Donations are not tax deductible.) |