
Honda CR-V
Rear Wiper Blade Replacement Guide
How to change the rear window wiper blade
on a 3rd generation 2007-2011 Honda CR-V with photo illustrated steps.

By Paul B. Michaels Author & Photographer Auto Mechanic Since 1989 |
||
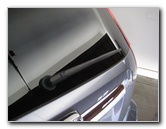 2011 CR-V Rear Wiper |
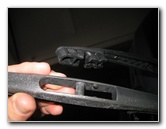
 Pull Off Plastic Cover |
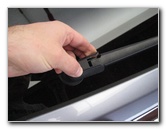
 Cap Removed From Base |
| This
automotive maintenance tutorial was specifically written to assist owners of the
third generation (2007, 2008, 2009, 2010 & 2011) Honda CR-V in
changing the rear windshield window wiper blade on the tail gate
door. Owners of other Honda or Acura SUV, minivan or hatchback vehicles with similar rear window wiper assemblies such as the Pilot, Insight, CR-Z, Fit, Crosstour, Odyssey, TSX Sport Wagon, RDX and MDX may also find these DIY instructions to be helpful. A few compatible replacement size 14" (inches) rear window wiper blades with their part numbers include the following: Trico 14-B, Anco AR-14B, Valeo R14G, Bosch H354, Michelin # 9514 and Silblade RB114-B. No tools are needed to change the rear wiper blade. |
||
|
|
||
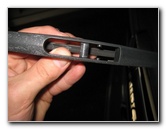
 Lift Arm Off Window |
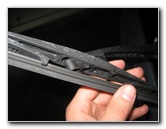 Rotate Blade Away From Arm |
 Pop Bar Out of Socket |
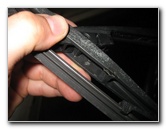
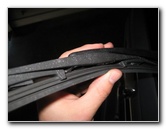
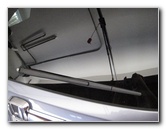
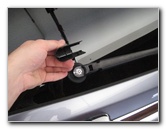
| The first step is
to gently pull off the plastic cover at the base of the wiper arm. Set the cover aside in a safe place. Then lift the wiper arm off the rear window until it stays in the raised position by itself. Rotate the old wiper blade away from the wiper arm at a slight angle. Firmly pop the mounting bar in the center of the old wiper blade out of the "C" shaped socket at the end of the wiper arm. |
||
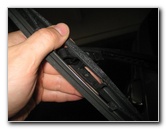
 Mounting Bar & "C" Socket |
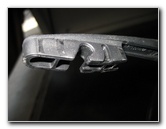 Wiper Arm "C" Socket |
 Mounting Bar - Center of Blade |
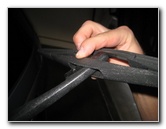
| Once you have the
old wiper blade removed, you'll see that there are two openings at the
center of the blade surrounding the mounting bar. One opening is completely clear of obstructions and the other one has two small pegs or "nubs" that slide in to the indentations on the sides of the wiper arm. |
||
|
|
||
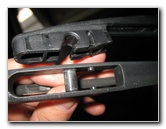 Line Up Bar & Socket |
 Slide Arm Through Blade |
 Push Bar In To Socket |
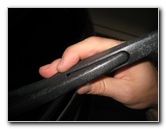
| I recommend buying
the Trico 14-B rear wiper blade
since it has excellent reviews on Amazon. Line up the mounting bar at the center of the new blade with the "C" socket at the end of the wiper arm. Slide the end of the wiper arm through the opening in the new blade that doesn't have the mounting pegs. Rotate the blade towards the wiper arm and gently pop the mounting bar in to the "C" socket. |
||
 New Blade Mounted To Arm |
 Rotate Blade Parallel To Arm |
 |
| Rotate the new wiper blade until it is parallel with the wiper arm. | ||
 Lower Blade To Window |
 Line Up Plastic End Cap |
 Snap Cover In Place |
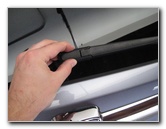
| Lower the wiper arm
back down to the window.
For best wiper performance, thoroughly clean off the window and apply a glass treatment product such as Rain-X or Zaino Glass Polish. For more,
check out my other
Honda CR-V Repair & Maintenance Guides. |
||
| If you found this guide to be helpful,
please consider making a small donation by clicking on the PayPal.com
"Donate" button located to the right of this paragraph. Thank you!
(Note: I am not a registered charity. Donations are not tax deductible.) |