
Chevrolet
Cobalt Tail Light Bulbs Replacement Guide
How to replace the brake / turn signal,
reverse and rear side marker light bulbs in a 2005-2010 GM Chevy Cobalt.

By Paul B. Michaels Author & Photographer Auto Mechanic Since 1989 |
||
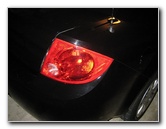 Cobalt Tail Light Assembly |
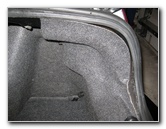 Open Trunk Lid |
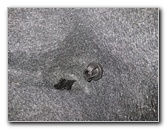 Black Plastic Thumb Screw |
| This
automotive "how-to" guide was specifically written to assist owners
of the 2005, 2006, 2007, 2008, 2009 & 2010 Chevrolet Cobalt in replacing a burnt out brake
/ turn signal, reverse and rear side marker bulbs in the tail light assemblies. Owners of other similar GM vehicles such as the Cruze, Impala, Malibu, Sonic, Lumina, Buick LaCrosse, Regal, Verano, Enclave, GMC Acadia, Yukon, Pontiac Grand Prix, G6, G5, Grand Am, GTO, Vibe, Sunfire, Oldsmobile Alero, Aurora, and Cutlass may also find this guide to be helpful. Replacement tail light bulbs for the 05-10 Cobalt from Sylvania and other manufacturers with their respective part numbers are as follows: combination brake / turn signal # 3157, reverse (back up) # 921 and rear side marker # 194. The tools needed to replace the bulbs include a 10mm open-end wrench and a 7mm socket with a ratcheting wrench. |
||
|
|
||
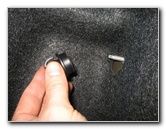
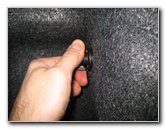 Twist Off Thumb Screw |
 Pull Back Trunk Carpeting |
 Remove Upper 10mm Nut |
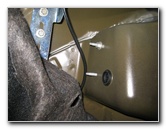
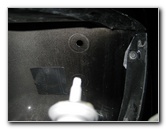
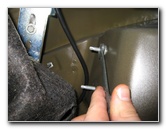
| The first steps are
to open the trunk lid, move to the tail light with the burnt out bulb, and
locate the black plastic thumb screw at the inside corner of the trunk. The
fastener doubles as a hooking point for a cargo net. Then pull back the grey trunk carpeting and remove the nut on the upper exposed screw end with the 10mm wrench. |
||
 Remove Two 7mm Screws |
 Pull Out Tail Light Assembly |
 Turn Tail Light Upside Down |
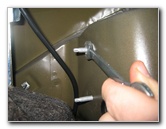
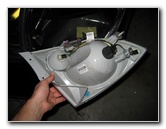
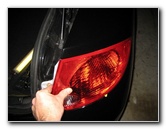
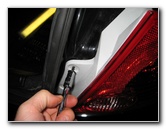
| Move to the outside
of the trunk and remove the two 7mm screws in the grey plastic part of the
tail light assembly using the socket with ratcheting wrench. Carefully pull the tail light assembly straight away from the rear of the vehicle. If you have trouble removing it, try gently wiggling while you pull or tap on the exposed screw ends inside the trunk. To avoid scratching the bumper, lay down a towel or rag before resting the tail light on the painted surface. |
||
|
|
||
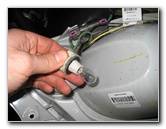
 1/4 Turn Counter Clockwise |
 Brake / Turn Signal Bulb |
 Pull Out Old # 3157 Bulb |
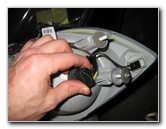
| The combination
brake / turn signal / parking bulb is contained in the largest black socket
on the rear of the tail light assembly.
Remove it by rotating the socket 1/4 turn counter clockwise and pull it straight out of the assembly. Pull the old # 3157 bulb straight out of the socket and push in a new one. Insert the new bulb back into the tail light assembly and rotate the socket 1/4 turn clockwise to secure it in place. |
||
 1/4 Turn Counter Clockwise |
 Reverse (Back Up) Bulb |
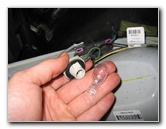 Pull Out Old # 921 Bulb |
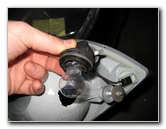
| The reverse (back
up) light bulb is the medium sized light grey socket located at the edge of
the tail light closest to the center line of the vehicle. Turn the socket 1/4 turn counter clockwise and pull it straight out of the tail light assembly. Pull the old # 921 reverse bulb straight out of the socket and push in a new one. Insert the new bulb back into the tail light and rotate it 1/4 turn clockwise to lock it in place. If you would like to have brighter reverse lights, install some compatible replacement 921 LED bulbs. Repeat the same steps to replace the rear side marker # 194 light bulb which is located at the other end of the tail light closest to the outer edge of the vehicle. |
||
 Line Up Tail Light Bolts |
 Re-Install Tail Light |
 Tighten Upper 10mm Nut |
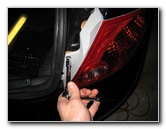
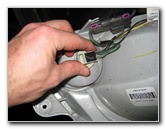
| To replace the tail
light assembly, line up the two exposed screw ends on the rear with the
holes in the painted metal body and gently push them in.
Tighten the single 10mm nut on the upper screw end inside the trunk. |
||
 Replace Carpet & Fastener |
 Tighten Two 7mm Screws |
 Test New Tail Light Bulbs |
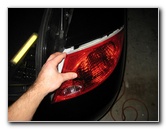
| Replace the grey
carpeting over the corner of the trunk and twist the black plastic thumb
screw on in the clockwise direction.
Then replace the two black screws on the outside of the trunk and tighten them with a 7mm socket and ratcheting wrench. Test the new tail light bulbs by having someone step on the brake pedal, activate the hazard signals and put the transmission in reverse. Be sure to record the bulb change in your vehicle's service records. For more,
check out my other
Chevy Cobalt Repair & Maintenance Guides. |
||
| If you found this guide to be helpful,
please consider making a small donation by clicking on the PayPal.com
"Donate" button located to the right of this paragraph. Thank you!
(Note: I am not a registered charity. Donations are not tax deductible.) |