
Chevrolet
Camaro V6 Engine Spark Plugs Replacement Guide
How to change the engine spark plugs in a
5th generation 2010 to 2015 GM Chevy Camaro with the 3.6L V6 motor.

By Paul B. Michaels Author & Photographer Auto Mechanic Since 1989 |
||
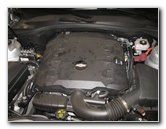
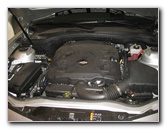 2014 Camaro 3.6L LFX V6 |
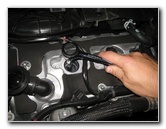
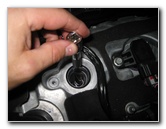
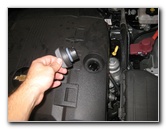 Remove Oil Filler Cap |
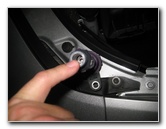
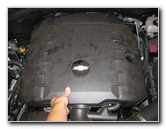
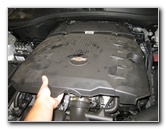 Lift Off Engine Cover |
| This
automotive maintenance tutorial was specifically written to assist
owners of the fifth generation (2010, 2011, 2012, 2013, 2014 & 2015)
GM Chevrolet Camaro in checking or changing the spark plugs
in either the LLT or LFX 3.6 liter V6 engines. Owners of other General Motors vehicles such as the Spark, Cruze, Malibu, Sonic, Impala, Traverse, Tahoe, Trax, SS, GMC Terrain, Acadia, Yukon, Buick Verano, Regal, LaCrosse, Encore, Enclave and the Holden Barina may also find these DIY instructions to be helpful. The items needed to complete this procedure include a flat head screwdriver, a 10mm socket with a 1/4" drive ratchet, a 5/8" spark plug socket, a 6" extension bar, a 3/8" drive ratchet and a tube of dielectric grease. The OEM iridium tipped spark plugs in this 2014 Camaro are AC Delco 41-109 (or GM part # 12622561). |
||
|
|
||
A few compatible replacement spark plugs with their part numbers include the following: Autolite XP5263, NGK # 6509 (LTR6IX-11), ACDelco Platinum 41-834, Autolite AP5263, Pulstar ef1h10, Bosch 9616, and Bosch (6728) HR7MPP30X.
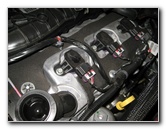
Note - In this guide I'm only checking the front
three plugs since this vehicle only has about 15,000 miles on the odometer.
To access all three rear plugs, the intake manifold must be removed.
|
||
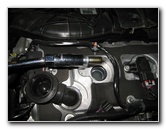
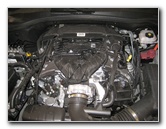 Engine Cover Removed |
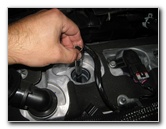
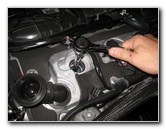
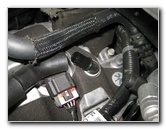
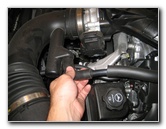 Disconnect Hose |
 Swing Hose To The Side |
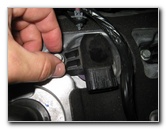
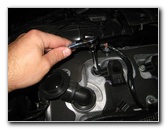
| The first few steps
are to open the hood, twist off the oil filler cap in the counterclockwise
direction and then pull off the plastic engine cover. Once the engine cover has been removed, replace the oil filler cap or place a rag in the hole to prevent from having debris fall down in to the engine. Disconnect the rubber vacuum line and swing it to the side in order to access the spark plug ignition coils. Unfortunately, in order to replace the 3 spark plugs on the rear of the engine, the intake manifold will need to be removed. It would also be best to have an assortment of wobble extension bars in different sizes and also a universal swivel joint. Here are the written instructions from the shop manual for removing and replacing the intake manifold on the GM 3.6L V6 engine: Intake Manifold Replacement The OEM part number for the intake manifold gasket is GM 12647263 (also known as ACDelco 12647263). This should apply to any GM vehicle equipped with the LFX or LLT 3.6L V6 engines such as the Cadillac CTS, STS, ATS, SRX, XTS, Buick Enclave, Chevy Traverse, GMC Acadia, LaCrosse, Terrain, Caprice, Colorado, Canyon, Equinox, Impala and the Holden Commodore. |
||
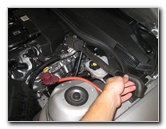
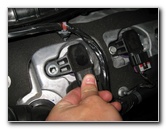
 Spark Plug Ignition Coils |
 Ignition Coil & Power Plug |
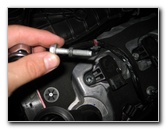
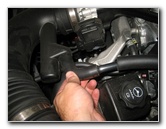
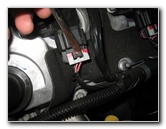 Slide Back Locking Tab |
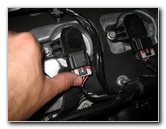
| Gently slide back the plastic lock tab on the ignition coils electrical connector with your finger tip or use a flathead screwdriver. | ||
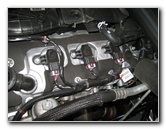
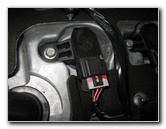
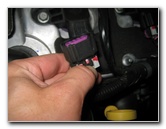 Press Release Button |
 Electrical Connector Removed |
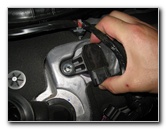
 Loosen 10mm Bolt |
| Press down the
release tab on the electrical connector before sliding the plug straight off
the ignition coil. Loosen the single bolt that holds the ignition coil in place by turning it counterclockwise with a 10mm socket and 1/4" drive ratcheting wrench. |
||
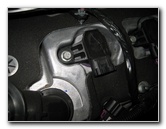
 10mm Bolt Removed |
 Rotate Back & Forth |
 Gently Pull Out Coil |
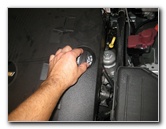
| Set the 10mm bolt
aside in a safe place. I'd recommend only checking or changing one spark plug at a time in order to reduce the risk of having debris fall down in to the cylinder or to keep you from misplacing parts. Gently rotate the the ignition coil back and forth a few times before pulling it straight out of the well. Set the ignition coil aside in a safe place. |
||
|
|
||
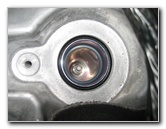 Spark Plug Well |
 Loosen With 5/8" Socket |
 Spin Out Old Spark Plug |
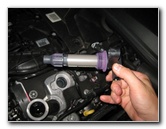
| Attach the
5/8" spark plug socket to a 6" extension bar and a 3/8" drive ratcheting wrench. Lower the socket down over the old spark plug and loosen it in the counterclockwise direction. Try to avoid using excessive force to loosen the old spark plug to prevent from cracking the ceramic portion of the plug. If you have trouble loosening the old spark plug, try spraying a small amount of penetrating oil such as PB Blaster, Liquid Wrench or Kano Kroil and wait at least 15 minutes or more before attempting to loosen it again. If you don't have any penetrating oil, try spraying some WD-40 and/or warm up the engine for a few minutes to help expand the metal engine block. Once the spark plug has been loosened, detach the ratchet from the extension bar and spin it out the rest of the way by hand. Carefully lift the old spark plug out of the well and remove it from the socket. |
||
 Lift Out Old Spark Plug |
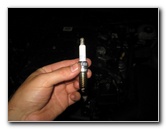 Inspect Old Spark Plug |
 Lower In New Spark Plug |
| If the rubber
insert from the spark plug socket is attached to the old plug, remove it and
push it back in to the socket. If the electrode at the end of the old spark plug looks ashy white, the plugs may have been exposed to high temperatures such as overheating or they may be the incorrect heat range for your driving conditions or environment. On the other hand, if the old spark plugs are grey or covered in dark black soot, the engine may be burning oil and should be examined by a professional mechanic. (An optional step is to apply some anti-seize grease to the threads on the spark plug. Most spark plug manufacturers recommend that you do not use anti-seize grease since it can lead to over tightening.) Some mechanics believe that using anti-seize grease on the spark plugs will help prevent them from becoming stuck or "frozen" in to the cylinder head if they are not removed again for another 100,000 miles. If you have a spark plug gap gauge, check that the new spark plugs are gapped to the manufacturer's specification listed on the box. They should be pre-set from the factory, so don't worry if you don't have a gap gauge. The OEM plugs should be pre-gapped to .043". |
||
 Tighten New Plug Clockwise |
 Apply Dielectric Grease |
 Lower In Ignition Coil |
| The OEM iridium tipped spark plugs in
this 2014 Chevy Camaro are the AC Delco 41-109
(or GM part # 12622561) Push the new spark plug in to the 5/8" socket. Your spark plug socket should have a rubber insert or a strong magnet to securely hold the plug in place. Lower the spark plug down in to the well and spin it in by hand in the clockwise direction with the extension bar until it makes contact with the cylinder head. Apply a small amount of dielectric grease to the opening in the rubber dust boot at the bottom of the ignition coil.The dielectric grease will help keep out any moisture or debris which will allow a good electrical connection between the spark plug and the ignition coil. Lower the ignition coil down in to the spark plug well and rotate it back and forth several times to help spread the dielectric grease. |
||
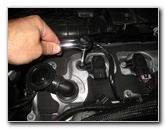
 Replace 10mm Bolt |
 Tighten 10mm Clockwise |
 Push In Power Plug |
| Re-insert the 10mm
bolt in to the ignition coil and tighten it in the clockwise direction until
it is snug. Try to avoid over tightening the 10mm bolt to prevent from cracking the plastic ignition coil housing. Push the power plug straight on to the ignition coil until it clicks securely in place. |
||
 Power Plug Replaced |
 Slide In Lock Tab |
 Replace Vacuum Hose |
| Slide in the grey
plastic lock tab to secure the power plug. Once you have done checking or replacing all three plugs on one side of the V6 engine, replace the vacuum hose line. |
||
 Push On Engine Cover |
 Replace Oil Filler Cap |
 Engine Spark Plugs Replaced |
| Push on the plastic
engine cover and replace the oil filler cap by twisting it on in the
clockwise direction. Start the engine and listen for any strange sounds that may indicate a problem such as a disconnected power plug or a loose spark plug. For more,
check out my other
2010-2015 GM Chevrolet Camaro DIY Repair Guides. |
||
| If you found this guide to be helpful,
please consider making a small donation by clicking on the PayPal.com
"Donate" button located to the right of this paragraph. Thank you!
(Note: I am not a registered charity. Donations are not tax deductible.) |