
Ford Flex
Serpentine Belt Replacement Guide
How to replace the serpentine accessory
belt on a 1st generation 2009 to 2019 Ford Flex with the part numbers.

By Paul B. Michaels Author & Photographer Auto Mechanic Since 1989 |
||
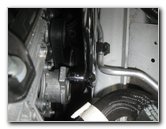
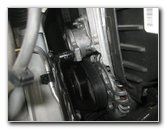
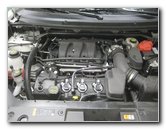
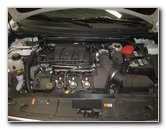 2019 Flex 3.5L V6 Engine |
 Left Side of Engine Bay |
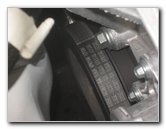
 Belt Tensioner Assembly |
| This automotive
maintenance tutorial was specifically written to assist owners of the first
generation (2009, 2010, 2011, 2012, 2013, 2014, 2015, 2016, 2017, 2018 &
2019) Ford Flex crossover SUV in changing the serpentine accessory belt on
the Duratec 35 3.5 liter V6 engine. Owners of other Ford or Lincoln vehicle such as the Explorer, Fiesta, Focus, Fusion, C-Max, Mustang, Taurus, EcoSport, Escape, Edge, Expedition, Transit Connect, F-150, Ranger, MKZ, MKC, Navigator, MKX and Continental may also find these DIY instructions to be helpful. The belt change procedure should be the same or very similar for the EcoBoost 3.5L V6 engine. The original OEM belt part number is Bando 6PK1140 (also known as FoMoCo part # GB5E-6C301-BA). A few other compatible replacement aftermarket belts with their part numbers include the following: Gates K060448, Motorcraft JK4-377-BA and Dayco 5060450. The only tool needed to complete this procedure is a long 3/8" drive breaker bar. You could also use a standard 3/8" drive ratchet with a piece of metal pipe as a breaker bar. I chose to attach a 3/8" drive adapter to my 1/2" drive breaker bar. |
||
|
|
||
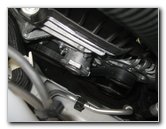
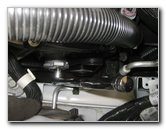
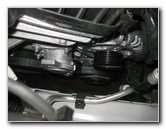
 Tensioner & Crankshaft |
 Rear of Engine - Crankshaft |
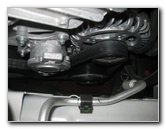 Alternator & A/C |
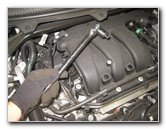
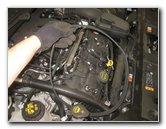
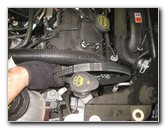
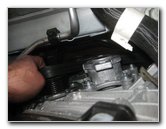
| The first two steps
are to open the hood and then move to the left (passenger) side of the
engine bay. Take a few moments to study how the original OEM belt is routed around the various pulleys including the crankshaft, A/C compressor, alternator and the tensioner assembly pulley. |
||
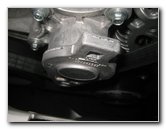
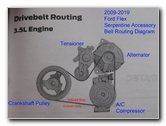 Belt Routing Diagram |
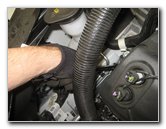
 3/8" Drive & Ratchet |
 Insert 3/8" Drive Ratchet |
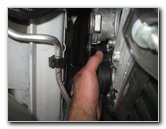
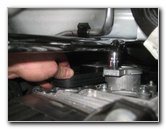
| I took a picture of
the belt routing diagram from the service manual and labeled the pulleys
including the orientation of the ribbed and flat or "smooth" side of the
belt. If you look closely at the tensioner arm, you'll see an arrow pointing towards the front of the car (towards the headlights, away from the windshield). There is also the word "LIFT" stamped on the tensioner. Place the 3/8" drive ratchet into the square opening at the top of the tensioner assembly just above the arrow and "LIFT". |
||
 Rotate To Front of Car |
 Rotate Forward / Down |
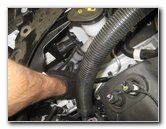 Release Tension On Belt |
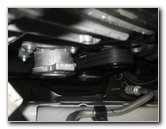
| Carefully rotate
the ratchet handle towards the front of the car and down to the floor. As you rotate the tensioner arm, you'll see the belt become loose. Hold the tensioner in the released position and very carefully slip the old belt off the alternator pulley at the top front area of the engine. Avoid putting your fingers in between the old belt and the pulleys. Once your other hand is out the way, slowly allow the tensioner arm to move back into its original position. |
||
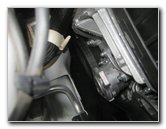
|
|
||
 Slip Old Belt Off Pulleys |
 Removing Old Belt |
 Old Belt Removed |
| Continue pulling the old belt off the other pulleys. | ||
 Inspect OEM Belt |
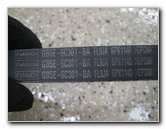 FoMoCo GB5E-6C301-BA |
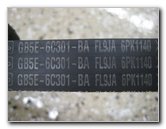 FL9JA 6PK1140 |
| Inspect the old
belt for any cracks, chunks of missing rubber, fraying or abrasion / rubbing
marks. If the old belt is in relatively good condition for its age, consider keeping it as an emergency backup just in case the new belt fails prematurely. The old belt was labeled as part number FoMoCo GB5E-6C301-BA FL9JA 6PK1140 EPDMK. I recommend buying the Bando 6PK1140 belt since Bando is the original supplier for Ford. You can see that 6PK1140 is part of the very long part number written on the OEM belt. The service interval for replacing the belt is every 150,000 miles according to the owner's manual. I would rather be cautious and replace it every 100K miles. If it was very easy to release the tensioner or the original belt seemed very loose, you may need to replace the tensioner assembly. You should also check to see if the tensioner pulley spins easily or if it is difficult to spin or wobbles. If you need to replace the tensioner assembly, a few compatible replacement parts include the following: Motorcraft BT97, ACDelco 38485 and Dayco 89603. |
||
 Lower In New Belt |
 Wrap Around Pulleys |
 Hold Last Loop By Alt. |
| Carefully lower the
new belt down into the left side of the engine bay. Begin by wrapping the ribbed side of the new belt around the large crankshaft pulley located at the lower rear of the engine. Then wrap the belt around the bottom of the air conditioning compressor pulley and up towards the alternator. Lower the smooth side of the new belt under the tensioner pulley. Hold the last loop of the new belt near the alternator pulley. |
||
 Release Tensioner |
 Slip Belt Over Alternator |
 Serpentine Belt Replaced |
| With your other
hand, use the 3/8" drive breaker bar to rotate the tensioner arm towards the
front of the car. Very carefully slip the new belt over the alternator pulley. Do not place your fingers in between the new belt and any of the pulleys. Double check that the new belt is routed properly, fully seated on the ribbed pulleys and aligned with the tensioner pulley. Start the engine and listen closely for any strange sounds that may indicate a problem such as a improperly routed belt or a worn or stuck (seized / frozen) pulley. If you do hear any strange noises, immediately turn off the ignition and double check the belt routing. Please
check out all of my
Ford Flex DIY Repair & Maintenance Guides. |
||
| If you found this guide to be helpful,
please consider making a small donation by clicking on the PayPal.com
"Donate" button located to the right of this paragraph. Thank you!
(Note: I am not a registered charity. Donations are not tax deductible.) |