
Ford Explorer
Map Light Bulbs Replacement Guide
How to change a burnt out map light bulb
in the overhead console of a 5th generation 2011-2015 Ford Explorer SUV.

By Paul B. Michaels Author & Photographer Auto Mechanic Since 1989 |
||
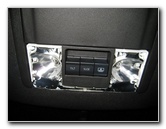
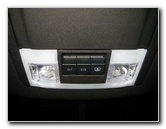
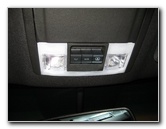 2014 Explorer Map Lights |
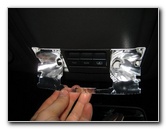
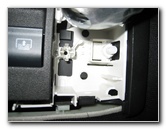
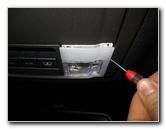 Gently Pry Out Lens Cover |
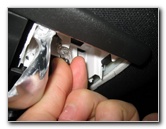
 Release Both Sides of Cover |
| This
automotive maintenance tutorial was specifically written to assist
owners of the fifth generation (2011, 2012, 2013, 2014 & 2015) Ford
Explorer SUV in changing a burnt out overhead map light bulb or
upgrading them both to brighter LED units. Owners of other Ford or Lincoln vehicles with similar map light bulb housings such as the Fusion, Mustang, Taurus, Escape, Edge, Flex, Expedition, F-150, Focus, C-MAX, MKC, MKZ, MKX, MKS, MKT and Navigator may also find these DIY instructions to be helpful. A replacement bulb is part number 168 which is available from various manufacturers such as Sylvania, GE, Eiko and PIAA. If you would like to have brighter map lights, install some compatible 168 LED bulbs. If necessary, you may also use any other miniature wedge base bulbs such as the # W5W, 2825, 158 or 194. The only tool needed to replace the bulbs is a small flathead screwdriver or a plastic pry bar tool used to pry out the plastic lens cover. |
||
|
|
||
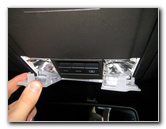
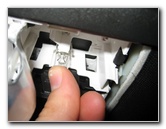
 Lens Cover Removed |
 Map Light Bulbs Exposed |
 Pull Back Metal Reflector |
| To prevent from
scratching the plastic surfaces, you may choose to cover the tip of your
screwdriver with a thin micro fiber cloth. Carefully insert the blade of the small flathead screwdriver in between the edge of the lens cover and the overhead console. Gently pry out one side of the lens cover and then move the screwdriver to pry out the other edge. The lens cover should pop out relatively easily. Do not use excessive force to prevent from cracking the plastic. Pull the lens cover off the overhead console and set it aside in a safe place. You might be able to grasp the old bulbs with just the lens cover removed. I was unable to get a good grip on them, so I carefully pulled down the front edge of the silver metal reflector and bent it towards the rear of the SUV to gain easy access to the old bulbs. |
||
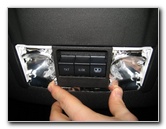
 Easier Access To Old Bulbs |
 Pull Out Old Bulb |
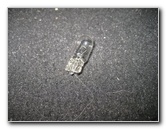 Old # 168 Light Bulb |
|
Grasp the old bulb with your thumb and forefinger before pulling it straight out of its socket. |
||
 Empty Bulb Socket |
 Push In New # 168 Bulb |
 Push Back Metal Reflector |
| Push a new #
168 bulb straight in to the socket. If necessary, you may also use any other compatible miniature wedge base bulbs such as the # W5W, 158, 194, 2825 or a brighter LED unit. Gently push the metal reflector back in to place over the bulbs. |
||
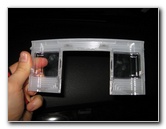
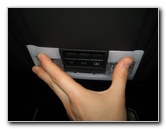 Gently Pop In Lens Cover |
 Lens Cover Replaced |
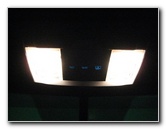 Test New Map Light Bulbs |
| Line up the plastic
lens cover and gently pop it back in to place. Test the new map light bulbs by pressing the outer edges of the lens cover to activate the "On/Off" switches. For more, check out my other
Ford Explorer DIY Repair & Maintenance Guides. |
||
| If you found this guide to be helpful,
please consider making a small donation by clicking on the PayPal.com
"Donate" button located to the right of this paragraph. Thank you!
(Note: I am not a registered charity. Donations are not tax deductible.) |