
Ford EcoSport
Headlight Bulbs Replacement Guide
How to change a burnt out low beam, high
beam or side marker light bulb in a 2013 to 2021 Ford EcoSport.

By Paul B. Michaels Author & Photographer Auto Mechanic Since 1989 |
||
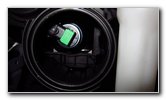
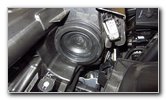
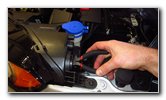
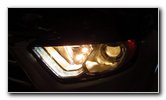
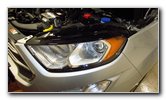 2020 EcoSport Headlight |
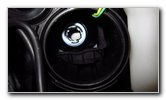
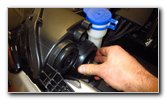
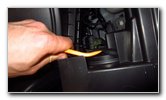
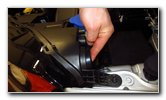
 Low Beam Rubber Cover |
 Pull Off Rubber Dust Cap |
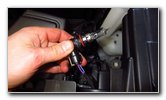
| This automotive
maintenance tutorial was specifically written to assist owners of the second
generation 2013, 2014, 2015, 2016, 2017, 2018, 2019, 2020 and 2021 Ford
EcoSport compact SUV in changing a burnt out low beam, high beam or front
side marker light bulb in the headlight housings. (The front turn signal and
fog light bulbs are both located in a separate housing located at the bottom
of the bumper cover.) Owners of other Ford or Lincoln vehicles such as the Fiesta, B-Max, Escape, Edge, Bronco Sport, Explorer, Expedition, Transit, Focus, Mondeo, S-Max, Puma, Kuga, Endura, Everest, Ka, Figo, Endeavour, Aviator, Corsair, Nautilus and Navigator may also find these DIY instructions to be helpful. The compatible replacement light bulb part numbers are as follows: Low Beam # H11, High Beam # 9005 and Front Side Marker # 2825 (also known as W5W). If you would like to have brighter headlight bulbs that will also last much longer before burning out like the halogen and incandescent bulbs, install some H11 LED, 9005 LED and 2825 LED units. Please double check the part numbers on the OEM (original equipment manufacturer) light bulbs in your SUV before purchasing new bulbs. No tools are required to access and replace the light bulbs. Although it may be helpful to have a plastic pry bar tool, standard pliers and possibly also needle nose pliers. The first two steps are to open the hood and then move to the side of the vehicle with the burnt out light bulb. The procedure for replacing the bulbs in the driver side and the passenger side headlight assemblies are the same. The low beam bulb is situated near the middle of the headlight housing. Reach in behind the headlight and carefully pull off the round black rubber access cover. |
||
|
|
||
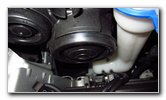
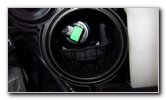
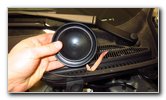
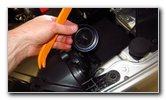
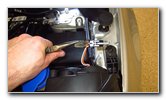
 Rubber Cap Removed |
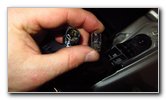
 Base of Old Low Beam |
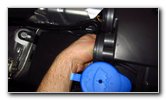 1/4 Turn Counterclockwise |
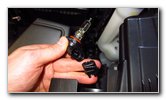
| Set the rubber dust
cap aside in a safe place. Gently rotate the base of the old low beam light bulb 1/4 turn in the counterclockwise direction. |
||
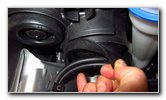
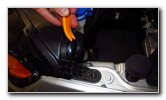
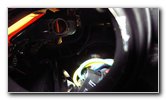
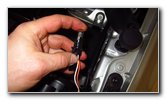
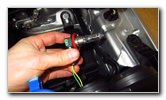 Pull Out Old Light Bulb |
 Pull Back Retaining Clip |
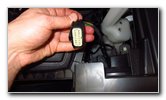
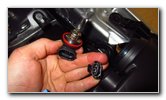 Disconnect Power Plug |
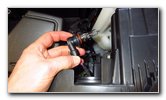
| Pull the old light
bulb straight out of the housing.
Gently pull back the black plastic retaining clip on the electrical connector before sliding it straight off the base of the old low beam bulb. Try to avoid touching the glass part of the new halogen bulb with your fingers or anything greasy in the engine bay. If you do get the new bulb dirty, wipe it clean with a paper towel and some rubbing alcohol. |
||
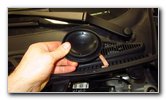
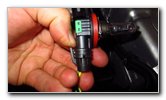
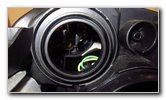
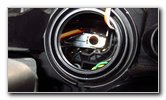
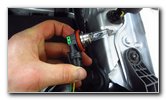 Push Plug On New Bulb |
 Empty Bulb Housing |
 1/4 Turn Clockwise |
| Push the electrical
connector straight on to the base of the new
H11 light bulb. You should feel or hear the power plug "click" securely into place. If you would like to have brighter low beam lights, install some compatible replacement H11 LED bulbs. Install the new bulb into the housing and rotate it 1/4 turn in the clockwise direction to secure it into place. |
||
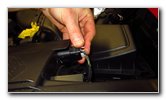
 Replace Rubber Cover |
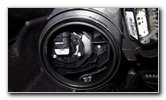
 High Beam - Inner Corner |
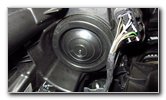 Rubber Dust Cover |
| Make sure the new
low beam bulb is properly installed. Push the rubber dust cover back into place. The high beam light bulb is located near the inner corner of the headlight assembly. For better access to the high beam bulb, I recommend disconnecting the large power plug for the entire headlight assembly. |
||
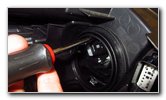
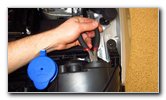
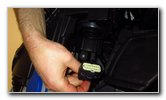 Disconnect Power Plug |
 Pry Off Rubber Dust Cap |
 Rubber Cap Removed |
| Push in the release
tab on the large electrical connector and slide it straight out of its
socket. Pull off the rubber dust cover for the high beam bulb. You may need to pry off the cover with a plastic pry bar tool. Set the rubber dust cap aside in a safe place. |
||
 Old High Beam Bulb |
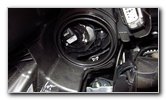 Small Hole & Off Center |
 1/4 Turn Counterclockwise |
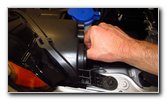
| The opening for
accessing the high beam bulb is small and the bulb is offset which makes it
rather difficult to remove. Rotate the base of the old high beam bulb 1/4 turn in the counterclockwise direction. I used a pair of pliers to get a better grip and rotate the high beam bulb. |
||
 Rotating Counterclockwise |
 Old High Beam Removed |
 Disconnect Power Plug |
| I also had to use a
flat head screwdriver to rotate the bulb the last bit. Pull the old high beam bulb straight out of the housing. Pull back the black plastic retaining clip on the electrical connector before sliding it straight off the base of the old high beam bulb. |
||
 Plug New High Beam |
 Install New High Beam |
 1/4 Turn Clockwise - Lock |
| Avoid getting any
grease, oil or dirt on the new halogen high beam bulb.
If you do get the new bulb dirty, clean it off with a paper towel and some rubbing alcohol. Any grease or oil on the halogen bulb could cause a hot spot which may reduce the life of the bulb. Push the electrical connector on to the base of the new number 9005 light bulb. If you would like to have brighter high beam lights, install some compatible replacement 9005 LED bulbs. You should hear or feel the electrical connector "click" securely into place. Install the new high beam bulb into the housing and rotate it 1/4 turn in the clockwise direction. Make sure the new bulb is properly seated in the housing. It can be difficult to install due to the access opening being off center and narrow. |
||
 Replace Rubber Cover |
 Rubber Cap Secured |
 Outer Edge Rubber Cap |
| Push the rubber
dust cap back into place. The front side marker light bulb is located at the outer edge of the headlight housing. Pull off the small round black rubber access cover. You may need to use the plastic pry bar tool to remove the dust cap. |
||
 Side Marker Access Cover |
 Long Black Plastic Handle |
 Pull Socket Straight Out |
| If you look inside
the side marker housing, you'll see the long black plastic handle that
extends out from the bulb socket. Pull the tab straight back to remove the socket from the housing. |
||
 Side Marker Bulb Socket |
 Empty Bulb Housing |
 Side Marker Light Housing |
| I had to use a pair of needle nose pliers to grasp the black plastic handle and pull it out the side marker socket. | ||
 Pull Out Old Light Bulb |
 Push In New Light Bulb |
 Push In Bulb Socket |
| Carefully pull the
old light bulb straight out of the socket. If you have trouble removing the old bulb due to rust, sand or debris in the socket, try gently wiggling the bulb while pulling it straight out of the socket. Push a new number 2825 light bulb straight into the socket. If you would like to have brighter front side marker lights, install some compatible replacement 2825 LED bulbs. Push the side marker bulb socket straight back into the housing. Make sure the socket is fully seated. |
||
 Socket Securely In Place |
 Replace Rubber Dust Cap |
 Headlight Power Plug |
| Push the rubber
dust cap back into place. If you detached the large electrical connector for the entire headlight assembly, line it up with its socket. |
||
 Push On Connector |
 Test New Headlight Bulbs |
 Testing High Beam Bulb |
| Push the large
power plug back into its socket.
You should hear or feel the electrical connector "click" securely into place. To test the new light bulbs, turn on the headlights and flash the high beams. Be sure to write down the bulb change in your vehicle's service records. Tip - If you installed an LED bulb and it doesn't work, remove it from the socket, rotate it 180 degrees and push it back into the socket. Some LED bulbs are "polarized" and will only work when the "+" positive and "-" negative electrical contacts are in the correct orientation. If you need to change a burnt out front turn signal light bulb or fog light bulb located in the separate housing attached to the lower front bumper cover, take a look at my complete list of EcoSport tutorials at the link below. For more,
check out all of the
2013-2021 Ford EcoSport DIY Repair & Maintenance Guides. |
||
| If you found this guide to be helpful,
please consider making a small donation by clicking on the PayPal.com
"Donate" button located to the right of this paragraph. Thank you!
(Note: I am not a registered charity. Donations are not tax deductible.) |