
Dodge Durango
Rear Window Wiper Blade Replacement Guide
How to change the rear windshield wiper
blade on the back window of a 3rd generation 2011-2015 Dodge Durango.

By Paul B. Michaels Author & Photographer Auto Mechanic Since 1989 |
||
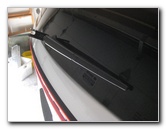
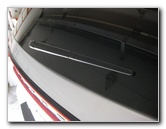
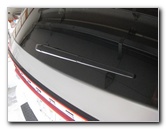 2014 Durango Rear Wiper Blade |
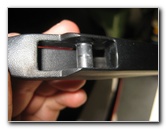
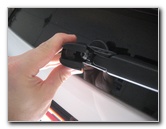
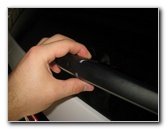 Pull Open Plastic Cover |
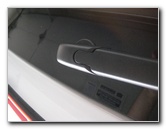
 Swing Open Hinged Cap |
| This
automotive maintenance tutorial was specifically written to assist
owners of the third generation (2011, 2012, 2013, 2014, 2015 & also
2016 in Canada) Dodge Durango SUV in changing the rear window wiper
blade. Owners of other Chrysler, Dodge and RAM minivan or SUV vehicles such as the Town & Country, Journey, Grand Caravan, and Ram C/V Tradesman may also find these DIY instructions to be helpful. The OEM back windshield wiper blade is 12 inches in size. A few compatible new aftermarket replacement 12" wiper blades with their part numbers are as follows: Michelin 9512, Trico 12-A, Bosch H307, Anco AR-12A, Valeo R12E, ACDelco 8-212A and Denso 160-5512. No tools are needed to replace the rear wiper blade. |
||
|
|
||
 Lift Wiper Off Window |
 Rotate Blade Away |
 Continue Rotating Old Blade |
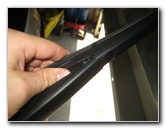
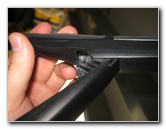
| The first step is
to gently open the hinged plastic cover or "cap" on the base of the wiper
arm assembly. Lift the wiper arm off the back window until it remains in the raised position by itself. Rotate the old wiper blade away from the wiper arm. |
||
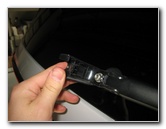
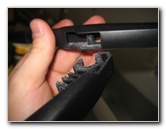
 Pop Out Mounting Bar |
 Bar & "C" Socket |
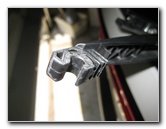 "C" Shaped Socket |
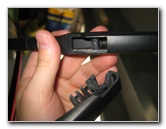
| Continue rotating the old wiper blade away from the wiper arm until the mounting bar can be popped out of the "C" shaped socket. | ||
|
|
||
 Mounting Bar - Center Blade |
 Line Up Bar & Socket |
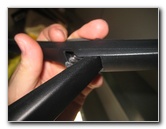 Pop In Mounting Bar |
| I recommend buying
the Michelin 9512 rear wiper
blade since it has excellent reviews on Amazon. Orientate the new wiper blade with the rubber blade facing out away from the rear window. Line up the mounting bar in the center of the new wiper blade with the "C" shaped socket at the end of the wiper arm. Gently pop the mounting bar in to the "C" shaped socket. |
||
 Rotate Blade Parallel |
 New Blade Attached To Arm |
 Lower Blade To Glass |
| Continue rotating
the new wiper blade until is parallel with the wiper arm. Gently lower the wiper blade and arm to the rear window. |
||
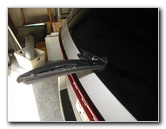
 Swing Closed Plastic Cover |
 Base Cap Replaced |
 New Wiper Blade Installed |
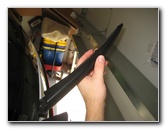
| For the best wiper
performance, I'd recommend thoroughly cleaning off the back windshield and
applying a window treatment product such as
Rain-X or Zaino Glass Polish. For more,
check out my other
Dodge Durango DIY Repair & Maintenance Guides. |
||
| If you found this guide to be helpful,
please consider making a small donation by clicking on the PayPal.com
"Donate" button located to the right of this paragraph. Thank you!
(Note: I am not a registered charity. Donations are not tax deductible.) |