
Dodge Charger
Rear Reading Light Bulbs Replacement Guide
How to replace the rear passenger overhead reading /
courtesy light bulbs in a 2006 to 2010 Dodge Charger sedan.

By Paul B. Michaels Author & Photographer Auto Mechanic Since 1989 |
||
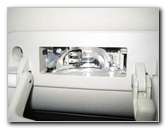
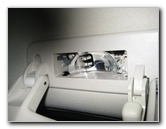
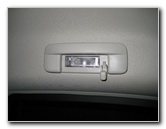 Rear Passenger Reading Light |
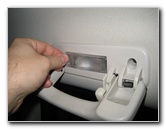
 Pry Out Clear Lens Cover |
 |
| This
automotive "how-to" guide was specifically written to assist owners
of the 2006 to 2010 Dodge Charger in replacing a burnt out rear
passenger overhead reading or "courtesy" light bulb. Owners of other Dodge or Chrysler vehicles such as the 300, 300C, Magnum, Challenger, Caliber, Journey, Avenger, Nitro, Durango, Grand Caravan, 200 and Town & Country minivan may also find this guide to be useful. Replacement bulbs for the rear passenger reading lights are part # 2825 from Sylvania and other manufacturers. If you would like to have a brighter light, install a compatible replacement 2825 LED bulb. The same bulb is also in the step courtesy lights at the bottom of the doors. To replace the bulbs, you'll need a small flathead screwdriver or a plastic pry bar tool to pry out the clear plastic lens cover. A butter knife, coin, thin key or nail file may also work instead. |
||
|
|
||
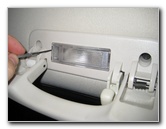
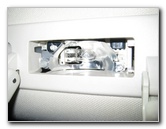
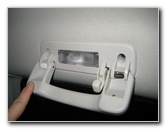
 Lens Cover Removed |
 |
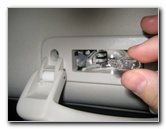 Pull Bulb Out of Socket |
| The best place to
pry out the clear plastic lens cover is at the narrow side closest to the
front of the vehicle. Insert the blade of the flathead screwdriver in
between the handle mount and the edge of the lens cover and slowly turn the
screwdriver towards the front of the car.
If you'd like to keep your interior in pristine condition, place a micro fiber cloth or other thin material over the blade of the screwdriver before inserting it. |
||
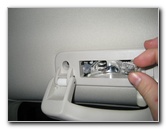 |
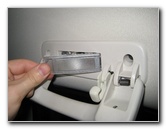
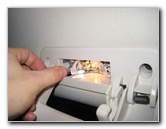
 Old # 2825 Light Bulb |
 |
| To remove the old bulb, grab it with your thumb and forefinger before pulling it straight out of the socket. | ||
|
|
||
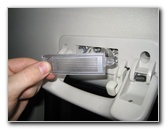
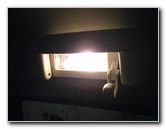
 Push In New # 2825 Bulb |
 Press Button - Test Bulb |
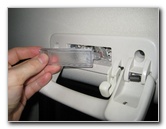 Insert Rear of Lens Cover |
| Push a new # 2825 light bulb into the socket and test it by pushing the round button on the area closest to the front of the vehicle. | ||
 Snap Front In Place |
 |
 Test New Light Bulb |
| Replace the lens
cover by inserting the protruding tab into the end closest to the rear of
the vehicle first.
Then gently snap the other side (closest to the front of the car) in to place. Test the new light bulb again by pressing the button located under the area of the lens cover closest to the front of the vehicle. For more, check out my
Dodge
Charger Maintenance & Repair Guides page. |
||
| If you found this guide to be helpful,
please consider making a small donation by clicking on the PayPal.com
"Donate" button located to the right of this paragraph. Thank you!
(Note: I am not a registered charity. Donations are not tax deductible.) |