
Chevrolet
Colorado 3rd Brake & Cargo Bed Light Bulbs Replacement Guide
How to change a burnt out high mount
third brake or cargo bed light bulb on a 2015 to 2022 GM Chevy Colorado.

By Paul B. Michaels Author & Photographer Auto Mechanic Since 1989 |
||
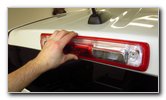
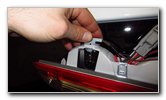
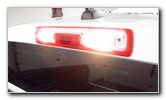
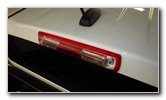 2019 Colorado 3rd Brake |
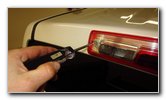 Loosen Counterclockwise |
 Remove Second Screw |
| This automotive
maintenance tutorial was specifically written to assist owners of the second
generation (2015, 2016, 2017, 2018, 2019, 2020, 2021 and 2022) GM Chevrolet Colorado truck in changing a burnt out high mount
3rd brake light bulb or the cargo bed light bulbs located in the housing
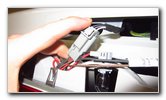
attached to the top of the passenger cabin above the rear windshield. Owners of other General Motors vehicles from Chevrolet, GMC, Cadillac, Buick and Holden such as the Trax, Equinox, Traverse, Blazer, Tahoe, Suburban, Sonic, Cruze, Trailblazer, Spark, Malibu, Impala, Volt, Bolt, Corvette, Camaro, Silverado, Express, Regal, LaCrosse, Cascada, Encore, Enclave, Envision, Canyon, Sierra, Terrain, Acadia, Yukon, XT4, XT5, XT6, Escalade, CT5, CTS, XTS, CT6, ATS, Astra and Commodore may also find these DIY instructions to be helpful. The compatible replacement miniature wedge base bulb part number for all three lights is 921 (also known as W16W). If you would like to have a brighter 3rd brake light or cargo bed lights, install some 921 LED bulbs. The only tool required to access and replace the bulbs is a Torx T20 star bit screwdriver. The first two steps are to lower the tailgate and climb on to the cargo bed. Loosen the two screws on the light housing by turning them in the counterclockwise direction with the Torx T-20 screwdriver. |
||
|
|
||
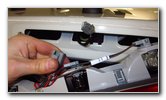
 Two Screws Removed |
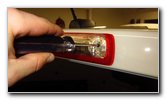
 Pull Off Light Housing |
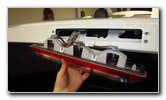 Light Housing Removed |
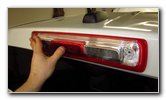
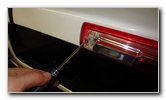
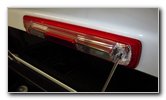
| Set the two screws
aside in a safe place. Gently pull the light housing straight off the back of the passenger cabin. If you have trouble removing the light housing, use a small plastic pry bar tool to carefully separate the housing from the vehicle. An optional step is to disconnect the housing from the electrical connector. Push in the release tab on the power plug before sliding it straight out of its socket. |
||
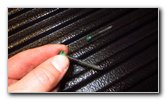
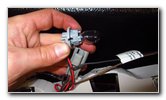
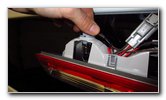 1/4 Turn Counterclockwise |
 Left Bed Light Socket |
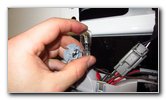 Pull Out Old Light Bulb |
| Rotate the base of
the bulb socket 1/4 turn in the counterclockwise direction before pulling it
straight out of the housing. If you have trouble removing the old light bulb from the socket due to rust or debris, try gently wiggling it back and forth while pulling. Try to avoid using excessive pressure on the old light bulb to prevent from having it break and cut your fingers. The OEM (original equipment manufacturer) light bulbs in this 2019 Colorado LT were marked as part number W16W which is the same as the 921 bulbs. |
||
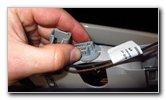
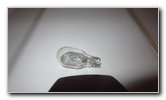 Old Light Bulb Removed |
 Push In New Light Bulb |
 1/4 Turn Clockwise - Lock |
| Push a new number
921 light bulb straight into
the socket. Clean the new bulb with a paper towel or a micro fiber cloth. If there is any grease or oil on the new bulb, it can cause a hot spot and lead to the bulb failing prematurely. If you would like to have a brighter 3rd brake light or cargo bed lights that will also last a lot longer before burning out, install some compatible replacement 921 LED bulbs. Re-insert the bulb socket into the housing and twist it 1/4 turn in the clockwise direction to secure it into place. |
||
|
|
||
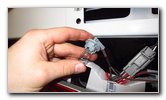
 Bulb Socket Secured |
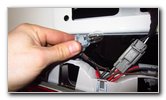
 Disconnect Power Plug |
 3rd Brake Light Bulb |
| The high mount
third brake light bulb is located in the center of the light housing. To replace the other bulbs, repeat the process. Rotate the bulb socket 1/4 turn in the counterclockwise direction, pull out the old bulb, push in the new bulb, clean the bulb, re-insert the socket into the housing and rotate it 1/4 turn in the clockwise direction. |
||
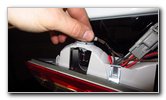
 Re-Install Bulb Socket |
 Push In Power Plug |
 Push In Light Housing |
| If you disconnected
the power plug, push it back into its socket. The electrical connector should "click" securely into place. Line up the light housing and push it back into place on the rear of the passenger cabin. |
||
 Replace Two Screws |
 Tighten Clockwise |
 Test New Light Bulbs |
| Replace the two
screws by turning them in the clockwise direction with the Torx T20 star bit
screwdriver until they are snug. Try to avoid over tightening the screws to prevent from cracking the plastic light housing. To test the new light bulbs, have an assistant step on the brake and press the "Unlock" button on the key fob to activate the cargo bed lights. Tip - If you installed LED bulbs and they don't work, try removing the bulbs from the sockets, rotate them 180 degrees and push them back into the sockets. Some LED bulbs are polarized and will only work when the "+" positive and "-" negative electrical contacts are in the correct orientation. Be sure to write down the bulb change in your truck's service records. Please check out all of my
2015-2019 GM Chevrolet Colorado DIY Repair & Maintenance Guides. |
||
| If you found this guide to be helpful,
please consider making a small donation by clicking on the PayPal.com
"Donate" button located to the right of this paragraph. Thank you!
(Note: I am not a registered charity. Donations are not tax deductible.) |