
Acura MDX
Serpentine Accessory Belt Replacement Guide
How to change the serpentine accessory
belt on the 3.5L V6 VTEC engine in a 1st generation 2001 to 2006 Acura MDX.

By Paul B. Michaels Author & Photographer Auto Mechanic Since 1989 |
||
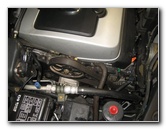
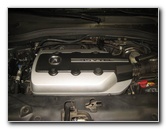 2006 MDX 3.5L V6 Engine |
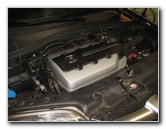 Move To Right Side |
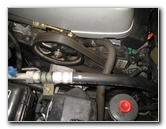 Serpentine Belt & Pulleys |
| This
automotive maintenance tutorial was specifically created to assist
owners of the first generation (2001, 2002, 2003, 2004, 2005 & 2006)
Acura MDX in removing and replacing the serpentine accessory belt on
the Honda 3.5 liter V6 VTEC J35A3 or J35A5 engine. Owners of other Acura or Honda vehicles such as the RDX, ILX, TLX, RLX, TL, CL, RSX, RL, TSX, ZDX, NSX, Integra, Pilot, Accord, Civic, Fit, Clarity, CR-V, CR-Z, HR-V, Odyssey, Element and Ridgeline with the VTEC 3.5L V6 engine may also find these DIY instructions to be helpful. A few compatible replacement serpentine accessory belts with their part numbers are as follows: Bando 6PK2135, Gates K060841, Dayco 5060840, ACDelco 6K841 and Mitsuboshi 6PK2135. The tools required to complete this procedure include a 14mm socket with a long handled 1/2" drive ratchet and an optional breaker bar. You may opt to purchase a specialized 14mm serpentine belt tool such as the Schley SL10950, Lisle 59000, Honda YA9317 and Assenmacher HON1419. |
||
|
|
||
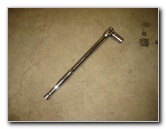 14mm Socket & 1/2" Ratchet |
 Black Plastic Wire Loom |
 Blue Plastic Wire Holder |
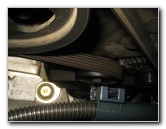
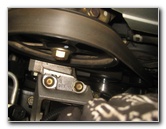
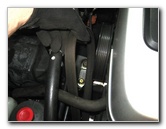
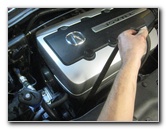
| The
first two steps are to open the hood and then move to the left (passenger)
side of the engine bay. If you have recently driven the SUV, I recommend allowing the engine to cool off for at least an hour or two before you replace the belt. Then locate the blue plastic wire loom holder that secures the black wire loom to the engine bay near the pulleys. |
||
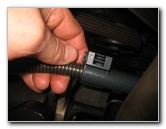
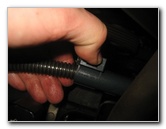 Pull Out Release Clip |
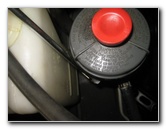 Pry Back Tab - P/S Tank |
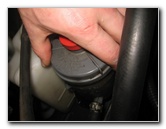 Lift Out Power Steering |
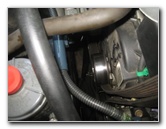
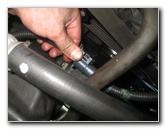
| Gently pull the
blue plastic release tab away from the connector and wire loom (towards the
engine). Carefully lift the wire loom holder off its mounting bracket and move it away from the pulleys and belt. Then use a flathead screwdriver to pry back the release tab on the mounting bracket for the power steering fluid reservoir (grey plastic with a red cap). Lift the power steering fluid reservoir up and off its mounting bracket. Move it off to the left away from the pulleys and belt. |
||
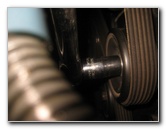
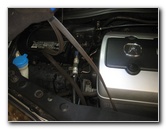
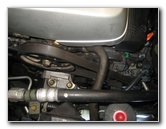
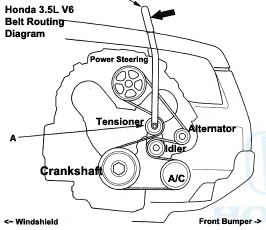
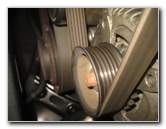 Study Belt Routing |
 Belt Tensioner Pulley |
 A/C Compressor Pulley |
| Take a minute to study how the old belt is routed around the various pulleys including the power steering pump, tensioner pulley, idler pulley, alternator, crankshaft and the A/C (air conditioning / HVAC system) compressor. | ||
 Crankshaft Pulley |
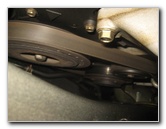 |
 Power Steering Pump |
|
|
||
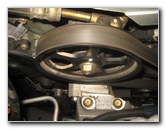
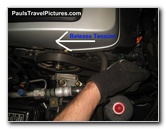
 |
 Socket On Tensioner |
 14mm Tensioner Pulley |
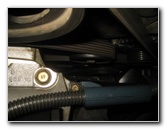
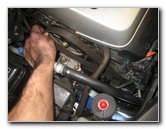
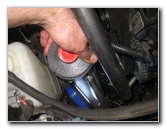
| Place the 14mm 1/2"
drive socket attached to the long handled ratchet over the bolt head on the
tensioner pulley located behind the alternator and below the power steering
pump pulley. Make sure that the socket is securely in place. |
||
 Rotate Counterclockwise |
 Pull Back Towards Windshield |
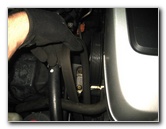 Slip Old Belt Off Pulleys |
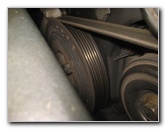
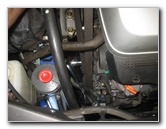
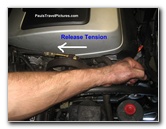
| Carefully and
firmly rotate the long handled 1/2" drive ratchet back towards the
windshield to release the tension on the old belt. This is the counterclockwise direction if you are standing on the left (passenger) side of the engine bay. Carefully hold the ratchet in place rotated back towards the windshield with the tension released and slip the old belt off the top of the power steering pump pulley at the top of the engine.
Slowly return the ratchet to the starting position towards the front of the SUV. |
||
|
|
||
 |
 Lift Old Belt Out |
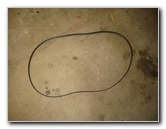 Old OEM Belt Removed |
| Pull the old belt
off the pulleys and out of the engine bay. Inspect the old belt for fraying, chunks of missing rubber and exposed metal strands. If the old belt is in good condition, consider keeping it as an emergency backup just in case the new belt fails prematurely. Check the idler and tensioner pulleys to make sure they spins freely. If they do not, replace them with new pulleys. The new idler and tensioner pulleys with their part numbers are as follows: Hayden Automotive 5979, ACDelco 38006, Gates 38006 and Dayco 89007. If it seemed very easy to rotate the tensioner assembly and release the old belt, the OEM tensioner assembly might be worn out and should be replaced. Another symptom of a weak tensioner arm is an intermittent "chirping" sound coming from the belt. A compatible replacement tensioner assembly is part number Continental Elite 49349. |
||
 Lower In New Belt |
 |
 Wrap Belt Around Crankshaft |
| Lower the new belt
down into the engine bay. I recommend buying the Bando 6PK2135 serpentine belt since it has excellent reviews on Amazon. A good tip to remember when you are installing the new belt is that the ribbed side of the belt will be wrapped around ribbed pulleys and the smooth side will go against the smooth pulleys. Start by wrapping the ribbed side of the new belt around the large crankshaft pulley at the rear lower part of the engine. |
||
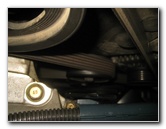
 HVAC Compressor |
 Belt On Crankshaft |
 |
| Then follow the
belt routing diagram to route the new belt around the A/C compressor pulley,
idler pulley, alternator, tensioner pulley and up to the water pump pulley.
|
||
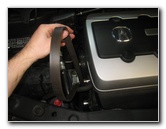
 Hold Last Loop By P/S Pump |
 Rotate Counterclockwise |
 New Belt Installed |
| Hold the last loop
of the new serpentine belt near the power steering pump at the top of the
engine. Place the 14mm socket and long handled 1/2" drive ratchet over the bolt head on the tensioner assembly pulley. Pull the ratchet handle back towards the windshield and the rear of the SUV (counterclockwise). Carefully slip the last loop of the new serpentine belt over the power steering pulley. Slowly rotate the ratchet handle back to the starting position closer to the front of the SUV. Double check that the new belt is properly routed around the crankshaft, A/C, idler, tensioner, alternator and power steering pump pulleys. |
||
 Replace P/S Reservoir |
 Replace Wire Loom Holder |
 Start Engine - Test New Belt |
|
Push the power steering fluid reservoir back down on to its mounting bracket. Push the blue plastic wire loom holder on to its mounting bracket. Start the engine and listen closely for any strange sounds that may indicate an improperly routed belt or a worn out pulley. If you hear any strange noises, immediately turn off the engine and check that you have properly routed the new belt. Be sure to record the belt change in your vehicle's service records. For more,
please check out all of my
2001-2006 Acura MDX DIY Repair & Maintenance Guides. |
||

| If you found this guide to be helpful,
please consider making a small donation by clicking on the PayPal.com
"Donate" button located to the right of this paragraph. Thank you!
(Note: I am not a registered charity. Donations are not tax deductible.) |