
Acura MDX MAP
Sensor Replacement Guide
How to clean or change a faulty manifold
absolute pressure sensor in a 1st generation 2001 to 2006 Acura MDX.

By Paul B. Michaels Author & Photographer Auto Mechanic Since 1989 |
||
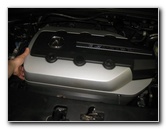
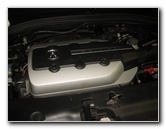
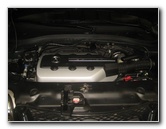 2006 MDX 3.5L V6 Engine |
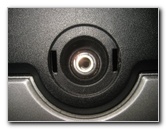
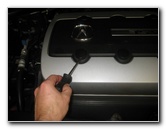 Pry Off Bolt Cover |
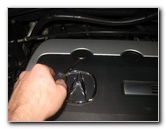 Left Rear Bolt Cover |
| This
automotive maintenance tutorial was specifically created to assist
owners of the first generation (2001, 2002, 2003, 2004, 2005 & 2006)
Acura MDX in cleaning or changing the MAP (manifold absolute
pressure) sensor in the throttle body of the VTEC 3.5 liter V6
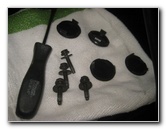
engine. Owners of other Acura or Honda vehicles such as the RDX, ILX, TLX, RLX, TL, CL, RSX, RL, TSX, ZDX, NSX, Integra, Pilot, Accord, Civic, Fit, Clarity, CR-V, CR-Z, HR-V, Odyssey, Element and Ridgeline may also find these DIY instructions to be helpful. The OEM MAP sensor was the Denso 079800-5410. Other compatible replacement MAP sensors with their part numbers are as follows: Standard Motor Products AS191, Wells SU5585, Airtex 5S2404 and Spectra MP118. The tools needed to access and replace the MAP sensor include a small flathead screwdriver, a 10mm socket with a 1/4" drive ratchet and a Phillips head screwdriver. |
||
|
|
||
Some of the possible symptoms of a faulty MAP sensor include a rough idle, loss of power, lower fuel economy (MPG), a failed emission (smog) test, stalling, fouled spark plugs, detonation (knocking / pinging), hesitation and/or surging. The engine error codes (A.K.A. check engine light "CEL", service engine soon "SES" or trouble codes) that indicate a problem with the MAP sensor are as follows: P0108 High Voltage, P0107 Low Voltage and P0106 Range / Performance. |
||
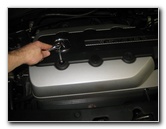
 Front Right Bolt Cover |
 Rear Right Bolt Cover |
 Loosen Counterclockwise |
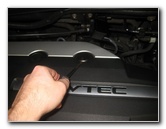
| The first step is
to open the hood to access the engine bay. Then locate the small round black plastic bolt covers on the top of the plastic engine cover. There are four bolts that hold the plastic engine cover in place. The two plastic covers in the center of the engine cover at the front and rear are decorative and do not need to be removed. Remove the four plastic bolt covers at the front left, rear left, front right and rear right of the engine cover. Use a small flathead screwdriver to gently pry up the bolt covers. To prevent from scratching the plastic surfaces, you may choose to either cover the tip of your screwdriver with a thin micro fiber cloth or instead use a plastic pry bar tool. |
||
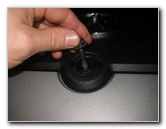
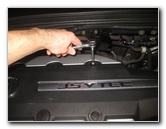
 Remove Front Left Bolt |
 Remove Front Right Bolt |
 Remove Right Rear Bolt |
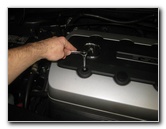
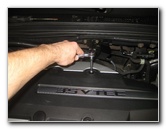
| Set the four
plastic bolt covers aside in a safe place. Remove the four bolts on the top of the engine cover by turning them counterclockwise with a 10mm socket, a short extension bar and a 1/4" drive ratchet. |
||
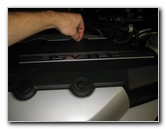
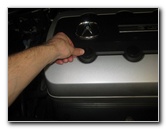
 Covers & Bolts Removed |
 Plastic Engine Cover |
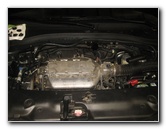 Engine Cover Removed |
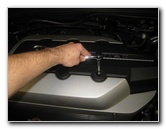
| Set the four bolts
aside in a safe place. Carefully lift the plastic cover off the top of the engine. Set the engine cover aside in a safe place. |
||
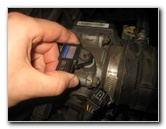
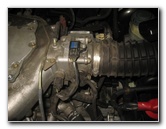 Top of Throttle Body |
 Push In Release Tab |
 Pull Off Electrical Connector |
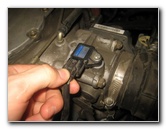
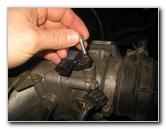
| Move to the right
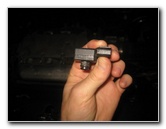
(driver) side of the engine bay. Locate the round black rubber air intake hose that leads into the square shaped silver metal throttle body. The small black plastic manifold absolute pressure sensor is situated at the top of the throttle body. The original MAP sensor on my 2006 MDX had a blue and silver sticker label. The OEM sensor in my SUV was part number Denso 079800-5410 5V PS-4A 8G31 and was made in Japan. Push in the release tab on the electrical connector before pulling the power plug straight off the old MAP sensor. |
||
 Phillips Head Screw |
 Loosen Counterclockwise |
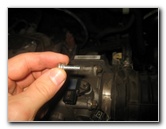 Single Bolt Removed |
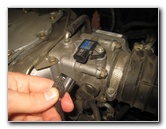
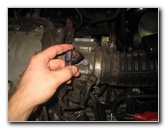
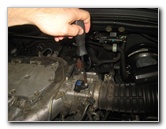
| Remove the single
bolt that secures the MAP sensor to the throttle body by turning it
counterclockwise with either a Phillips head screwdriver or a flathead
screwdriver. Set the bolt aside in a safe place. |
||
|
|
||
 Rotate Old MAP Sensor |
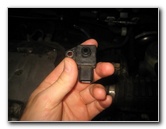 Pull Out Old MAP Sensor |
 Inspect Old MAP Sensor |
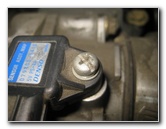
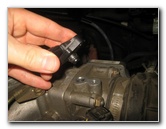
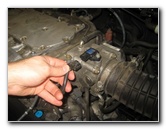
| Carefully pull the
old MAP sensor out of its port on the top of the throttle body. If you have trouble removing the old sensor, try gently rotating it back and forth while pulling up. Inspect the old MAP sensor for any oil, soot, sludge or other debris. Check to make sure the rubber o-ring gasket is not damaged. |
||
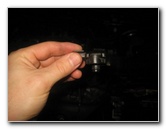
 Inspect Rubber O-Ring |
 MAP Sensor Port (Hole) |
 Line Up New MAP Sensor |
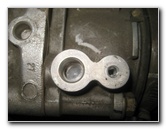
| Since the MAP
sensor does not actually sit in the air flow, it should not be very dirty.
You'll notice that the port for the MAP sensor is mostly enclosed with a curved metal bottom at the bottom of the well. There is only a small hole on the left (passenger) side of the port near the "27" stamped on the top of my throttle body in the picture above. My MAP sensor is over 11 years old and still looks brand new. If you would like to try cleaning the old MAP sensor to see if that solves your engine problems, I recommend that you use some CRC Electronic Cleaner which dries without leaving any residue on electric parts. Spray the electronic cleaner into the MAP sensor itself and also the electrical connector. Allow both of them to fully dry out. If you already have some MAF cleaner on hand, that would also work. Keep in mind that a MAF (mass air flow sensor) is a heated wire that actually sits in the air flow stream inside the throttle body or air intake tube. So it is much more likely to collect soot, oil or debris. So if your Acura or Honda has one of the MAP error codes (P0108, P0107, P0106), the old MAP sensor most likely needs to be replaced. (The engine error codes are defined as follows: P0106 - MAP Barometric Pressure Circuit Range/Performance Problem, P0107 - Manifold Absolute Pressure Barometric Pressure Circuit Low Voltage Input and P0108 - MAP Barometric Pressure Circuit High Voltage Input.) |
||
 Push In New MAP Sensor |
 Re-Insert Screw |
 Tighten Clockwise |
| If you buy a new
MAP sensor, I recommend buying the
Standard Motor Products AS191 since it has excellent review on
Amazon. Some people like to apply a small amount of silicon grease or new motor oil to the rubber o-ring gasket on the new MAP sensor. Line up the new sensor with the port on the throttle body. Gently push the new MAP sensor straight down into place. Try to avoid twisting or rotating the new sensor to prevent form damaging the rubber o-ring. Re-insert the bolt and tighten it in the clockwise direction with the Phillips head screwdriver until it is snug. Avoid over tightening the bolt to prevent from cracking the plastic sensor housing. |
||
 Push On Power Plug |
 Electrical Connector Secured |
 Replace Engine Cover |
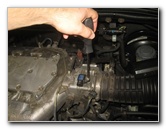
| Push the electrical
connector straight on to the new sensor. The plug should "click" securely into place. You may want to start the engine and check to see if the new MAP sensor has cleared up your error codes. If necessary, use an OBD II (A.K.A. OBDII or OBD2) scanner to clear the error codes, or you can try disconnecting the 12V automotive battery for at least 15 minutes. Lower the plastic engine cover back into place. |
||
 Line Up Bolt Holes |
 Lower In Bolts |
 Spin In Clockwise |
| Line up the bolt
holes in the plastic cover with the holes on the top of the motor. Spin in the four bolts a few turns by hand in the clockwise direction to prevent them from becoming cross threaded. |
||
 Tighten Clockwise |
 |
 Push On Bolt Covers |
| Tighten the four
bolts by turning them clockwise with the 10mm socket, an extension bar and a
1/4" drive ratchet until they are snug. Avoid over tightening the bolts to prevent from cracking the plastic engine cover. Gently pop the round plastic bolt covers back into place. Be sure to record the MAP sensor change in your SUV's service records. For more,
please check out all of my
2001-2006 Acura MDX DIY Repair & Maintenance Guides. |
||
| If you found this guide to be helpful,
please consider making a small donation by clicking on the PayPal.com
"Donate" button located to the right of this paragraph. Thank you!
(Note: I am not a registered charity. Donations are not tax deductible.) |