
Acura MDX
Coolant Change Guide
How to drain and refill the coolant /
antifreeze in the radiator and engine block of a 2001 to 2006 Acura MDX.

By Paul B. Michaels Author & Photographer Auto Mechanic Since 1989 |
||
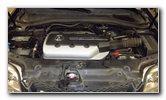 2006 Acura MDX 3.5L |
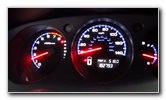
 Turn Ignition To "ON" |
 Set Heater To "HI" (Max) |
| This
automotive maintenance tutorial was specifically created to assist
owners of the first generation (2001, 2002, 2003, 2004, 2005 & 2006)
Acura MDX equipped with the 3.5L VTEC V6 engine in replacing the
coolant (antifreeze) by draining the radiator and engine block before
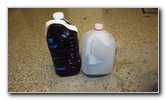
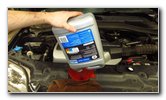
refilling. Owners of other Acura or Honda vehicles such as the RDX, ILX, TLX, RLX, TL, CL, RSX, RL, TSX, ZDX, NSX, Integra, Pilot, Accord, Civic, Fit, Clarity, CR-V, CR-Z, HR-V, Odyssey, Element and Ridgeline with the VTEC 3.5L V6 engine may also find these DIY instructions to be helpful. Acura recommends only using genuine OEM Acura or Honda Type 2 50/50 pre-mixed blue coolant which is part number Acura OL999-9011 or Honda OL999-9011. We've been using Valvoline's Zerex brand Asian coolant in our Toyota Corolla and my friend's Honda Pilot for many years. So I chose to buy two gallons of Zerex Asian Vehicle Blue coolant which is also silicate free and borate free in a 50% coolant to 50% distilled water pre-diluted mixture. The coolant change capacity specification for this 2006 MDX is 1.88 U.S. gallons (7.1 Liters) which includes the fluid that will be drained out of the radiator, engine block and overflow reservoir bottle. Please double check your owner's manual to verify the coolant change capacity specification for your SUV. The 2006-2008 Honda Pilot has a capacity of 1.93 U.S. gallons (or 7.3L). The tools and other items required to complete this procedure include a catch basin, a large automotive funnel preferably such as the EPAuto Spill-Proof radiator funnel and a 12mm wrench or a 12mm socket with a 1/4" or 3/8" drive ratchet to loosen the engine block drain valve. Since my MDX is over 14 years old with close to 183,000 miles, I decided to replace the radiator cap, the plastic radiator drain plug and the rubber o-ring gasket for the plastic plug to help prevent any future coolant leaks. The part numbers are as follows: Radiator Cap - Denso 19045-PAA-A01, Radiator Drain Plug - Honda 19011-PH1-621 and Drain Plug O-Ring - Honda 19012-671-300. Make sure the SUV is on a level surface and engage the emergency / parking brake to prevent the vehicle from moving. The first few steps are to start the engine, set the A/C system's temperature control to "HI" for maximum heat and then turn off the ignition switch. |
||
|
|
||
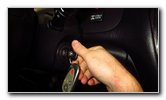
 Turn Ignition To "OFF" |
 Cold Engine - Loosen Cap |
 Allow Pressure Escape |
|
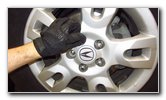
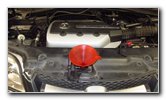
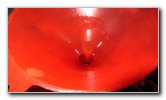
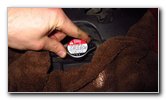
If the vehicle was recently driven, you may need to let it sit for at least a few hours. Once the radiator and engine are cool to the touch, you may proceed with the rest of the procedure. Open the hood and locate the radiator cap at the front of the engine bay just behind the "A" Acura logo and next to the hood latch release lever. Carefully twist the radiator cap in the counterclockwise direction about 1/4 to 1/2 turn. Allow any residual pressure to escape before you remove the cap. |
||
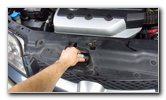
 Radiator Cap Removed |
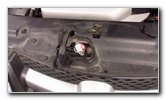
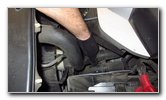
 View From Above - Plug |
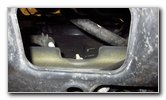 View From Below - Drain |
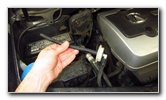
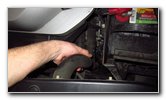
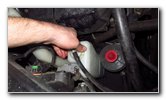
| Continue rotating
the radiator cap in the counterclockwise direction to 1/2 turn and pull it
off the filler neck. Set the radiator cap aside in a safe place. The radiator drain plug or "petcock" can be viewed from the top of the engine bay. To see the location of the drain plug, click on Picture #8 which has a red arrow pointing it. The drain plug is situated just below the left radiator fan on the passenger side of the vehicle. It is much easier to loosen the radiator drain plug from below the engine bay. Some MDX owners prefer to remove the entire plastic skid plate or "splash guard" for easier access. |
||
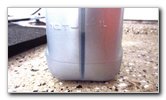
 Slightly Loosen Petcock |
 Coolant Draining Out |
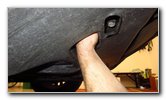
 Paper - Catch Spillage |
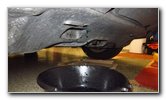
| Slide under the
front of the engine bay. Position the used oil catch container just below the opening in the plastic splash guard for the radiator drain plug. Reach in and carefully loosen the plastic drain plug in the counterclockwise direction just one or two turns until old coolant starts to flow out. If you trouble loosening a stuck or stubborn radiator drain plug, use a pair of pliers to loosen it. Do NOT fully remove the drain plug. There is a hole on the bottom of the radiator drain port that allow the old coolant to drain out with the plug still partially inserted. Allow the old coolant to drain out for at least five to ten minutes or until the flow slows down to just an occasional drip. Some of the coolant might drip down out of the rear edge of the skid plate. Make sure the used oil catch container is under both streams of fluid.
|
||
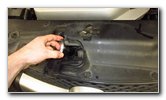
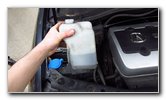
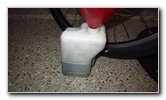
 Overflow Reservoir Bottle |
 Gently Pull Out Tank |
 Twist Off Reservoir Cap |
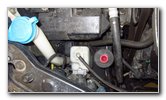
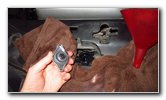
| While the old
coolant is draining out of the radiator, move to the front left area of the
engine bay. Locate the white plastic coolant overflow bottle situated in between the windshield washer fluid filler tube and the gray plastic power steering reservoir bottle. Twist off the cap on the reservoir bottle by turning it in the counterclockwise direction. |
||
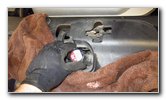
 Old Coolant In Tank |
 Pour Into Catch Basin |
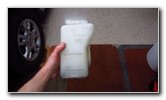 Thoroughly Clean Bottle |
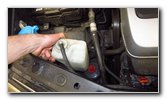
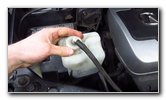
| Carefully pull the
reservoir bottle straight off its mounting bracket. Pour the old coolant out of the reservoir bottle and into the catch basin. Thoroughly clean out the reservoir bottle with a garden hose or in a tub or a sink. Be sure to shake out all of the tap water from the bottle since it may contain sediment or other contaminants. |
||
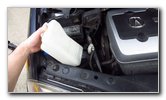 Lower In Reservoir |
 Slide On To Bracket |
 Reservoir Replaced |
| Lower the reservoir back into place on to its mounting bracket. | ||
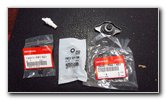 New Honda Parts |
 Remove Old Drain Plug |
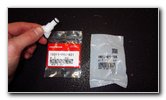 New Plug & O-Ring |
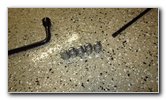
| Once the coolant
stops draining from the radiator, fully remove the plastic drain plug by
turning it in the counterclockwise direction. Inspect the plastic plug and the rubber o-ring gasket for any cracking, tears or other damage. I chose to replace both parts to prevent future coolant leaks since they may have been weakened after being subjected to thousands of heat cycles. The part number for the drain plug is Honda 19011-PH1-621 and the rubber o-ring part number is Honda 19012-671-300. |
||
 Spin In New Drain Plug |
 Tighten Radiator Plug |
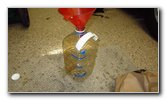 Gallon Jug - Quart Lines |
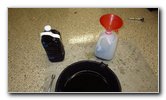
| Clean the drain
hole on the bottom of the radiator with a small towel. Spin in the drain plug in the clockwise direction and tighten it until it is snug. Try to avoid over tightening the plug to prevent from cracking the plastic radiator, breaking the plug or tearing the rubber o-ring gasket. I recommend measuring how much coolant you have drained out by marking an old gallon sized water or milk jug. I added pieces of blue painter's tape to indicate quarts on the side of the jug. You can measure by pouring in 4 cups of water from a measuring cup for each quart. You could also use the empty coolant bottle that was just emptied into the radiator. Just make sure you mark the coolant bottle with a large Sharpie marker or put an "X" on it with electrical tape to indicate that it is "used" or "old" coolant. |
||
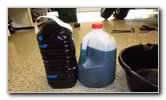
 Gallon Full + More |
 Radiator - Over 1 Gallon |
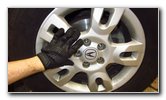
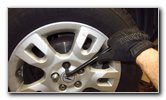
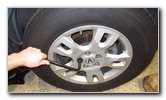 Loosen 5 Lug Nuts |
| Carefully pour the
old coolant from the catch basin into the gallon jug. I was able to drain just over 1 gallon of old coolant from the radiator. Some home mechanics might choose to stop the procedure at this point and re-fill the radiator. If you only drain the radiator, you should perform this drain and re-fill procedure more frequently such as every 30,000 miles or 2-3 years instead of waiting the full 60,000 miles or five years. It would be best to continue with draining most of the coolant by opening the valve on the engine block situated on the rear passenger corner of the engine close to the oil filter. If you'd rather not remove the front passenger wheel for easy access to the engine block drain valve, turn the steering wheel all the way to the left to create more working room in the wheel well. I chose to just remove the wheel. Slightly loosen the five lug nuts by rotating them about 1/4 to 1/2 turn in the counterclockwise direction with the lug nut wrench. |
||
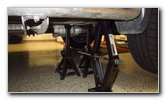 Raise Front of SUV |
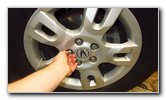 Spin Off Lug Nuts |
 Five Lug Nuts Removed |
| Carefully raise the
front passenger corner of the SUV with the floor jack. Securely support the vehicle with at least two jack stands. Please do not solely rely on the floor jack to support the car. Spin off the five lug nuts in the counterclockwise direction and set them aside in a safe place. |
||
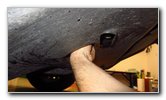
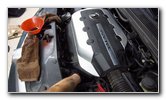
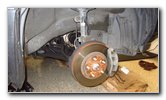 Pull Off Front Wheel |
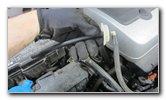
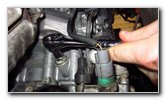
 Look Above Oil Filter |
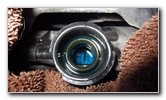
 Engine Block Drain Valve |
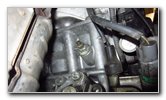
| Carefully pull off
the front passenger wheel and tire. Set the wheel aside in a safe place. Locate the engine block coolant drain valve situated above the oil filter, near the rocker arm oil pressure switch and just next to the engine oil pressure switch (sensor). |
||
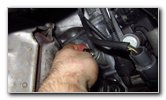
 Overflow Cap Tube |
 Detach Rubber Hose |
 Brake Fluid Bleeder Tube |
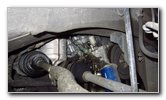
| To prevent from
making a mess, you can use a piece of rubber tubing over the valve to route
the old coolant down to the catch basin. I grabbed the black rubber hose from the overflow bottle cap and a smaller tube from my brake fluid bleeder bottle. |
||
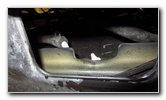
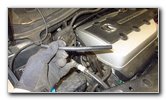
 Loosen Coolant Valve |
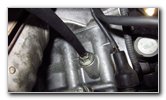 Hose On Valve Nipple |
 Tube Hanging Down |
| Slightly loosen the
smaller copper valve by turning it in the counterclockwise direction with a
12mm socket and a 1/4" or a 3/8" drive ratchet. You could also use a
standard 12mm wrench. Do NOT loosen the larger silver metal nut below the valve. Push the rubber hose over the valve. Route the tube down to the catch basin. |
||
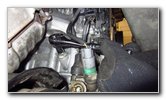
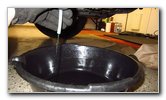 Open Valve - Draining |
 Spin Valve Closed |
 Torque Drain Valve |
| Spin open the valve
a few turns by hand. Allow the old coolant to drain out for at least a few minutes or until the flow slows down to just an occasional drop. Spin the valve closed with your fingers. Pull off the rubber hose. Tighten the valve with the 12mm socket and a ratchet in the clockwise direction until it is snug. If you have a very sensitive and reliable torque wrench, the specification in the service manual for tightening the engine block coolant drain valve is 7.4 lb-ft (10 N-m). |
||
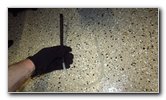
 Replace Rubber Hose |
 Second Gallon Jug |
 About 1.75 Gallons Total |
| Re-attach the black
rubber hose to the underside of the reservoir cap. Pour the old coolant into the second gallon water jug. I measured about 1.75 U.S. gallons of old coolant in my two gallon water jugs. I probably got very close to the 1.88 U.S. gallons total drained out since some of the coolant leaked on to my garage floor from both the radiator and engine block drain valve. |
||
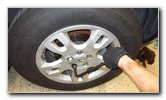
 Replace Front Wheel |
 Spin On 5 Lug Nuts |
 Slightly Tighten Lug Nuts |
| Double check that
the drain valve is tight before moving on to the next steps. If you removed the front passenger wheel, push it back into place over the lug studs. Spin on the five lug nuts a few turns by hand in the clockwise direction to prevent them from becoming cross threaded. Slightly tighten the lug nuts in the clockwise direction in a criss-cross or star pattern with the tire iron. |
||
 Lower SUV From Stands |
 Torque Lug Nuts |
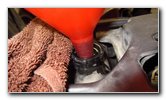
 Insert Automotive Funnel |
| Carefully lower the
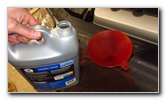
SUV from the jack stands by using the floor jack. Tighten the lug nuts in a criss-cross or star pattern to just past hand tight. It would be best to use a torque wrench to tighten the lug nuts to the owner's manual specification of 80 lb-ft. The largest funnel I currently have is the same one I use for oil changes. I highly recommend buying a large "spill-free" or "spill-proof" funnel specifically made for filling a radiator with coolant such as the EPAuto AQ-001-1. My smaller funnel almost overflowed when I had the engine running while trying to burp out any air bubbles from the cooling system. Insert the funnel snugly into the radiator filler neck. |
||
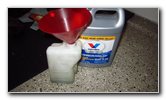
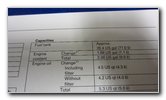 2006 MDX Capacity |
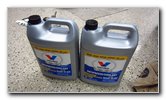 2 Gallons Zerex Asian |
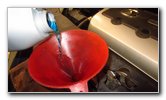 Pour In New Coolant |
| The fluid capacity
specification for this 2006 MDX Touring with the 3.5L VTEC V6 engine for a
coolant change is 1.88 U.S. gallons (or 7.1 liters).
Please double check your owner's manual for the correct capacity for your vehicle. Slowly pour the first new gallon of coolant into the funnel. Your goal is to pour smoothly and avoid creating air bubbles. Imagine you are pouring a beer bottle into a mug. Make sure the coolant isn't leaking out from between the funnel and the radiator fill hole. The funnel should be snugly wedged into the hole. |
||
 First Gallon Empty |
 Open Second Gallon |
 Fill Radiator To Top |
| After the first
gallon just is empty, begin slowly pouring in the second gallon. When you see the coolant level reach the bottom of the funnel, stop pouring. Leave the funnel in the radiator filler neck. |
||
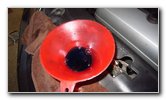 Start Engine - Bubbles |
 Release Trapped Air |
 Gently Squeeze Hoses |
| The procedure for
bleeding or "burping" out any air from the cooling system is described in
the 2006 to 2008 Honda Pilot service manual as follows:
1. Start the engine and hold the engine speed at
1,500 RPM until it warms up (the radiator fan comes on at least twice). The service manual has these steps repeated a few more times. You should notice that the coolant will expand as the engine heats up and begins filling the funnel. With the engine off, carefully and gently squeeze the coolant hoses to release any air bubbles. You'll see some bubbles coming out of the funnel and the level will drop. You may need to wait a bit for the coolant to cool off in order for the level to drop down out of the funnel and below the radiator filler neck. |
||
 Radiator Full |
 New Radiator Cap |
 Twist On Clockwise |
| Once the radiator
is full and the level has dropped down to the very bottom of the funnel, you
can remove the funnel. If necessary, fill up the radiator until you see the coolant at the bottom of the filler neck. At this point, you should have poured in at about 1.69 U.S. gallons (or 6.76 quarts) of new coolant into the radiator. (The remaining 0.19 U.S. gallons of the 1.88 U.S. gallons total capacity will be poured into the overflow bottle.) Carefully push down the radiator cap and twist it on in the clockwise direction. If the rubber gasket on the old radiator cap appears rotted, torn or damaged, it should be replaced. The genuine Honda / Acura radiator cap part number is Denso 19045-PAA-A01. Make sure the radiator cap is securely in place. |
||
 Fill Reservoir Bottle |
 Fill To "MAX" Line |
 Replace Reservoir Cap |
| Don't forget to
fill up the reservoir bottle. Pour in new coolant up to the "MAX" line on the reservoir bottle. Replace the cap on the reservoir by tightening it in the clockwise direction. The 2006-2008 Honda Pilot service manual specifies that you should "fill the coolant reservoir with Honda Long Life Antifreeze/Coolant Type 2 up to the MAX mark on the coolant reservoir, then add an extra 0.4L (0.11 U.S. gallon) coolant." I didn't add the extra 0.11 U.S. gallon (0.44 quart) to the overflow bottle which is probably why I still had just under a quart of new coolant in my second gallon jug. |
||
 Less Than Quart Left |
 Next Day - Start Engine |
 Hot Coolant In Funnel |
| The next day when
the engine was cold, I checked the coolant level again. It was still at the top of the filler neck, so I started the engine with the radiator cap off and the funnel in place. I repeated the procedure of turning the heater on high or the air conditioning to maximum cooling. A few more bubbles came out and I was able to pour in slightly more coolant. |
||
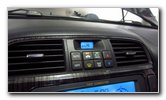 A/C Heat & Cool |
 Funnel Still Full |
 Squeeze Hoses |
| To help release
some extra air bubbles, I carefully and gently squeezed the rubber coolant
hoses while the engine was turned off.
|
||
 Releasing Bubbles |
 Replace Radiator Cap |
 Coolant Change Done! |
| Once you are
satisfied that you have poured in about 1.88 U.S. gallons of new coolant as
specified in the owner's manual, you can remove the funnel and replace the
cap. Update - I checked the coolant overflow bottle a few days later when the engine was cold and the level was down below the "LOW" mark which is why the 2006-2008 Honda Pilot service manual recommends pouring in coolant to above the "MAX" line. I poured in some more coolant into the overflow bottle again until it reached the "MAX" mark. The radiator must have sucked the extra fluid out of the reservoir.
Be sure to check your driveway, parking spot or garage for any drops of blue coolant which might indicate a leak from the radiator drain plug or the engine block drain valve. It would also be a good idea to watch the temperature gauge during your next few trips to make sure the cooling system is working properly. Don't forget to write down the coolant change in your vehicle's service records. Please bring the old used coolant to a hazardous waste disposal center, an auto repair shop or an auto parts store to be properly recycled. The owner's manual service interval specification for the coolant is to change it after 120,000 miles or 10 years the first time and then every 60,000 miles or every 3 years after that.
For more,
please check out all of my
2001-2006 Acura MDX DIY Repair & Maintenance Guides. |
||
| If you found this guide to be helpful,
please consider making a small donation by clicking on the PayPal.com
"Donate" button located to the right of this paragraph. Thank you!
(Note: I am not a registered charity. Donations are not tax deductible.) |