
Toyota RAV4
Engine Oil Change Guide
How to change the oil and filter in a 5th
generation 2019 to 2025 Toyota RAV4 with the 2.5L I4 engine.

By Paul B. Michaels Author & Photographer Auto Mechanic Since 1989 |
||
 2019 RAV4 2.5L I4 |
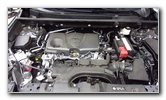
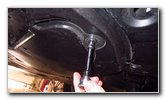
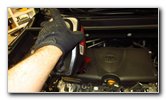
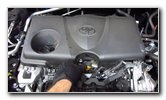
 Oil Fill Cap & Dipstick |
 Twist Off Oil Fill Cap |
| This automotive
maintenance tutorial was specifically written to assist owners of the fifth
generation (2019, 2020, 2021, 2022 and the updated 2023, 2024 and 2025 model years) Toyota
RAV4 SUV equipped with the naturally aspirated A25A-FKS 2.5 liter inline
four cylinder in changing the motor oil and replacing the filter. Owners of other Toyota and Lexus vehicles such as the Camry, Corolla, Highlander, Prius, Avalon, C-HR, GR86, Venza, Sienna, Sequoia, 4Runner, IS 250, IS 300, IS 350, ES 350, GS 350 and GX 460 may also find these DIY instructions to be helpful. The OEM (original equipment manufacturer) oil filter part number is Toyota 90915-10009 (or 90915-YZZN1). A few compatible replacement aftermarket oil filters with their part numbers are as follows: Fram PH4967, K&N PS-1003, Wix 51394 and EcoGard X11574. Update: The 2024 Toyota RAV4 owner's manual specifies an oil fill capacity of 4.5 U.S. Quarts (or 4.3L). Please check the owner's manual for your model year. Apparently Toyota updated the specification due to the new OEM Toyota oil filters being shorter than the original filters on the earlier model years. The oil capacity for the 2019 Toyota RAV4 with the A25A-FKS 2.5L I4 engine for an oil change with a filter replacement is 4.8 U.S. quarts (or 4.5L), so you'll need to buy 5 U.S. quarts of new SAE 0W-16 oil. (Please check your owner's manual for the oil viscosity recommendation for your climate or region of the world. This 2019 RAV4 requires SAE 0W-16 oil.) The tools needed to complete this procedure include a floor jack, two jack stands (or automotive ramps), a 10mm socket with a 1/4" drive ratchet, a 14mm socket with a 3/8" drive ratchet, a used oil catch container and an automotive funnel. It would be best to perform an oil change after a short drive or you can idle the engine for a few minutes. Warming up the engine will help suspend any contaminants within the old oil and also allow it to drain out more quickly. The next steps are to open the hood, twist off the oil fill cap in the counterclockwise direction and lift out the dipstick an inch or two. |
||
|
|
||
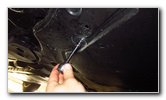
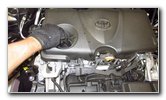
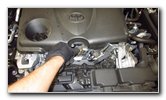
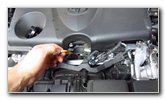 Partially Remove Dipstick |
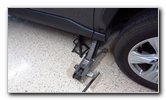 Raise Front of SUV |
 Under Engine Cover |
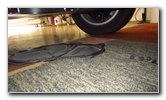
| Removing the fill
cap and lifting up the dipstick a small amount will help prevent a vacuum
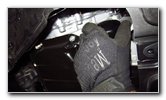
from forming and allow the old oil to drain out quickly. Make sure that the emergency / parking brake is engaged and place wheel chocks on both sides of the rear tires to prevent the vehicle from moving. Carefully raise the front of the vehicle with the floor jack and securely support it with at least two jack stands. I found that just raising the front passenger side was enough to access the oil filter and drain plug. |
||
 Loosen Counterclockwise |
 Second Screw |
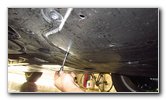 3rd Screw |
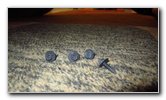
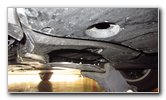
| Locate the black
plastic oil change access panel in the center of the under engine cover or
"skid plate". Remove the four screws by turning them in the counterclockwise direction with a 10mm socket and a 1/4" drive ratchet. You could also use a Phillips head screwdriver. |
||
 4th Screw |
 Access Panel Removed |
 Four Screws Removed |
| Set the four screws
aside in a safe place. Remove the oil change service access cover. |
||
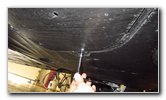
 Black Metal Oil Pan |
 Silver Oil Drain Bolt |
 Black Oil Filter |
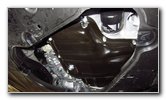
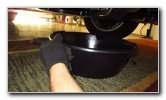
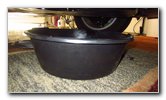
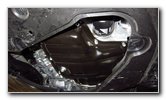
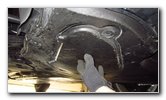
| Once the plastic
cover is out of the way, you'll see the black metal oil pan. The silver metal oil drain bolt is situated on the rear edge of the oil pan. The engine oil filter is located on the front passenger corner of the oil pan. |
||
 Used Oil Catch Container |
 Loosen Counterclockwise |
 Drain Out Old Oil |
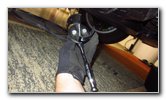
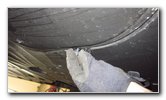
| Slide the used oil
catch container to just below the drain bolt. Carefully loosen the oil drain bolt in the counterclockwise direction with the 14mm socket and a 3/8" drive ratchet. Be careful when you remove the drain bolt. The old oil might still be hot enough to burn your fingers. Allow the old oil to drain out for at least a few minutes. |
||
 Tighten Oil Drain Bolt |
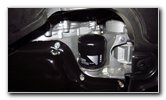
 Oil Filter Location |
 Lisle Oil Filter Wrench |
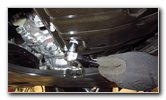
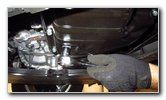
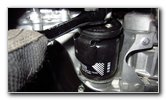
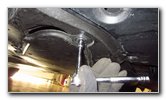
| Inspect the washer
or "gasket" on the oil drain bolt. If it appears to be damaged, it should be
replaced. Some mechanics choose to change the washer during every oil
change. The OEM part number for the oil drain bolt washer is Toyota 90430-12031. Reinsert the oil drain bolt and spin it in a few turns in the clockwise direction by hand to help prevent it from becoming cross threaded. Tighten the drain bolt in the clockwise direction until it is snug. Try to avoid over tightening the bolt to prevent from damaging the threads or the aluminum oil pan. The service manual torque specification for the 5th generation RAV4 with the A25A-FKS 2.5L I4 engine with the 14mm oil drain plug is 30 lb-ft (or 40 N*m). I highly recommend using an oil filter wrench such as the Lisle 63600. It makes removing even the most stubborn and stuck filters extremely easy. Attach the oil filter wrench to a short extension bar and the 3/8" drive ratchet. |
||
 Loosen Counterclockwise |
 Dip Finger In New Oil |
 Lubricate Rubber O-Ring |
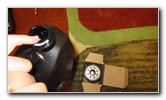
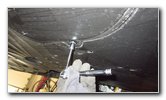
| Carefully slide the
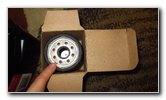
used oil catch container to just below the old oil filter. Loosen the old oil filter by turning it in the counterclockwise direction. Spin off the old oil filter and allow the old oil to drain out for a few minutes. Dip your finger into some new oil and lubricate the rubber o-ring gasket on the new filter. Lubricating the oil filter o-ring will help it form a better seal, prevent oil leaks and also make it easier to remove during the next oil change. |
||
 Spin On New Oil Filter |
 Replace Access Panel |
 Hold Cover In Place |
| Make sure the old
rubber o-ring gasket from the old oil filter is not still attached to the
engine. Spin on the new oil filter in the clockwise direction until it is snug. Or about 1/2 turn past finger tight. Try to avoid over tightening the new oil filter to prevent from damaging the gasket which could result in an oil leak. Double check that the oil drain bolt and the new oil filter are properly tightened before moving on to the next steps. Raise the access panel back into place. |
||
 Spin In Four Screws |
 |
 Tighten Clockwise |
| Spin in the four
screws in the clockwise direction. Tighten the four screws with the 10mm socket and a 1/4" drive ratchet until they are snug. |
||
 Access Cover Secured |
 Lower From Jack Stands |
 Automotive Funnel |
| Carefully lower the
SUV from the two jack stands by using the floor jack. Insert the automotive funnel into the oil fill hole. The oil capacity specification for a 2019 Toyota RAV4 with the A25A-FKS engine is 4.8 U.S. quarts (4.5L or 4.0 Imperial quarts) of SAE 0W-16 synthetic oil. Update: The 2024 Toyota RAV4 owner's manual specifies an oil fill capacity of 4.5 U.S. Quarts (or 4.3L). Please check the owner's manual for your model year. |
||
 Pour In New Oil |
 Replace Oil Fill Cap |
 Push Down Dipstick |
|
It is much better to have slightly less oil than necessary in an engine than
to overfill it. I recommend only pouring in about 4 to 4.25 U.S. quarts of new oil into the engine at first. Then replace the oil filler cap by twisting it on in the clockwise direction and push the oil dipstick back down into place. Start the engine and allow it to warm up for at least a few minutes. Turn off the engine and allow the new oil to drain down to the oil pan for at least five to ten minutes. |
||
 Check Dipstick Oil Level |
 Replace Dipstick |
 Oil Change Complete |
|
To check the oil level, pull out the dipstick, wipe it clean with a paper
towel, fully re-insert it and then pull it out again. If necessary, slowly pour in more oil and repeatedly check the level on the dipstick until it reaches just at or below the upper metal dimple in the tip of the dipstick which indicates the "MAX " or "FULL" line. You may not need to pour in the entire 4.5 U.S. quarts or 4.8 U.S. quarts (depending on the model year) of new oil in order for the level on the dipstick to reach the full line depending on how long you allowed the old oil to drain out. Update: The 2024 Toyota RAV4 owner's manual specifies an oil fill capacity of 4.5 U.S. Quarts (or 4.3L). Please check the owner's manual for your model year. To reset the "MAINT REQD" (maintenance required) oil life meter, follow these steps: 1. Select "Vehicle Settings" on the multi-information display LCD screen and press "OK". 2. Select "Scheduled Maintenance" and press "OK". 3. Select "Yes" and press "OK". A message will appear on the screen when the reset procedure is complete. It would be a good idea to check your parking spot, driveway or garage for spots of fresh oil during the next few days to ensure that the drain bolt and oil filter were properly installed. Be sure to record the oil change in your SUV's service records. According to the "Warranty & Maintenance" guide for the 2019 RAV4, the oil should be changed every 10,000 miles or at least every 12 months.
For more, please check out all of my
2019-2023 Toyota RAV4 DIY Repair & Maintenance Guides. |
||
| If you found this guide to be helpful,
please consider making a small donation by clicking on the PayPal.com
"Donate" button located to the right of this paragraph. Thank you!
(Note: I am not a registered charity. Donations are not tax deductible.) |