
Toyota RAV4
Engine Air Filter Replacement Guide
How to change the air filter in a 2019 to
2023 Toyota RAV4 SUV equipped with the A25A-FKS I4 engine.

By Paul B. Michaels Author & Photographer Auto Mechanic Since 1989 |
||
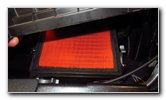
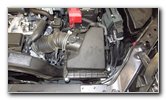
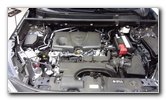 2019 RAV4 2.5L I4 |
 Engine Air Filter Housing |
 Front Edge Two Latches |
| This automotive
maintenance tutorial was specifically written to assist owners of the fifth
generation (2019, 2020, 2021, 2022 and the updated 2023 model year) Toyota
RAV4 SUV equipped with the A25A-FKS 2.5 liter naturally aspirated inline
four engine in checking, cleaning and changing the engine air filter
element. Owners of other Toyota and Lexus vehicles such as the Camry, Corolla, Highlander, Prius, Avalon, C-HR, GR86, Venza, Sienna, Sequoia, 4Runner, IS 250, IS 300, IS 350, ES 350, GS 350 and GX 460 may also find these DIY instructions to be helpful. The OEM (original equipment manufacturer) air filter part number for the A25A-FKS 2.5L I4 engine is Toyota 17801-25020 or Toyota 17801-F0050. A few compatible replacement aftermarket filters with their part numbers are as follows: Spectre SPA-2457, Luber-finer AF5190, K&N 33-2443, AEM 28-20443 and Wix 10859. No tools are needed to access and replace the filter. The first two steps are to open the hood and move to the right (driver) side of the engine bay. The black plastic engine air filter housing is located in front of the 12V automotive battery, to the left of the electrical fuse / relay box and behind the driver side headlight housing. |
||
|
|
||
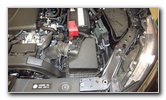
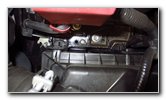
 Pull Back Left Fastener |
 Left Side Latch Released |
 Release Right Side Latch |
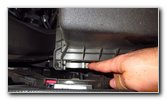
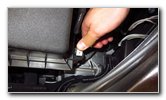
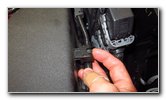
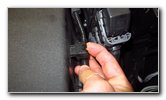
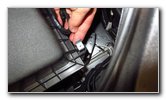
| There are two
silver metal latches on the front edge of the air box cover. Flip the fastener on the front left corner to the right side of the vehicle to release it. Push the fastener on the front right corner of the air box cover back towards the windshield of the vehicle to release it. |
||
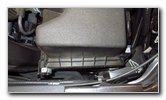
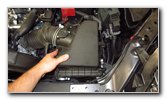
 Second Fastener Released |
 Rear Edge - Tabs & Slots |
 Lift Air Box Cover |
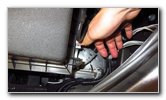
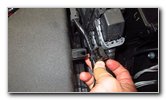
| Once the two metal
latches have been released, slide the air box cover slightly forward towards
the front of the vehicle. Release the two tabs on the back edge of the air box cover from their corresponding slots on the bottom half of the housing. Gently lift open the air box cover. There is a wire loom attached to the right side of the air box cover that limits it to being opened only a few inches. If you'd like to detach the wire loom, see the pictures down below. |
||
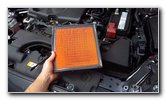 Remove Old Air filter |
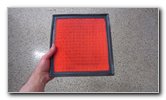 OEM Air Filter Removed |
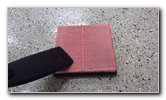 Clean With Shop Vacuum |
| Slide the old air
filter out of the bottom half of the air box. Inspect both sides of the air filter. If the old air filter is dark gray or black and clogged with dirt, dust, sand, pollen, soot, insects, leaves and other debris, it should be replaced with a new element. If the old filter is relatively clean and it can be reused for awhile longer, tap out the large debris and remove any fine dust with a wet/dry shop vacuum. |
||
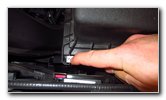
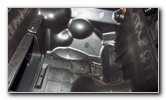 Clean Out Bottom Half |
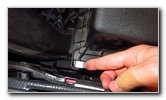
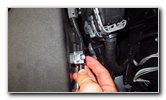
 Wire Loom Release Tab |
 Pull Up Release Tab |
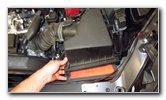
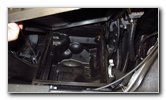
| Check the bottom
half of the air box for any sand, insects or other debris. Clean out the bottom half of the air box with the crevice attachment of your vacuum. If you'd like to detach the cable from the right side of the air box cover, gently lift up the release tab and pull off the wire loom fastener. |
||
 Detach Wire Loom |
 Easier Access To Air Box |
 Install New Air Filter |
| Lower the new air
filter into the bottom half of the air box.
Make sure it is fully seated in place. |
||
 Slide Tabs Into Slots |
 Lower Air Box Cover |
 Swing Up Left Latch |
| Slide the two
plastic tabs on the rear edge of the air box cover into their corresponding
slots on the bottom half of the housing. Lower the front edge of the air box cover down into place. Swing up the two metal latches and snap them into place over the top half of the air box. |
||
 Secure Right Side Latch |
 Reattach Wire Loom |
 Engine Filter Replaced! |
| Make sure the two
halves of the air box are flush together at every edge with no part of the
new filter visible. Reattach the wire loom to the mounting bracket on the right side of the air box cover. It should "click" securely into place. Be sure to write down the filter change in your vehicle's service records. According to the maintenance schedule in the "Warranty and Maintenance Guide", the engine air filter has a service interval of 30,000 miles or it should be changed at least every 36 months (3 years). For more, please check out all of my
2019-2023 Toyota RAV4 DIY Repair & Maintenance Guides. |
||
| If you found this guide to be helpful,
please consider making a small donation by clicking on the PayPal.com
"Donate" button located to the right of this paragraph. Thank you!
(Note: I am not a registered charity. Donations are not tax deductible.) |