
Ford
Expedition Serpentine Accessory Belt Replacement Guide
How to change the serpentine accessory
belt on the EcoBoost 3.5L V6 engine in a 2018 to 2020 Ford Expedition.
By Paul B. Michaels Author & Photographer Auto Mechanic Since 1989 |
||
 2018 Expedition 3.5L V6 |
 A/C Pulley Stretch Belt |
 Serpentine Accessory Belt |
| This automotive
maintenance tutorial was specifically written to assist owners of the 4th
generation (2018, 2019, 2020 and most likely also the 2021, 2022 and 2023 model
years) Ford Expedition SUV in changing the serpentine accessory belt (plus
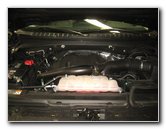
written directions for changing the stretch belt for the A/C compressor). Owners of other Ford or Lincoln vehicles such as the Explorer, F-150, Escape, EcoSport, Transit, F-350, F-250, Edge, Flex, Ranger, Fiesta, Focus, Fusion, Mustang, Bronco, Super Duty, Navigator, Continental, MKZ, MKX, MKC, MKT, Aviator, Corsair and Nautilus may also find these DIY instructions to be helpful. A few compatible replacement serpentine accessory or "main drive" belts with their part numbers include the following: Dayco 5060500, Bando 6PK1270 and MotorCraft JK6505. The compatible replacement part numbers for the smaller and narrower "stretch" belt that connects the crankshaft pulley to the air conditioning compressor pulley are as follows: Ford BR3Z-8620-S (or BR3Z8620S), Dayco E040359 and Motorcraft JK4377B. The tools required to replace the main drive serpentine accessory belt include a 15mm socket with a 3/8" or 1/2" drive ratchet or a long handled breaker bar. If you need to replace the A/C compressor stretch belt, you'll need scissors or a knife to cut off the old belt, a few cable ties (also known as "zip" ties) and an 18mm socket with a 1/2" drive ratchet or a breaker bar. The first step is to open the hood simply to allow light to enter the engine bay for easier viewing of the belts and pulleys. Slide under the front bumper cover of the SUV and look behind the radiator to access the belts. |
||
|
|
||
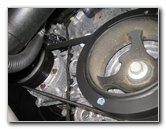
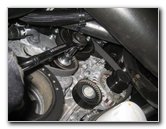
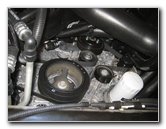
 Crankshaft Pulley |
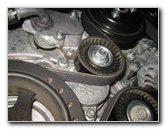 Belt Tensioner Assembly |
 A/C Compressor - Left |
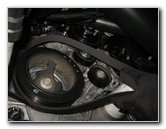
| Take a moment to
study how the two belts are routed around the various pulleys including the
crankshaft, tensioner, idler, coolant (water) pump, alternator and the A/C
compressor. I'll include a labeled belt routing diagram further down on this page. |
||
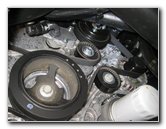
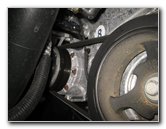
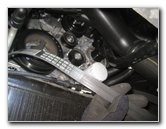
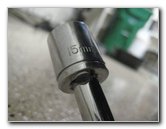 15mm Socket |
 Release Tensioner Arm |
 Rotate Ratchet Right |
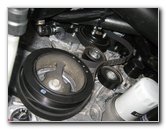
| Attach the 15mm
socket to a 3/8" or 1/2" drive ratchet or a long handled breaker bar. I found it best to also use a short extension bar on the socket to help prevent from scraping my knuckles against the pulleys. Rotate the ratchet handle to the right towards the driver side of the engine bay. This will cause the tensioner arm assembly to rotate towards the left (passenger) side of the engine and release the tension on the serpentine accessory belt. |
||
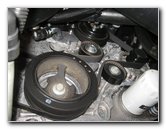
 Pull Old Belt Off Pulleys |
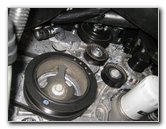 Large Crankshaft Pulley |
 Old Belt Removed |
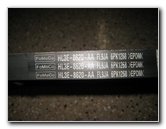
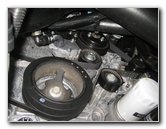
| While holding the
tensioner arm in the released position with one hand, very carefully use
your other hand to slip the old belt off the alternator pulley (or any other
pulley that you prefer to start with). Avoid placing your fingers in between the old belt and any of the pulleys! The OEM (original equipment manufacturer) on this 2018 Expedition Max was marked as part number FoMoCo HL3E-8620-AA FL9JA 6PK1268 EPDM. I recommend buying the genuine Ford part number for the serpentine belt which is MotorCraft JK6505. A/C Compressor Stretch Belt Replacement Instructions To replace the smaller and narrower stretch belt for the air conditioning compressor pulley, follow these steps. First, cut off the old belt with a knife or a pair of strong scissors. The new belt part number is Motorcraft JK4377B. Then route the new belt over the A/C compressor pulley and place the other side on the top of the crankshaft pulley. Use a cable tie (or "zip" tie) to secure the belt to the top of the crankshaft pulley. Slowly rotate the crankshaft pulley in the clockwise direction with an 18mm socket and a 1/2" drive ratchet. Use a second cable tie to secure the next section of the A/C belt to the top of the crankshaft to guide it into the proper grooves on the pulley. Continue rotating the crankshaft pulley in the clockwise direction (away from the A/C pulley and towards the right driver side). Once the new A/C belt is fully seated on the crankshaft pulley, cut away the cable ties. Double check that the new stretch belt is properly aligned in the A/C pulley and crankshaft pulley. Note - According to some manufacturers, if a stretch belt is removed from the engine, it must be replaced with a new one. |
||
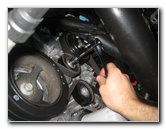
 FoMoCo Part Number |
 Wrap Belt On Crankshaft |
 Hold Belt Near Alternator |
| Check to see if the
idler pulley and tensioner pulley rotate freely. If they are hard to turn,
feel notchy or wobbly, the bearings may have worn out or are failing and the
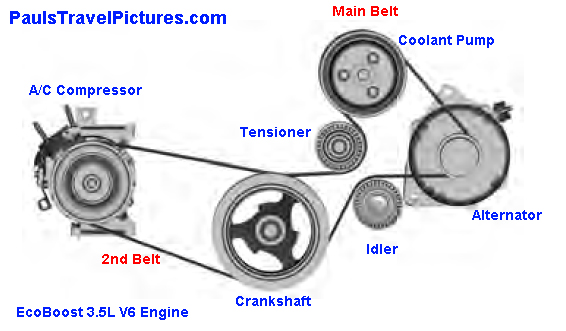
pulleys should be replaced. To install the new serpentine accessory (main drive) belt, first wrap it around the crankshaft. A good guideline to keep in mind is that the ribbed side of the belt should be wrapped around ribbed pulleys and the smooth side will be placed against smooth pulleys. Route the rest of the belt under the tensioner pulley, around the coolant (water) pump pulley and above the idler pulley. Hold the last loop of the belt near the alternator pulley. Below is a routing diagram for the main drive and A/C compressor belts on the EcoBoost 3.5L twin-turbo V6 engine.
|
||
 New Belt Installed |
 Double Check Routing |
 Start Engine - Test Belt |
| Place the 15mm
socket on the tensioner pulley. Rotate the ratchet or breaker bar in the counterclockwise direction (towards the right driver side of the car when you are under the vehicle). Hold the tensioner in the released position with one hand while carefully slipping the last loop of the new belt over the alternator pulley. Avoid placing your fingers in between the new belt and any of the pulleys! Carefully allow the tensioner arm to move back into position. Double check that the serpentine belt has been properly routed. If the tensioner arm was very easy to rotate or the new belt feels loose, you may need to replace the tensioner assembly. The OEM Ford tensioner arm and pulley assembly part number is Motorcraft BT135. Start the engine and listen carefully for any strange sounds that might indicate a problem such as a improperly routed belt or a failing pulley bearing. If you do hear any odd noises, immediately turn off the ignition and double check your work. Be sure to write down the belt change in your SUV's service records. The owner's manual service interval specification is to change the serpentine accessory belt every 150,000 miles. Please
check out all of my
2018-2020 Ford Expedition DIY Repair & Maintenance Guides. |
||
| If you found this guide to be helpful,
please consider making a small donation by clicking on the PayPal.com
"Donate" button located to the right of this paragraph. Thank you!
(Note: I am not a registered charity. Donations are not tax deductible.) |

|