
Chevrolet
Equinox Spark Plugs Replacement Guide
How to change the spark plugs in a 3rd
generation 2018 to 2022 GM Chevy Equinox with the Ecotec 1.5L I4 engine.

By Paul B. Michaels Author & Photographer Auto Mechanic Since 1989 |
||
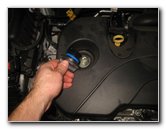
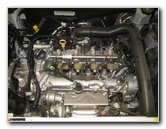
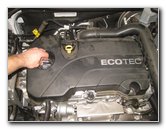
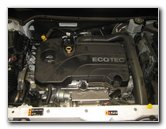 2018 Equinox 1.5L I4 |
 Bolt - Front Right Corner |
 Loosen Counterclockwise |
| This automotive
maintenance tutorial was specifically written to assist owners of the third
generation (2018, 2019 and probably also the face-lifted or revised 2020,
2021 and 2022 model years) GM Chevrolet Equinox SUV in checking or changing
the spark plugs in the Ecotec 1.5 liter turbocharged four cylinder engine.
The procedure may be the same or very similar for the 2.0L turbo I4 engine
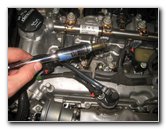
or the 1.6L I4 diesel engine. Owners of other General Motors vehicles from Chevy, Buick, GMC, Cadillac and Holden such as the Trax, Blazer, Traverse, Tahoe, Suburban, Cruze, Malibu, Impala, Camaro, Cascada, LaCrosse, Encore, Envision, Enclave, Regal, Canyon, Sierra, Terrain, Acadia, Yukon, Savana, XT4, XT5, XT6, Escalade, CTS, XTS, CT6, Astra, Commodore and Trailblazer may also find these DIY instructions to be helpful. The original "OEM" spark plugs in this 2018 Equinox Premier were the ACDelco 41-153 iridium. Another compatible replacement spark plug is the ACDelco 41-156 "Professional" iridium. The tools and other items needed to complete this procedure include a Torx T30 star bit screwdriver, a 10mm socket with a 1/4" drive ratchet, a 9/16" spark plug socket with an extension bar, a 3/8" drive ratchet and a tube of dielectric grease. The first two steps are to open the hood and then locate the black metal bolt at the front right (driver side) corner of the black plastic engine cover. Loosen the bolt by turning it in the counterclockwise direction with the Torx T-30 screwdriver. |
||
|
|
||
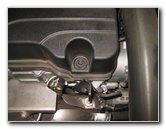
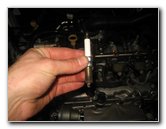
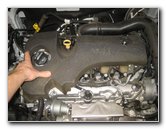
 Metal Bolt Removed |
 Remove Oil Fill Cap |
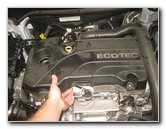 Pull Off Engine Cover |
| Set the black metal
bolt aside in a safe place. Then remove the oil fill cap by twisting it in the counterclockwise direction. Carefully pull the plastic cover off the top of the engine. |
||
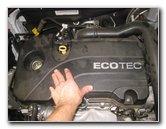
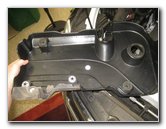 Plastic Cover Removed |
 Foam Rubber Cover |
 Rubber Cover Removed |
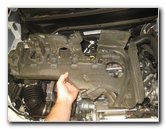
| Set the plastic
engine cover aside in a safe place. Next, pull off the foam rubber noise and vibration reducing cover from the top of the engine. Set the rubber cover aside with the plastic cover. |
||
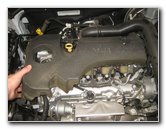
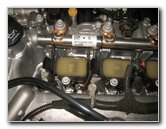
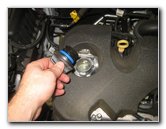
 Replace Oil Filler Cap |
 Four Ignition Coils |
 Left Ignition Coil |
| I recommend
replacing the oil fill cap to help prevent from having debris fall down into
the engine. Rotate the oil fill cap in the clockwise direction to secure it into place. If you have access to compressed air or a wet/dry shop vacuum, clean off the top of the engine. Once the two covers are out of the way, you'll be able to see the four ignition coils. I prefer to only check or change one spark plug at a time to help further reduce the risk of having debris or other foreign objects fall down into the spark plug well or the cylinder. |
||
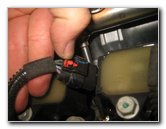
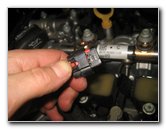
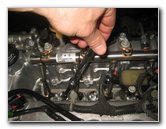
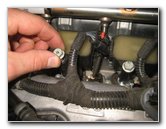
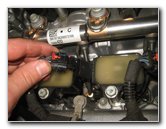
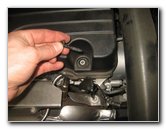
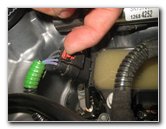 Slide Out Red Lock Tab |
 Push In Release Tab |
 Second Ignition Coil |
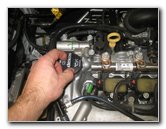
| Slide the red
locking tab on the electrical connector straight out to unlock the power
plug. Then push down on the black plastic release tab before sliding the electrical connector straight off the ignition coil. |
||
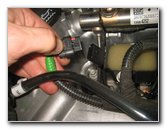
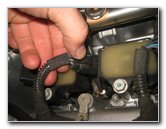
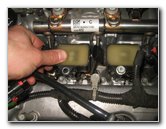
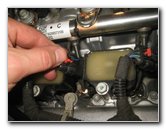
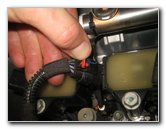
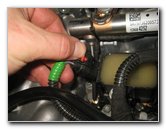
 Sliding Out Red Lock Tab |
 Pull Off Electrical Connector |
 Power Plugs Removed |
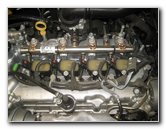
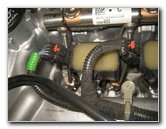
| Since there are
such tight clearances between the ignition coils, I also removed the second
ignition coil as well to create more working room. Repeat the process of sliding out the red lock tab and push down the black release tab to remove the electrical connector. |
||
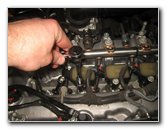
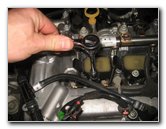 Loosen Counterclockwise |
 Ignition Coil Bolt Removed |
 Lift Out Ignition Coil |
| Loosen the single
silver metal bolt that holds each ignition coil in place by turning it in
the counterclockwise direction with the 10mm socket, a short extension bar
and a 1/4" drive ratchet. Set the ignition coil bolt aside in a safe place. Gently pull the ignition coil straight out of the spark plug well. If the rubber boot at the bottom of the ignition coil seems to be stuck or "frozen" to the top of the old spark plug, try gently rotating the ignition coil back and forth or wiggling it while you pull up. If you have a SES or CEL (service engine soon / check engine light) and your OBD2 or OBDII scanner reveals that the DTC (diagnostic trouble code) is related to the ignition coils such as P0351, P0352, P0353 or P0354, you may need to replace a faulty ignition coil. The General Motors OEM (original equipment manufacturer) part number for the ignition coils is ACDelco 12635672. Set the ignition coil aside in a safe place. |
||
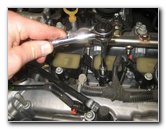
 Slanted Spark Plug Well |
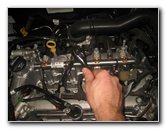
 Remove Other Bolt(s) |
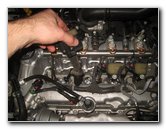 Slide Out Ignition Coil |
| Since the spark
plug wells are slanted (angled or curved) with a bent elbow section, I found
it necessary to remove the second ignition coil. Set the other ignition coil aside with the first one. |
||
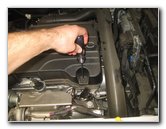
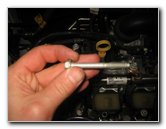
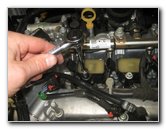
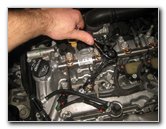 Loosen Counterclockwise |
 Spin Out Old Spark Plug |
 Old Spark Plug Removed |
| Attach the 9/16"
spark plug socket to the extension bar and a 3/8" drive ratchet. Carefully loosen the old spark plug by turning it in the counterclockwise direction. If you have trouble loosening the old spark plug that might be a bit rusted in place, try spraying in small amount of penetrating oil into the spark plug well. Allow the penetrating oil to seep down into the threads for at least five to ten minutes before attempting to loosen the spark plug again. Once the old spark plug is loose, detach the ratchet and spin it out the rest of the way by hand. Lift the old spark plug out of the well and detach it from the socket. |
||
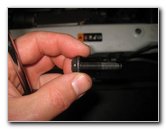
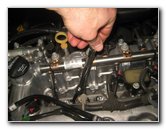
 Inspect Old Spark Plug |
 Lower In New Spark Plug |
 Tighten Clockwise |
| Inspect both ends
of the old spark plug. If the electrode tip of the old spark plug appears to be oily or covered in soot, the engine may be burning oil and should be inspected a professional mechanic. If the electrode of the spark plug appears to white or ashy, the engine may have experienced overheating. It would be best to have the cooling system inspected. The OEM spark plugs in this 2018 Equinox Premier with the Ecotec 1.5L turbo I4 engine were the ACDelco 41-153 iridium plugs. (Also known as part number GM 12673527.) You could also use the "Professional" version of the OEM spark plug which is part number ACDelco 41-156. If you have a spark plug gap gauge, check the gap on the new spark plugs to make sure they match the specification on the box. Push the new spark plug into the socket. Your spark plug socket should have a rubber insert or a strong magnet to securely hold the new plug in place. Carefully lower the new spark plug down into the well. Try to avoid hitting the electrode tip against the spark plug well or the cylinder head. Spin in the new spark plug a few turns by hand in the clockwise direction to help prevent it from becoming cross threaded. Attach the 3/8" drive ratchet to the extension bar. Tighten the new spark plug in the clockwise direction to just past the point when you feel the new crush washer collapse. If you are re-installing the old spark plugs after checking their condition, tighten the plugs to just a fraction of a turn past finger tight. Try to avoid over tightening the spark plugs. If you choose to use anti-seize lubricant, remember to use less force when tightening the spark plugs. Most spark plug manufacturers do not recommend using anti-seize since it can easily lead to over tightening. Double check that the spark plugs are tight before moving on to the next steps. |
||
|
|
||
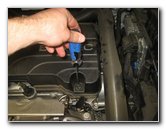
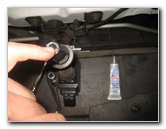 Apply Dielectric Grease |
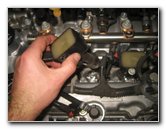 Lower In Ignition Coil |
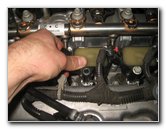 Push Down To Secure |
| Turn over the
ignition coil assembly so that you can access the rubber dust boot. Apply a small amount of dielectric grease to the opening in the rubber dust boot. The dielectric grease will help ensure a reliable connection by keeping out any moisture or dust. Lower the ignition coil down into the spark plug well and push it over the top of the new spark plug. Rotate the ignition coil back and forth a few times to help spread the dielectric grease. |
||
 Replace Metal Bolt |
 Spin In Clockwise |
 Replace Other Ignition Coil |
| Line up the bolt
hole in the ignition coil housing with the corresponding hole in the top of
the engine. Spin in the ignition coil bolt a few turns by hand in the clockwise direction to help prevent from having it become cross threaded. |
||
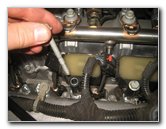
 Replace Bolt |
 Tighten Bolt Clockwise |
 Tighten Other Bolt |
| Tighten the bolt in
the clockwise direction with the 10mm socket, an extension bar and the 1/4"
drive ratchet until it is snug. Try to avoid over tightening the bolt to prevent from cracking the plastic ignition coil assembly. Repeat the steps to replace the other ignition coil. |
||
 Push On Power Plug |
 Slide In Red Lock Tab |
 Connector Secured |
| Slide the power
plug straight into the socket on the ignition coil. You should feel or hear the electrical connector "click" securely into place. Slide the red plastic lock tab straight in towards the ignition coil to secure the electrical connector in place. |
||
 Replace Other Connector |
 Ignition Coils Replaced |
 Replace Rubber Cover |
| Double check that
the electrical connectors are securely in place. Lower the foam rubber cover back into place. |
||
 Remove Oil Fill Cap |
 Push On Plastic Cover |
 Replace Oil Fill Cap |
| Temporarily remove
the oil fill cap by turning it in the counterclockwise direction. Lower the black plastic engine cover back into place over the top of the motor. Replace the oil filler cap by twisting it on in the clockwise direction until it is snug. |
||
 Spin In Black Bolt |
 Tighten Clockwise |
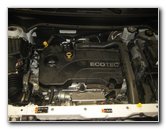 Spark Plugs Replaced |
| Replace the single
black metal bolt by turning it in the clockwise direction with the Torx T-30
screwdriver until it is snug. Try to avoid over tightening the Torx bolt to prevent from cracking the plastic engine cover. Start the engine and listen closely for any strange sounds or noises that might indicate a problem such as a loose spark plug or a disconnected electrical connector. Be sure to write down the spark plug change in your vehicle's service records. The service manual and owner's manual specification for the spark plug replacement interval for the OEM iridium electrode plugs is 60,000 miles (96,000 Km) for both the normal and severe maintenance schedules. For more, please check out all of my
2018-2022 GM Chevrolet Equinox DIY Repair & Maintenance Guides. |
||
| If you found this guide to be helpful,
please consider making a small donation by clicking on the PayPal.com
"Donate" button located to the right of this paragraph. Thank you!
(Note: I am not a registered charity. Donations are not tax deductible.) |