
Chevrolet
Equinox MAF Sensor Replacement Guide
How to clean or change the mass air flow
sensor in a 3rd generation 2018 to 2022 GM Chevy Equinox Ecotec 1.5L.

By Paul B. Michaels Author & Photographer Auto Mechanic Since 1989 |
||
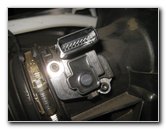
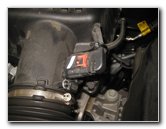
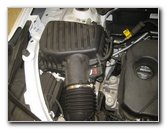 2018 Equinox Air Box |
 Mass Air Flow Sensor |
 Two Screws On Side |
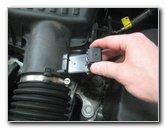
| This automotive
maintenance tutorial was specifically written to assist owners of the third
generation (2018, 2019 and probably also the face-lifted or revised 2020,
2021 and 2022 model years) GM Chevrolet Equinox SUV in cleaning or changing
the MAF (mass air flow) sensor for the Ecotec 1.5 liter turbocharged four cylinder engine.
The procedure may be the same or very similar for the 2.0L turbo I4 engine
or the 1.6L I4 diesel engine. Some of the symptoms of a dirty, failing or faulty MAF sensor include hard starting, rough idling, hesitating, surging, poor acceleration, hiccups, low fuel economy (reduced MPG), stalling, loss of power and misfiring. You may also see a CEL / SES (check engine light / service engine soon warning) on the gauge cluster. An OBDII scanner may reveal a MAF sensor related DTC (diagnostic trouble code) such as P0100, P0101, P0102, P0103 or P0104. Owners of other General Motors vehicles from Chevy, Buick, GMC, Cadillac and Holden such as the Trax, Blazer, Traverse, Tahoe, Suburban, Cruze, Malibu, Impala, Camaro, Cascada, LaCrosse, Encore, Envision, Enclave, Regal, Canyon, Sierra, Terrain, Acadia, Yukon, Savana, XT4, XT5, XT6, Escalade, CTS, XTS, CT6, Astra, Commodore and Trailblazer may also find these DIY instructions to be helpful. The OEM (original equipment manufacturer) part number for the MAF sensor is ACDelco 23366103. Two other compatible sensors with their part numbers include the ACDelco 23262344 and Spectra Premium MA376. The only tool needed to remove and replace the sensor is a Torx T20 star bit screwdriver. If you would like to try cleaning your old sensor before buying a new one, use some CRC Mass Air Flow Sensor Cleaner spray. The first two steps are to open the hood and then move to the left (passenger) side of the engine bay. The mass air flow sensor is located on the right side of the plastic air intake tube in between the rubber air intake hose and the black plastic engine air filter box. |
||
|
|
||
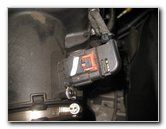
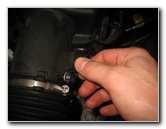
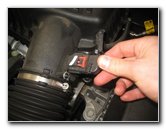
 Electrical Connector |
 Slide Out Red Lock Tab |
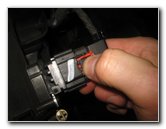 Push In Black Release Tab |
| Gently slide the
red plastic locking tab straight out away from the air intake tube. Then push down on the black plastic release tab before sliding the electrical connector straight off the old sensor. |
||
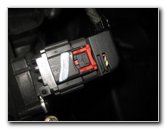
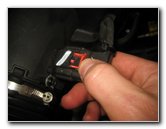
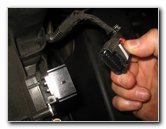 Pull Off Power Plug |
 Connector Removed |
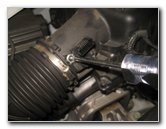
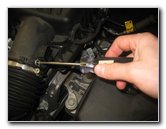
 Loosen Counterclockwise |
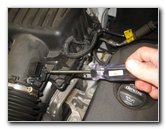
| Then loosen the two
small black metal screws in the counterclockwise direction with a
Torx T-20 star bit screwdriver. Keep one hand under the sensor to catch the screws in case they fall out unexpectedly. |
||
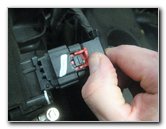
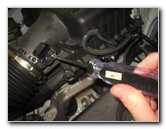
 Remove Second Screw |
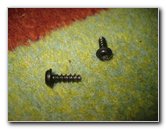 Two Screws Removed |
 Gently Remove Sensor |
| Once the two screws
are loose, spin them out the rest of the way with your fingers to prevent
from having them fall down into the engine bay and possibly become lost. Set the two screws aside in a safe place. Carefully slide the old MAF sensor straight out of the air intake tube. If the old sensor is difficult to remove, you may need to gently wiggle the sensor in order to slide it out. Try to avoid using excessive force to prevent from damaging the sensor or cracking the plastic air intake tube. |
||
|
|
||
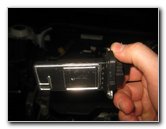 Inspect Old MAF Sensor |
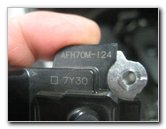 AFH70M-124 7Y30 |
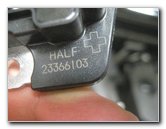 HALF 23366103 |
| The OEM sensor was
marked with a few sets of part numbers including AFH70M-124 7Y30 HALF
23366103 and 79300JI. The genuine GM compatible replacement mass air flow sensor part number is ACDelco 23366103. If you would like to try cleaning your old MAF sensor before buying a new one, carefully spray the sensor wire with some CRC Mass Air Flow Sensor Cleaner. Allow the sensor to air dry before re-installing it. Do not use compressed air or shake the sensor to dry it. |
||
 Slide In New MAF Sensor |
 Replace Two Screws |
 Tighten Clockwise |
| Orientate the new
sensor with the metal cover facing down and the black plastic cover facing
up towards you. Spin in the two screws a few turns by hand in the clockwise direction. Then tighten the screws with the Torx T20 star bit screwdriver until they are snug. Try to avoid over tightening the screws to prevent from cracking the plastic housing. |
||
 Push In Power Plug |
 Slide In Red Lock Tab |
 MAF Sensor Installed |
| Slide the
electrical connector straight into the socket on the new sensor. You should hear or feel the power plug "click" securely into place. Gently slide the red lock tab back towards the sensor to secure the connector. Start the engine and listen closely for any strange sounds that may indicate an issue with the new sensor. If you have an OBD2 scan tool, clear any MAF sensor related diagnostic trouble codes. Be sure to record the sensor cleaning or replacement in your vehicle's service records. For more, please check out all of my
2018-2022 GM Chevrolet Equinox DIY Repair & Maintenance Guides. |
||
| If you found this guide to be helpful,
please consider making a small donation by clicking on the PayPal.com
"Donate" button located to the right of this paragraph. Thank you!
(Note: I am not a registered charity. Donations are not tax deductible.) |