
Mazda CX-5
Dome Light Bulbs Replacement Guide
How to change a burnt out dome (rear
passenger courtesy reading light) bulb in a 2017 to 2022 Mazda CX-5.

By Paul B. Michaels Author & Photographer Auto Mechanic Since 1989 |
||
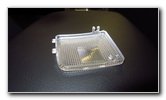
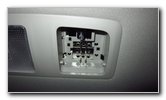
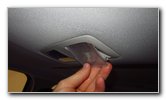
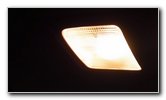
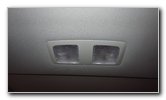 2019 CX-5 Dome Lights |
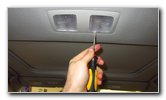 Flat Head Screwdriver |
 Pry Out Front Edge |
| This automotive
maintenance tutorial was specifically written to assist owners of the second
generation (2017, 2018, 2019, 2020, 2021 and 2022) Mazda CX-5 SUV in
changing a burnt out dome light bulb (also known as the rear passenger
courtesy reading light) in the housing attached to the headliner above the
second row of seats. Owners of other Mazda vehicles such as the CX-3, CX-30, CX-7, CX-9, Mazda3, Mazda6, MX-30, MX-5 Miata, Mazda2, CX-4, CX-8 and BT-50 may also find these DIY instructions to be helpful. The compatible replacement "festoon" style light bulb is part number DE3175 which is available from various manufacturers such as Sylvania, GE, Eiko and Philips. If you'd like to have brighter dome lights, install some DE3175 LED units. The only tool needed to remove the lens cover and access the old light bulbs is either a small flat head screwdriver or a small plastic pry bar tool. Sit in the middle of the back passenger seats. Insert the blade of the flat head screwdriver or the plastic trim panel removal tool in between the front edge of the lens cover (closer to the front windshield) and the light housing. Do NOT pry out the rear edge of the lens cover (located closer to the cargo area). There are two plastic tabs on that edge that can be easily broken. Very gently pry out the front edge of the lens cover. You might need to remove and re-insert the screwdriver into the other front corner of the lens cover to fully release the two retaining clips. |
||
|
|
||
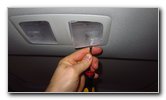
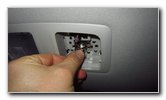
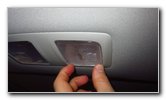
 Two Tabs Rear Edge |
 Lens Cover Removed |
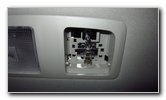 Old Light Bulb Exposed |
| Once the two "C"
shaped sockets are detached from their plastic mounting pegs, pull the two
tabs on the rear edge out of the housing. Set the lens cover aside in a safe place. If the old light bulb was recently turned on, it might still be hot enough to burn your fingers. Allow it to cool off or use gloves. |
||
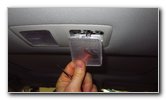
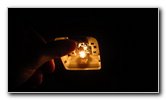
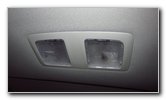
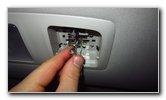 Pull Out Old Light Bulb |
 Old Light Bulb Removed |
 Empty Bulb Socket |
| Pull the old light
bulb straight out of the socket. The OEM (original equipment manufacturer) light bulb in this 2019 CX-5 was marked as part number KHA12V8W 49A29E. |
||
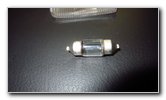
 Install New Light Bulb |
 Test Push On/Off Button |
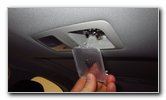 Tabs - Rear Edge |
| Push a new number
DE3175 festoon style light bulb
straight into the socket. If you'd like to have brighter dome lights that will also last much longer before burning out like the traditional incandescent bulbs, install some compatible replacement DE3175 LED units. Make sure the new bulb is evenly spaced in the two electrical contacts. To test the new light bulb, press the clear plastic "On / Off" button. Tip - If you installed an LED bulb and it doesn't work, try removing it from the socket, rotate it 180 degrees and then push it back into the socket. Some LED bulbs are "polarized" and will only work when the "+" positive and "-" negative electrical contacts are in the correct orientation. Line up the lens cover with the opening in the light housing. |
||
 Raise Front Edge |
 Pop In Retaining Clips |
 Lens Cover Secured |
| First, re-insert
the two small plastic tabs on the rear edge of the lens cover back into the
light housing. Then gently pop the two "C" shaped sockets on the front edge over their mounting bars. You should feel or hear the retaining clips "click" securely into place. Double check that the lens cover has been properly installed. |
||
 Press On / Off Button |
 Testing Left Side Bulb |
 Bulb Change Complete |
| To test the new
light bulb, press on the rear edge of the lens cover to activate the "On /
Off" switch. Be sure to write down the bulb change in your vehicle's service records. Please
check out all of my
2017-2022 Mazda CX-5 DIY Repair & Maintenance Guides. |
||
| If you found this guide to be helpful,
please consider making a small donation by clicking on the PayPal.com
"Donate" button located to the right of this paragraph. Thank you!
(Note: I am not a registered charity. Donations are not tax deductible.) |