
Jeep Compass
Cabin Air Filter Replacement Guide
How to change the A/C system's cabin air
filter element in a 2nd generation 2017 to 2022 Jeep Compass SUV.

By Paul B. Michaels Author & Photographer Auto Mechanic Since 1989 |
||
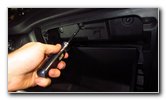
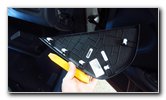
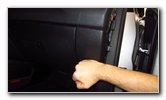
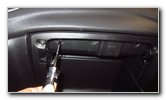
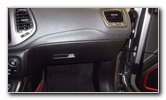 2019 Compass Glove Box |
 Open & Empty Out |
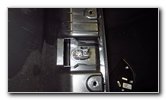
 3 Screws - Top Edge |
| This automotive
maintenance tutorial was specifically written to assist owners of the second
generation (2017, 2018, 2019, 2020, 2021 and facelifted 2022) Jeep Compass
SUV in cleaning or changing the A/C system's cabin air filter element
located in the HVAC blower motor housing. Owners of other Jeep, Dodge and RAM vehicles such as the Grand Cherokee, Wrangler, Renegade, Gladiator, Cherokee, Grand Wagoneer, Wagoneer, Charger, Challenger, Durango, RAM 1500, Promaster, 2500 and 3500 may also find these DIY instructions to be helpful. A few compatible replacement aftermarket cabin air filters with their part numbers are as follows: EcoGard XC10336, Fram CF11810, K&N VF1014, Premium Guard PC99158, Wix WP10106 and TYC 800142C. The tools needed to access the filter and complete this procedure include a Torx T25 star bit screwdriver, a 10mm socket with a 1/4" drive ratchet, a plastic pry bar tool and a Phillips head screwdriver. The first few steps are to sit in the front passenger seat, open the glove box and empty out the contents. Locate the three black metal screws along the top edge of the glove box's interior. |
||
|
|
||
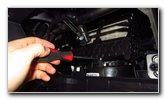
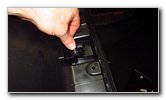
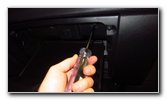
 Loosen Counterclockwise |
 Remove Middle Screw |
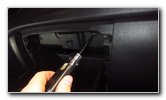 Remove Right Side Screw |
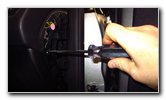
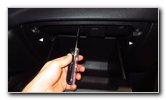
| Remove the top
three screws by turning them in the counterclockwise direction with the Torx
T-25 screwdriver. Set the three screws aside in a safe place. |
||
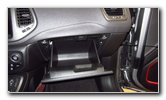
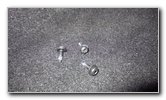 Three Screws Removed |
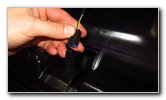
 Move To Bottom Edge |
 Pull Down Fabric Cover |
| Then move to the
bottom edge of the glove box and locate the grey fabric trim cover. Gently pull down the fabric cover to reveal the two screws on the bottom edge of the glove box. |
||
 Remove Left Side Screw |
 Remove Right Screw |
 Five Screws Removed |
| Remove the two
screws on the bottom edge by turning them in the counterclockwise direction
with the Torx T25 screwdriver. Set the two screws aside with the other ones. |
||
 Pry Off Side Cover |
 Five Clips Released |
 Locate Side Screw |
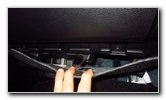
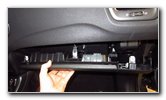
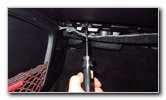
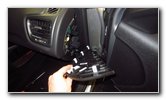
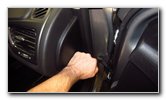
| Next, move to the
side of the dashboard (close to the front passenger door). Use the plastic pry bar tool to gently remove the trim cover on the outer edge of the dashboard. There are five white plastic friction fastener retaining clips holding the side trim panel in place. Set the trim cover aside in a safe place. |
||
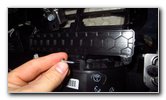
 Loosen Counterclockwise |
 Side Screw Removed |
 Six Screws Removed |
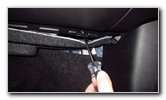
| Loosen the single
screw on the outer edge of the dashboard with the Torx T-25 screwdriver. Set the screw aside with the others. At this point, you should have removed a total of six screws. |
||
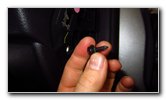
 Pull Out Glove Box |
 Light Bulb Power Plug |
 Lift Up Retaining Clip |
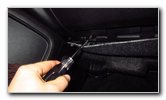
| Very carefully and
gently pull the entire glove box assembly out of the dashboard. Locate the electrical connector for the glove box light bulb housing. Use a flat head screwdriver or the plastic pry bar tool to gently lift up the retaining clip on the power plug. Slide the power plug straight out of its socket. |
||
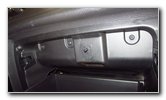
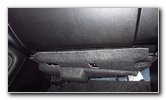
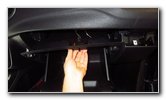
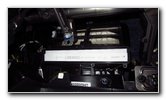
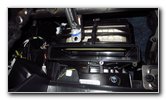
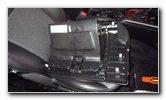 Glove Box Removed |
 Glove Box Light Wire |
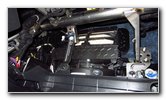 HVAC Blower Motor |
| Set the glove box
assembly aside in a safe place such as in the driver's seat. Move the glove box light bulb wire out of the way. Locate the metal bar that blocks access to the rectangular filter access slot. |
||
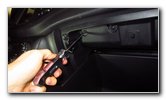
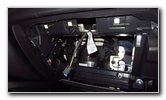
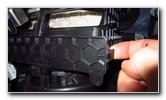
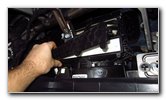
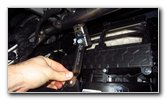
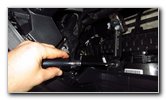 Remove Lower Screw |
 Loosen Top Bolt |
 Swing Metal Bar Up |
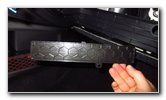
| Remove the screw on
the bottom edge of the metal bar by turning it in the counterclockwise
direction with the Torx T25 screwdriver. Set the screw aside with the others. Loosen the bolt on the top of the bar by turning it in the counterclockwise direction with the 10mm socket and a 1/4" drive ratchet. You do not need to remove the bolt on the top of the bar. Just loosen it a few turns. Rotate the metal bar up and out of the way. |
||
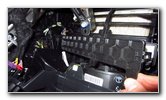
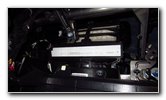
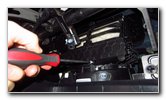
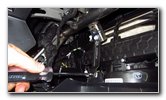
 Loosen Phillips Screw |
 Filter Cover Phillips Screw |
 Seven Screws Removed |
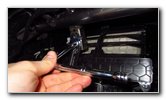
| Loosen the silver
metal screw on the bottom edge of the rectangular shaped filter cover by
turning it in the counterclockwise direction with the Phillips head
screwdriver. At this point, you should have removed a total of seven screws. |
||
 Release Right Side Clip |
 Swing Open Filter Cover |
 Remove Tab On Left Side |
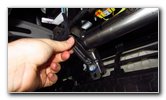
| Gently release the
retaining clip on the right side of the filter access cover. Swing open the filter access cover and remove the tab on the left side from its slot. Set the filter cover aside in a safe place. |
||
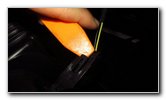
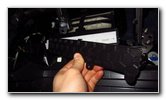
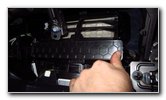
 Old Air Filter Exposed |
 Slide Out Old Air Filter |
 Old Air Filter Removed |
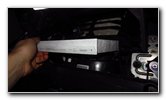
| Slide the old
filter straight out of the slot. Inspect both sides of the old air filter. |
||
 Inspect Both Sides |
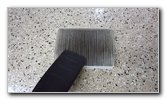 Clean With Shop Vacuum |
 Check Slot For Debris |
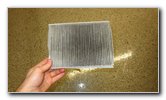
| If the old filter
is dark grey or black and clogged with dirt, dust, pollen, sand, soot,
twigs, insects, leaves and other debris, it should be replaced with a new
element. If the old filter is relatively clean, just tap out the large debris and remove any fine dust with a vacuum cleaner. Check the filter slot in the HVAC blower motor housing for any large debris such as leaves or dragonflies. |
||
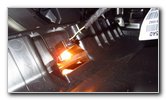
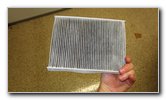
 Orientate Air Flow Arrow |
 Slide In New Air Filter |
 Line Up Access Panel |
| The OEM (original
equipment manufacturer) filter as marked as part number MicronAir B838
AA1455312560 9043 L3. Orientate the "Air Flow" arrows on the new filter with them pointing down at the floor mat. Slide the new air filter into the slot until it is flush with the opening. Line up the filter access cover with the slot. |
||
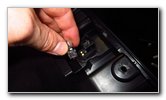
 Insert Tab In Slot On Left |
 Push Right Side - Clip |
 Replace Phillips Screw |
| Reinsert the tab on
the left side of the cover into its corresponding slot. Push on the right side of the cover to secure the retaining clip. You should feel or hear the retaining clip "click" securely into place. Replace the silver screw into the bottom edge of the filter cover by turning it in the clockwise direction with the Phillips head screwdriver until it is snug. Try to avoid over tightening the screw to prevent from cracking the plastic filter cover. |
||
 Swing Down Metal Bar |
 Replace Torx Screw |
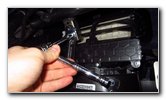 Tighten Silver Bolt |
| Swing the metal bar
back down into place. Replace the screw on the bottom of the metal bar by turning it in the clockwise direction with the Torx T25 screwdriver until it is snug. Tighten the silver bolt on the top of the metal brace bar by turning it in the clockwise direction with the 10mm socket and a 1/4" drive ratchet. |
||
 Glove Box Light Bulb |
 Empty Bulb Socket |
 Push In New 194 Bulb |
| If you were
planning on upgrading your glove box light bulb to a brighter LED unit
(which will also last much longer before burning out like the traditional
incandescent bulb), now would be a good time to get that done. Pull the old bulb straight out of the socket. The OEM unit was a 194 miniature wedge base bulb. Install a new # 194 LED bulb into the socket. |
||
 Replace Power Plug |
 Replace Glove Box |
 Push To Secure Clips |
| Hold the glove box
near the dashboard.
Push the electrical connector for the glove box light bulb straight into its socket. The power plug should "click" securely into place. Line up the retaining clips on the back side of the glove box with their corresponding slots in the dashboard. Push the glove box back into place to secure the friction fasteners. |
||
 Replace Side Screw |
 Replace Bottom Screws |
 Tighten Clockwise |
| Replace the single
screw into the side of the dashboard by turning it in the clockwise
direction with the Torx T25 screwdriver until it is snug. Replace the two T25 screws into the bottom edge of the glove box. |
||
 Replace Top Screws |
 Middle Torx Screw |
 Tighten Right Screw |
| Replace the three
Torx T25 screws into the top edge of the glove box. Try to avoid over tightening the screws to prevent from cracking the plastic glove box. |
||
 Line Up Trim Panel |
 Tap To Secure Clips |
 Close Glove Box - Done |
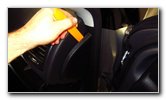
| Line up the side
trim cover with the outer edge of the dashboard (close to the passenger
door). Carefully tap on the trim cover to secure the five white plastic retaining clips. Replace the contents of your glove box and close it to complete the job. Be sure to write down the filter change in your vehicle's service records. Enjoy the fresh clean air from your A/C system! Please
check out all of my
2017-2022 Jeep Compass DIY Repair & Maintenance Guides. |
||
| If you found this guide to be helpful,
please consider making a small donation by clicking on the PayPal.com
"Donate" button located to the right of this paragraph. Thank you!
(Note: I am not a registered charity. Donations are not tax deductible.) |