
Chevrolet Malibu Shift Lock
Release Guide
How to move the gear selector from Park
to Neutral in a 9th generation 2016 to 2023 GM Chevy Malibu.

By Paul B. Michaels Author & Photographer Auto Mechanic Since 1989 |
||
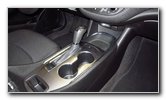
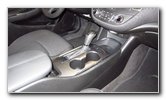 2020 Malibu Gear Selector |
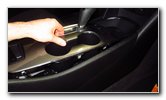
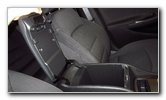 Open Center Console |
 Lift Up Rear of Trim |
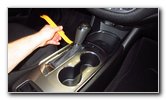
| This automotive
maintenance tutorial was specifically written to assist owners of the ninth
generation 2016, 2017, 2018, 2019, 2020, 2021, 2022 and 2023 GM Chevrolet
Malibu in releasing the automatic transmission's shift lock mechanism in
order to change the gear selector from "P" (Park) to "N" (Neutral) so that
the vehicle can be manually moved due to a dead 12V car battery, running out
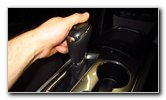
of gas, needing to be towed or some other mechanical or electrical problem. The 9th generation Malibu was supposed to undergo a "facelift" in 2022 or 2023 and the refreshed vehicle may have continued being produced into the 2024 and 2025 model years but it will now apparently be discontinued after the 2023 model year. Owners of other General Motors vehicles from Chevrolet, Buick, Cadillac, GMC and Holden such as the Impala, Corvette, Bolt, Sonic, Spark, Express, Trax, TrailBlazer, Equinox, Traverse, Blazer, Tahoe, Suburban, Colorado, Silverado, Cruze, Volt, Camaro, Encore, Envision, Enclave, Regal, LaCrosse, Canyon, Sierra, Terrain, Acadia, Yukon, Savana, XT4, XT5, XT6, Escalade, CT4, CT5, CT6 and Commodore may also find these DIY instructions to be helpful. The tools needed to complete this procedure include a plastic pry bar tool and a small thin tool such as a screwdriver from a jeweler's screwdriver set or an Allen key. For safety, I highly recommend that you engage the emergency / parking brake and place wheel chocks on both sides of the tires to help prevent the car from moving unexpectedly. The first step is to open the storage compartment's cover to allow easier access to the rear edge of the gear selector's trim cover. Gently and carefully pull up the rear edge of the silver gear selector's trim cover by inserting your fingers into the small storage pocket. |
||
|
|
||
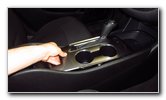
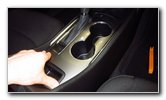
 Plastic Pry Bar Tool |
 Release Retaining Clips |
 Trim Cover Released |
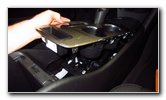
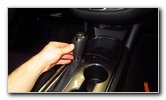
| Use the plastic pry
bar tool to gently release the plastic and metal friction fasteners all
along the edges of the trim cover. Try to avoid using excessive force so that you don't crack or scratch the trim cover. Continue releasing the retaining clips until you can pull the gear selector's trim cover straight up. You do not need to fully remove the trim cover. If you do want to fully remove the cover, I imagine you could remove the gear shifter knob. |
||
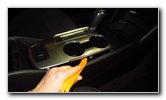
 Round Hole - Top Rear |
 Small Thin Tool |
 Insert Tool Into Hole |
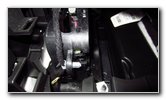
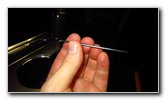
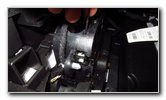
| For safety, make
sure your foot is firmly pressed down on the brake pedal to help prevent the
car from moving unexpectedly when you shift the gear selector to neutral. Locate the small round hole on the top of the gear selector assembly at the rear edge. To push the shift lock release button, you'll need a small tool such as an Allen key wrench, a screwdriver, a drill bit or a straightened wire hanger. Insert the tool into the small hole. Push down the white plastic button to release the shift lock mechanism. |
||
 Push Down White Button |
 Shift Lock Button Up |
 Shift Lock Button Down |
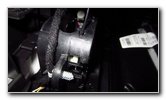
| Keep the button
pushed down with your one hand. With your other hand, push in the large button on the shift knob and move the gear selector stalk back from "Park" to "Neutral". |
||
 Move From "P" To "N" |
 Move Back To Park |
 Line Up Friction Fasteners |
| Release the
emergency / parking brake but keep your foot on the brake pedal. Have your assistants carefully move the disabled vehicle into the desired position. Keep your foot over the brake pedal just in case you need to quickly stop the car. Once you are done manually moving the car, shift the gear selector back into "Park". |
||
 Push Down Secure Trim |
 Push Down Front Edge |
 Trim Cover Secured |
| Line up the
retaining clips on the underside of the gear selector's trim cover with
their corresponding slots on the center console. Carefully push down the trim cover to secure the retaining clips. Make sure the trim cover is flush with the center console at every edge. Please check out all of the
2016-2023 GM Chevrolet Malibu DIY Repair & Maintenance Guides. |
||
| If you found this guide to be helpful,
please consider making a small donation by clicking on the PayPal.com
"Donate" button located to the right of this paragraph. Thank you!
(Note: I am not a registered charity. Donations are not tax deductible.) |