
Kia Optima
Serpentine Accessory Belt Replacement Guide
How to change the serpentine accessory
belt in a 4th generation 2016 to 2020 Kia Optima with the 2.4L I4.

By Paul B. Michaels Author & Photographer Auto Mechanic Since 1989 |
||
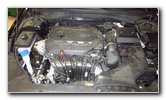
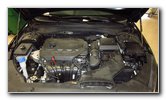 2019 Optima 2.4L I4 |
 Left - Passenger Side |
 Two Belts |
| This automotive
maintenance tutorial was specifically written to assist owners of the 4th
generation (2016, 2017, 2018, 2019 and 2020 model years) Kia Optima sedan in
checking or changing the serpentine accessory belt for the Theta II 2.4 liter
GDI
inline four cylinder motor. (The procedure should be the same or very
similar for the Theta II 2.0L Turbo I4 engine.) Owners of other Kia, Hyundai or Genesis vehicles such as the Niro, Sportage, Sedona, Telluride, Sorento, Rio, Forte, Soul, K900, Cadenza, K5, Stinger, Tucson, Santa Fe, Kona, Palisade, Elantra, Sonata, Accent, Veloster, Ioniq, Nexo, Venue, G70, G80 and G90 may also find these DIY instructions to be helpful. The Theta II 2.4L GDI I4 engine is equipped with two belts including a main drive belt and a small self tensioning elastic "stretch" belt for the coolant pump (also known as the "water pump"). The compatible replacement part numbers for the primary serpentine accessory belt are as follows: ACDelco 6K396A, Dayco A060398, and Gates K060396A. Two compatible elastic or "stretch" belts for the coolant pump to the crankshaft are the Dayco E030305 and the Bando 3PK796F. The only tool needed to change the main drive belt is a 17mm wrench or a 17mm socket with a 3/8" or 1/2" drive ratchet. To replace the water pump's stretch belt, you'll need a belt cutter (or scissors / a knife), some plastic cable ties (also known as "zip" ties) and a deep socket set with a 1/2" drive ratchet to turn the crankshaft pulley. |
||
|
|
||
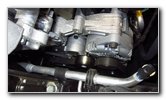
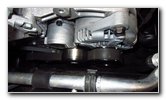
 A/C Compressor Belt |
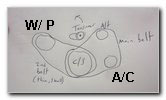 Belt Routing Diagram |
 Wrench On Tensioner |
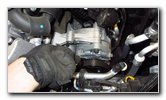
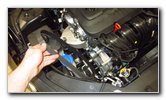
| The first two steps
are to open the hood and then move to the left (passenger) side of the
engine bay. Take a moment to study how the OEM (original equipment manufacturer) belt is routed around the various pulleys including the crankshaft, air conditioning compressor, alternator, tensioner pulley and the coolant pump (or "water pump"). Place a 17mm wrench on the tensioner pulley's bolt. (If you have a narrow 17mm socket and a 3/8" drive ratchet, you may be able to use that instead. I had trouble fitting my socket and ratchet in the narrow space in between the pulleys and the side of the engine bay.) |
||
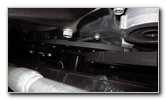
 Rotate Up - Towards Rear |
 Release Belt Tensioner |
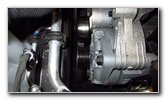 Slip Belt Off Pulleys |
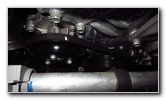
| Carefully rotate
the wrench handle up and towards the rear of the engine bay (closer to the
windshield). By rotating the wrench handle up and back towards the windshield, you'll be moving the tensioner arm assembly in the counterclockwise direction to release the tension from the old belt. Hold the tensioner assembly in the released position with one hand. Very carefully slip the old belt off the alternator pulley with your other hand. Do NOT place your fingers or hand in between the old belt and any of the pulleys! Slowly release the tensioner and allow it to rotate in the clockwise direction (towards the front of the car). Slip the old belt off the other pulleys and pull it out of the engine bay. Inspect the old belt for any fraying, chunks of missing rubber or exposed metal cables. If the old belt is still in good condition, consider keeping it in your trunk as an emergency spare belt just in case the new one fails unexpectedly. If you would like to replace the small and thin stretch belt that is routed from the crankshaft pulley to the coolant pump, carefully cut the old elastic belt with an automotive belt cutter, a knife or a pair of scissors. I recommend raising the front of the car, removing the front passenger wheel and removing the wheel well liner for better access to the pulleys. Then route the new elastic belt such as the Dayco E030305 over the coolant pump pulley and the top of the crankshaft pulley. Loosely attach the top of the new belt to the crankshaft pulley with a plastic cable tie (also known as a "zip" tie). I believe the crankshaft pulley has a 22mm bolt like on most Hyundai and Kia cars. Use the socket attached to a large 1/2" drive ratchet or a breaker bar to carefully turn the crankshaft in the clockwise direction. As you slowly turn the crankshaft pulley in the clockwise direction, continue guiding the new belt on to the crankshaft. You may need to use another cable tie or two to keep the new belt in the correct position on the crankshaft pulley. Once you are done installing the new stretch belt, carefully cut the cable ties and discard them. Double check that the new stretch belt is fully seated on the coolant pump and crankshaft pulleys. |
||
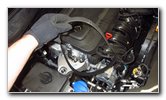 Old Belt Removed |
 Inspect Old Belt |
 Lower In New Belt |
| Lower the new
serpentine accessory belt into the left side of the engine bay. Take a look at my crude hand drawn belt routing diagram located higher up on this page. Keep in mind that the ribbed side of the belt should be routed around ribbed pulleys and the smooth side will be placed against the smooth tensioner pulley. Wrap the new belt around the crankshaft pulley and the A/C compressor pulley. Hold the last loop near the alternator pulley. |
||
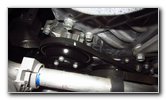
 2nd - A/C Stretch Belt |
 Route Belt Around Pulleys |
 Release Tensioner |
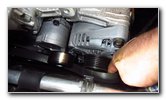
| With one hand,
rotate the tensioner arm back towards the rear of the car into the fully
released position. Then use your other hand to carefully slip the new belt over the alternator pulley. Slowly release the tensioner assembly in the clockwise position towards the front of the car. |
||
 New Belt Installed |
 Double Check Routing |
 Start Engine - Test Belt |
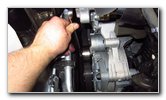
| Double check that
the new main drive belt has been routed properly and is fully seated in the
ribs on all of the pulleys. Start the engine and listen closely for any strange sounds. If you do hear any odd noises, immediately turn off the ignition and check your work. Be sure to write down the belt change in your vehicle's service records. Please check out all of my
2016-2020 Kia Optima DIY Repair & Maintenance Guides. |
||
| If you found this guide to be helpful,
please consider making a small donation by clicking on the PayPal.com
"Donate" button located to the right of this paragraph. Thank you!
(Note: I am not a registered charity. Donations are not tax deductible.) |