
Kia Optima
Rear Disc Brake Pads Replacement Guide
How to change the rear disc brake pads on
a 4th generation 2016, 2017, 2018, 2019 and 2020 Kia Optima sedan.

By Paul B. Michaels Author & Photographer Auto Mechanic Since 1989 |
||
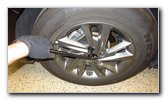
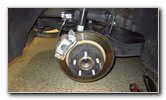
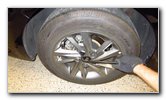
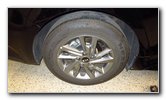 2019 Optima Rear Wheel |
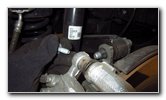
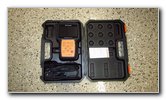 Foxwell OBD2 Scanner |
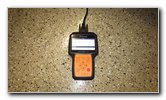 Connect OBDII Scan Tool |
| This automotive
maintenance tutorial was specifically written to assist owners of the 4th
generation (2016, 2017, 2018, 2019 and 2020 model years) Kia Optima sedan in
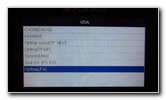
changing the rear disc brake pads and lubricating the caliper slider pins. Owners of other Kia, Hyundai or Genesis vehicles such as the Niro, Sportage, Sedona, Telluride, Sorento, Rio, Forte, Soul, K900, Cadenza, K5, Stinger, Tucson, Santa Fe, Kona, Palisade, Elantra, Sonata, Accent, Veloster, Ioniq, Nexo, Venue, G70, G80 and G90 may also find these DIY instructions to be helpful. Attention: If your Optima is equipped with an electronic parking brake (or "EPB"), it would be best to use a bi-directional OBD2 scanner (also known as an OBDII scan tool) that specifically has the ability to fully retract the EPB motor and place the system in "service mode". I bought a Foxwell OBD2 Scanner that can retract the EPB on a wide variety of vehicle makes and models. Another option is to perform the manual "Parking Brake Emergency Release" procedure which I will describe further down on this page.
A few compatible replacement sets of new rear brake pads with their part numbers are as follows: Power Stop Z23-1313, ACDelco 14D1829CH, Raybestos MGD1829CH, TRW TPC1157 and Centric 103.14450. The tools and other items needed to complete this procedure include a lug nut wrench, a floor jack, two jack stands, a 14mm socket with a 3/8" drive ratchet or a 14mm wrench, an "F" clamp and a tube of brake caliper grease. The first few steps are to drive the vehicle on to a level surface, shift the transmission into "Park" and turn off the ignition. Make sure that the standard emergency / parking brake or the electronic parking brake (EPB) has been released. Place wheel chocks on both sides of the front tires to prevent the vehicle from moving. This 2019 LX FE is not equipped with an electronic parking brake, but the other trim levels such as the "S", "EX", "EX Premium" and the "SX" trim levels may be equipped with an EPB that needs to be retracted with an OBD2 scan tool or manually. If you have an OBD2 scan tool with EPB special functions, connect it to the OBD2 port and perform the steps to place the electronic parking brake into "service" or "maintenance" mode. You should hear the electric motors retracting. |
||
|
|
||
 Optima JFA 2016+ |
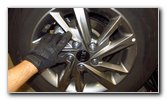
 Slightly Loosen Lug Nuts |
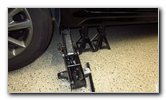 Raise Rear of Vehicle |
| Slightly loosen the
five lug nuts on the rear wheel by rotating them about 1/4 to 1/2 turn in
the counterclockwise direction with the tire iron.
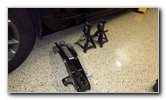
Carefully raise the rear of the car with the floor jack and support it with at least two jack stands. Please do not solely rely on the floor jack to support the vehicle! I prefer to work on one side of the vehicle at a time to keep three tires on the ground for extra safety. |
||
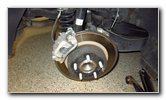
 Spin Off Five Lug Nuts |
 Five Lug Nuts Removed |
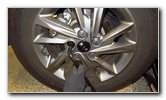
 Caliper, Bracket, Rotor |
| Spin off the five
lug nuts in the counterclockwise direction and set them aside in a safe
place. Carefully remove the rear wheel and tire. Once the rear wheel is out of the way, you'll be able to see the caliper, bracket, rotor and suspension.
Please remember, if your Optima is equipped with an EPB (electronic parking brake), it needs to be placed in "service" or "maintenance" mode with a Hyundai / Kia GDS diagnostic computer or an OBD2 scanner equipped with the EPB special functions feature.
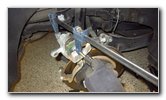
Make sure the vehicle is in "Park" and the front wheels are chocked before continuing. It would also be a good idea to disconnect the negative battery terminal and also disconnect the electrical connector on the EPB actuator motor. I recommend disconnecting the 12V battery and EPB motor connector since the EPB has "Auto Apply" and "Auto Hold" features that could automatically engage the parking brake in certain situations. Be careful! The Electronic Parking Brake Emergency Release Procedure as detailed in the service manual is summarized as follows: Use a hex head wrench to remove the two bolts that secure the EPB actuator motor to the back side of the rear caliper. Then use the same hex head wrench inserted into the opening in the back of the caliper where the electric motor was mounted to turn back the caliper in the clockwise direction. Turning the piston 1/2 to 1 turn will release the brake. If you are replacing the rear brake pads, continue carefully turning back the piston in the clockwise direction with the hex head wrench or "Allen" key until it is fully retracted. |
||
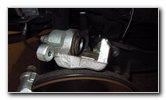
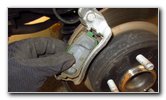
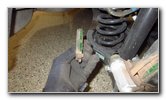
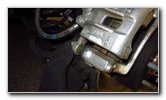
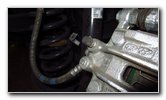
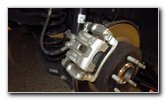 Rear Brake Caliper |
 Loosen Top Caliper Bolt |
 Loosen Bottom Bolt |
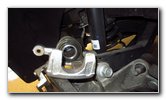
| Loosen the top
caliper bolt by turning it in the clockwise direction (as seen from the
outside of the vehicle) with the 14mm socket and a 3/8" drive ratchet. Then loosen the bottom caliper bolt by turning it in the clockwise direction (when viewed from the outside of the car looking in towards the cargo area) with the 14mm socket and a 3/8" drive ratchet. If you have trouble getting your ratchet and socket to fit over the lower caliper bolt due to the brake line or electronic parking brake actuator motor being in the way, you can use a standard 14mm wrench. |
||
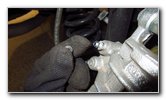
 Spin Out Lower Bolt |
 Spin Out Upper Bolt |
 Two Bolts Removed |
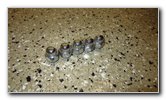
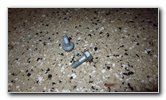
| Spin out the two caliper bolts and set them aside in a safe place. | ||
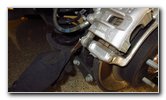
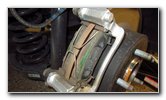
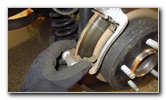
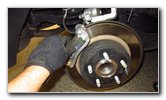
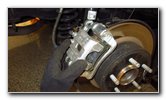
 Lift Off Rear Caliper |
 Rest Caliper On Rotor |
 LX FE Trim - No EPB |
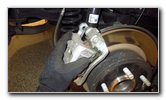
| Carefully lift the
rear caliper off the old brake pads and out of the bracket. Rest the caliper on the suspension or suspend it from the spring with a bungee cord or some rope. Try to avoid bending, kinking or stressing the rubber brake fluid hose. This LX FE trim level Optima does not have an electronic parking brake.
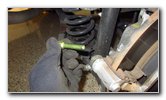
If your Optima has an electronic parking brake or "EPB" you should have already placed it in "service mode" with an OBD2 scanner or you could (as a last resort) manually retract with the caliper using the procedure listed above. Make sure that the electrical connector for the EPB actuator motor has been unplugged and it may also be a good idea to disconnect the negative 12V battery terminal. The EPB has "Auto Apply" and "Auto Hold" features that could be dangerous if the actuator motor or vehicle are still hooked up to the 12 volt battery. The Optima trim levels equipped with an EPB have caliper pistons that appear to be "screw-in" type caliper pistons but the service manual shows them being compressed back with a pad spreader which is Kia part number SST 09581-11000. You could also use an "F" clamp as shown in this guide. If you encounter any resistance, stop and consult with your Kia dealership. Make sure that the grooves on the piston line up with the corresponding alignment mark on the caliper piston housing and the peg or "pad center lobe" on the new brake pads.
|
||
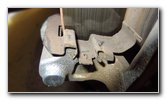
 Two "U" / "V" Clips |
 Remove Spring Clips |
 Drag Reduction Clips |
|
Remove the two "U" or "V" shaped drag reduction spring clips from the outer edge of the old brake pads. Save the old spring clips for re-installation later on. You set of new rear pads might also include a bag of replacement hardware with new spring clips. |
||
 2 Spring Clips Removed |
 Remove Old Outer Pad |
 Push Down Metal Tab |
| There are small
raised metal tabs on the pad abutment clips that may prevent you from
pulling the old brake pads from the bracket. Use a small flat head screwdriver to gently push down the metal tabs before pulling the old inner and outer brake pads out of the bracket. |
||
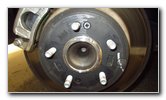
 Remove Old Inner Pad |
 Wear Bar @ Bottom Inner |
 Pad Abutment Clips |
| Make a mental note
of where the wear indicator bar or "squeal" bar is situated on the old brake
pads. On this 2019 Optima LX FE, the wear indicator bars were situated at the bottom of the inner brake pads. If your new set of rear pads includes a bag of replacement brake hardware, pull the old pad abutment or "anti-rattle" clips out of the top and bottom of the bracket. Clean off the rotor, bracket, caliper and lug studs with brake parts cleaner spray. Avoid breathing in the brake dust or the cleaning spray. Apply a thin layer of brake parts lubricant grease to the top and bottom of the new abutment clips where they will come in contact with the bracket or the new pads. |
||
 Replace Abutment Clips |
 Caliper Slider Pins |
 Lubricate & Replace Pins |
| Push the new pad
abutment clips into the top and bottom of the bracket. Make sure the clips are fully seated in the bracket. In order for the caliper to operate smoothly, the two caliper slider pins (or "guide pins") need to be well lubricated. Do NOT mix up the top and bottom caliper slide pins since they are slightly different. Pull one pin out at a time from the rubber dust boot attached to the bracket. Apply a thin layer of brake caliper grease to the smooth part of the pins before pushing them back into place. I like to rotate the pin around a bit and push it in and out to help spread the grease. |
||
|
|
||
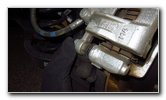
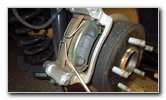
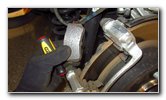
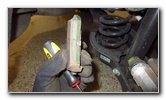
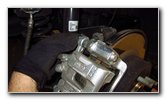
 Attach "F" Clamp |
 Brake Fluid Reservoir |
 Remove Counterclockwise |
|
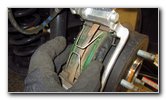
In order for the caliper to fit over the thicker new brake pads, the caliper piston will need to be compressed back.
Attention: I know I'm repeating myself, but if your Optima is equipped with the EPB (electronic parking brake), you should have already retracted the motors before you removed the calipers by using an OBD2 scan tool. If not, you may be able to use the manual method as described earlier on this page. Do NOT perform the "service mode" with an OBDII scanner after removing the calipers. It's possible that the piston will pop out of the caliper, leak brake fluid and introduce air into the system.
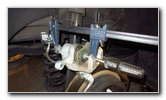
For this Optima LX FE with the manual parking brake, the rear caliper piston can simply be pushed back with an "F" clamp or a similar "pad spreader" tool. Attach the "F" clamp to the caliper and use the back of an old brake pad to help spread the force across the piston. Move to the right rear area of the engine bay and twist off the brake fluid reservoir cap in the counterclockwise direction. Set the cap aside in a safe place. Removing the reservoir cap will allow the brake fluid to more easily travel back through the system. (Some home mechanics like to "crack open" the bleeder screw valves in order to not push old dirty brake fluid back into the system from the calipers. I've found that this method just has a higher risk of introducing air into the lines and may force you to perform a full brake fluid bleed. I recommend that you do not open the bleeder valves unless you intend on bleeding the brake fluid at all four wheels.) |
||
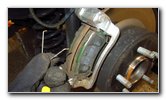
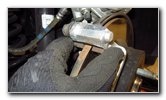
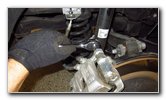
 Compress Caliper Piston |
 Install New Outer Pad |
 Wear Bar - Bottom Inner |
|
Slowly turn the "F" clamp handle in the clockwise direction to compress back the caliper piston. (This method is specifically for the Kia Optima models with the manual parking brake. Do not attempt this if your Optima has the EPB.) If you encounter any resistance, stop and make sure the piston is going in straight. Don't force the piston in if you encounter resistance. Consult your dealership. Continue slowly turning the "F" clamp handle in the clockwise direction until the caliper piston is just about flush with the rubber dust boot that surrounds it. Try to avoid pinching or otherwise damaging the rubber dust boot that surrounds the caliper piston. Replace the reservoir cap as soon as possible since brake fluid is hygroscopic (absorbs moisture from the air). If your Optima has been exhibiting shuddering, shaking or vibrations in the rear end during braking, the OEM rotors might be warped and should be replaced. To replace the rotors, remove the two 14mm caliper bracket bolts and take off the bracket from the wheel hub. Remove the two Phillips head set screws on the outer face of the rotor. Slide the old rotor off the wheel hub or "steering knuckle". If the rotor is stuck in place by rust or debris, hit it with a rubber mallet. Slide the new rotor over the lug studs. Replace the two Phillips head set screws and tighten them in the clockwise direction. Re-attach the bracket with the two 14mm bolts and tighten them to the service manual specification of 47.0 to 54.2 lb-ft (or 63.7 to 73.5 Nm) of torque. Some compatible replacement rear brake rotors with their part numbers are as follows: Bosch 28011498, ACDelco 18A2820A, DuraGo BR3142402, Callahan CRK15095 and Centric 320.50029. |
||
 Push Pads Against Rotor |
 Re-Attach Spring Clips |
 Lower Caliper Over Pads |
| Install the new
pads into the bracket.
The wear indicator bar should be situated at the bottom of the inner brake pad. Push the two pads together until they are flush against the rotor. If your new pads are equipped with the small holes on the outer edge, re-attach the two drag reduction spring clips. Carefully lower the caliper over the new pads and into the bracket. Line up the bolt holes in the caliper with their corresponding holes in the slider pins within the bracket. |
||
 Spin In Bottom Bolt |
 Spin In Top Bolt |
 Tighten Upper Bolt |
| Spin in the two
bolts a few turns by hand in the counterclockwise direction (as seen from
the outside of the vehicle) to help prevent them from becoming cross
threaded. Tighten the two bolts with the 14mm socket and a 3/8" drive ratchet in the counterclockwise direction (as seen when viewed from the outside of the car looking in towards the trunk) to just a small fraction of a turn past hand tight. If you have a torque wrench, tighten the two caliper bolts to the service manual specification of 18.1 to 21.7 lb-ft (or 24.5 to 29.4 Nm) of torque. |
||
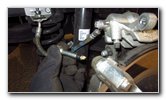
 Tighten Lower Bolt |
 Rubber Valve Cap |
 Brake Fluid Bleeder Valve |
| Double check that
the two caliper bolts are tight before moving on to the next steps. If your brake pedal has been feeling soft or spongy, you might need to bleed the brake lines in order to remove any air bubbles or moisture. Check out my Acura MDX Brake Fluid Bleeding Guide for more information on this topic. In general, you will bleed the brake lines from the furthest wheel from the brake fluid reservoir to the closest one. The brake fluid bleeder valve is located just below the top caliper bolt. It is covered by a rubber cap. You'll need a 10mm wrench to open and close the bleeder valve. If you would like to bleed the ABS modulator, you will need an OBD2 Scanner that specifically lists the ability to cycle the ABS module and perform an auto-bleed for Kia and Hyundai vehicles. |
||
 Two Rotor Set Screws |
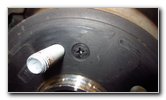 Phillips Head Screw |
 Rear Caliper Secured |
| I included some
pictures of the Phillips head set screws in case you plan on replacing the
rotors at some point in the future. If your Optima has the EPB, re-connect the electrical connector to the actuator motor. |
||
 Replace Rear Wheel |
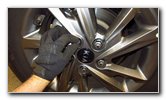 Spin On 5 Lug Nuts |
 Slightly Tighten Lug Nuts |
|
Carefully replace the rear wheel over the lug studs. Spin on the five lug nuts a few turns by hand in the clockwise direction to prevent them from becoming cross threaded. Slightly tighten the lug nuts with the tire iron in a criss-cross or star pattern in the clockwise direction. |
||
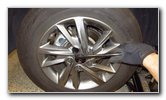
 Lower Car From Stands |
 Torque Lug Nuts |
 Rear Brake Job Done! |
|
Carefully lower the car from the jack stands by using the floor jack. Continue tightening the five lug nuts in the clockwise direction to about 1/8th to 1/4th of a turn past hand tight. It would be best to use a torque wrench to tighten the lug nuts to the owner's manual specification of 65.1 to 79.6 lb-ft (or 88.3 to 107.9 Newton-meters) of torque. If your Optima has the electronic parking brake system, re-attach the negative terminal to the 12V battery, use the OBD2 scanner to exit "service mode" and / or set and release the EPB several times to make sure it is working properly. If you see any warning lights on the gauge cluster, use the scanner to identify the DTC codes (diagnostic trouble codes). Sit in the driver's seat and firmly pump the brake pedal a few times to restore the brake line pressure. I would also recommend checking your driveway, parking spot or garage for fresh drops of brake fluid which might indicate a leak from the bleeder valve or the reservoir bottle. Check the fluid level in the reservoir and if necessary, add more DOT 3 or DOT 4 fluid. Be sure to record the brake pad change in your car's service records. Please check out all of my
2016-2020 Kia Optima DIY Repair & Maintenance Guides. |
||
| If you found this guide to be helpful,
please consider making a small donation by clicking on the PayPal.com
"Donate" button located to the right of this paragraph. Thank you!
(Note: I am not a registered charity. Donations are not tax deductible.) |